Showing posts with label to. Show all posts
Showing posts with label to. Show all posts
Wednesday, October 19, 2016
Browser Review A look back to 2014
Browser Review A look back to 2014

Another year has gone from our calendar. And were one more year close to the final day. 2014 was really a nice year with some technological breakthroughs. Actually we have innovations in every moment. Today I would like to write a review on Internet Browsers. In this post, I want you have a look back to the 2014.
Look at the following table:
| Browser | Statistics (2014) | Statistics by Marks PC (2013-2014) |
| Google Chrome | 56% | 48% |
| Firefox | 26% | 28% |
| Internet Explorer | 9% | 13% |
| Opera | 2% | 4% |
| Apple Safari | 4% | 2% |
| Others | 1% | 5% |
Here you get two statistics side by side. The first one is published by w3schools.com. You know they publish statistics month by month. Ive summed them up to show you the yearly users of the popular browsers.
And the second one is the statistics by Marks PC Solution itself. Its generated from Blogger Dashboard. Here Ive included the statistics of two years - 2013 & 2014. The browsers used by the visitors of Marks PC Solution from 2013 to 2014 are shown here.
Ive also created pie charts for better understanding. Have a look at them.


Reviews by Marks PC . . .
- Google Chrome: Market leader and the most popular browser as well. Chrome has captured more than 50% share of the browser market and ever growing!
- Mozilla Firefox: Beaten by Chrome about 2 years ago and now gonna lose its position as market challenger. Firefox has now only 26 to 28% market share and losing users to Chrome rapidly.
- Internet Explorer: Released in 1995 and survived as #1 for more than a decade. Now just keeping the honor of default browser of Windows OS. Capturing only 10 to 12% market share, the explorer will not give you a bad browsing experience at all!
- Opera: Tried their best to be popular in desktop environment. But it really disappoints the users! Being branded for mobile devices, Opera Mini is really successful in smart phones, tablets and featured phones.
- Apple Safari: A default browser for Mac OS. If the browsers were reviewed by weight, Safari would be the champion in this arena! I really hate this stupid browser. Its too heavy to work with. Your system may suffer to run it. It loads pages slowly as per my experience.
- Others: Combining all other browsers, you cant get more than 2 to 5% share. In Marks PC Solution, Ive detected these browsers - Mobile Safari, UCBrowser, Iron, Maxthon, Chromeframe, CriOS, NetFront, Netscape, Dragon etc.
Chrome has taken the first position in 2012. And now its going far away from Firefox. Nice look, continuous development, new features have made it unbeaten. Recently, Chrome has added some exciting features like - Cloud Printing, PDF conversion etc.
On the other hand, Firefox is still popular to the developers. Thousands of extensions have made it popular to the advanced users. But its heavy looking interface is mainly responsible for decline.
As a default browser, the number of users of Internet Explorer is really low. It should have at least 20% users. But its beaten by the browsing experience, compatibility and extensions (add-ons) of Chrome and Firefox. Microsoft is trying hard to make it popular. Earlier, the developers used to follow IE standards. But now they follow Firefox or Chrome sometimes!
Ive just tried to share my thoughts with you. Dont take it otherwise! Of course you got choice to discuss here . . .
Stay with Marks PC Solution to get more interesting IT topics!
Go to link download
Tuesday, October 18, 2016
How to Get Facebook Numeric ID
How to Get Facebook Numeric ID

Whether youre using Facebook or Google Plus, you have an unique numeric identity number. If youre a Google Plus user, you must notice a number in your profile URL unless you havent got a username from Google. But Facebook automatically gives you a username after opening account. And thus your numeric ID is hidden from Facebook Profile URL. But you may often need to use the numeric ID of your Facebook account.
If you are an apps developer, or using social plugins for your site, you may need to use your numeric ID. Today Im gonna share an easy way to find out the numeric ID of your Facebook account.
In this way, you can find any persons profile ID number and Facebook page ID number. Follow the instruction below:
- Go to this URL - http://graph.facebook.com
- And type your username as - http://graph.facebook.com/username
- For example - http://graph.facebook.com/jolley.roberts
Now you will get the following details -
"id": "100004080544971", "first_name": "Jolley", "gender": "male", "last_name": "Roberts", "link": "https://www.facebook.com/jolley.roberts", "locale": "en_GB", "name": "Jolley Roberts", "username": "jolley.roberts"
As I mentioned earlier, you can also look up your page ID number. Suppose, the Facebook Fan Page of Marks PC Solution is -
https://www.facebook.com/markstips
You have to type http://graph.facebook.com/markstips to get this page ID. And this page will show you the following details:
"id": "550920454928744", "about": "Your Ultimate Choice for Computer, Internet, Blogging, SEO & PC Troubleshooting Tips!", "can_post": false, "category": "Computers/internet website", "checkins": 0, "has_added_app": false, "is_community_page": false, "is_published": true, "likes": 109, "link": "https://www.facebook.com/markstips", "name": "Marks PC Solution", "parking": { "lot": 0, "street": 0, "valet": 0 }, "talking_about_count": 1, "username": "markstips", "website": "http://www.markspcsolution.com", "were_here_count": 0
There are many other sites where you just need to submit your username and they will show you the details. But sometimes, if their server is down, you may not be able to use them. And there is also a little chance to get trapped by phishing sites! So, I think, using the graph is better.
Im familiar with a site which you can trust - Find your Facebook ID. In this site, you have to input your username. Then hit on the button - Lookup Numeric ID. Finally, it will display your name along with the numeric ID.
Stay with Marks PC Solution to get more interesting IT topics!
Go to link download
8 Best PPC Advertising Networks to Monetize Your Blog 2015 Edition
8 Best PPC Advertising Networks to Monetize Your Blog 2015 Edition
Monetizing a blog with ad publishing network is the first level of earning which may take quite few months for any blogger to get started with various advertising methods PPC/CPC or CPM. Amongst all the categories of ad publishing—earning depends on Content, Traffic, Page CTR, Ad RPM, Bounce Rate etc. parameters. Some websites may generate more clicks with lower RPM rate and some fewer clicks but huge RPM rate. So these two different conditions define which ad network is perfectly suited for these two sites. Suppose the first website which generates more clicks than fewer RPM rate can perform well with advertising network who pays on PPC formula again for second website CPM ad network will perform ultimate to maximize revenue skyrocket.
![8 Best PPC Advertising Networks to Monetize Your Blog [2015 Edition]](https://blogger.googleusercontent.com/img/b/R29vZ2xl/AVvXsEjJF_q3MJ-K3s9nC9QOzmiWr6iCZ-tLKUD63et0FAn4F15yZHyXP6LBO2qE_u1YEizlcYJJbyRbY9JVs_jsfGDNMDHYWtNgyCpZrU3I6bzrR6KNZADkVP1CLDJ265EQaClGz0Vto6tcrzA/s1600/PayPerClick.jpg "8 Best PPC Advertising Networks to Monetize Your Blog [2015 Edition]")
So you can understand that website performance can help you to decide which ad network is best for your blog or site. I have seen may webmasters pull thousands of bucks with CPM ad networks out of Google Adsense[King of ad publisher] who pays on PPC formula.
Todays guide I will show you my 8 favorite lists of PPC and CPM advertising networks to monetize your newly launched blog.
Google Adsense
Adsense dominates over millions of advertisers all over the world using AdWords to list their products and services while Google adopt various processes to deliver these ads online. Amongst all of the Googles treasury to distribute ads majority are handled by Adsense [though Google ads appear on Search, Custom Search, Gmail, News, Blogs and other different places belong to Google products]Adsense is solely a PPC [Pay-per-click] or CPC [Cost-per-click] ad network which mainly focuses on websites to distribute ads based on content. There are lots of technologies Adsense uses to provide highly targeting, engaging and quality ads that perfectly suite a sites content and audience so that more feasibility of clicks.
Adsense uses crawler which is widely known as Adsense Crawler more similar to Google Crawler though there are prime differences between Adsense and Google Crawler are (1) Adsense crawler crawls headlines, texts, links to focus on keywords to deliver more relevant ads whereas
(2) Google crawler indexes all resources of a site to visible on search engines in terms of targeted search queries.
To get Adsense account approved is a bit tough these days when Google Adsense measures lots of things before including any website in their network. Here are some useful guides help you to get started with Google Adsense
Relevant Tutorials of Google Adsense:
Here are quite few useful guides to get your started with Media.net
The minimum payout of Infolinks is $50 via Paypal.
The installation procedure is quite easy and in handy process.
If youre approved with Google Adsense then monetize this ad network otherwise try out Media.net. Do let me know how you liked this article.
Adsense uses crawler which is widely known as Adsense Crawler more similar to Google Crawler though there are prime differences between Adsense and Google Crawler are (1) Adsense crawler crawls headlines, texts, links to focus on keywords to deliver more relevant ads whereas
(2) Google crawler indexes all resources of a site to visible on search engines in terms of targeted search queries.
To get Adsense account approved is a bit tough these days when Google Adsense measures lots of things before including any website in their network. Here are some useful guides help you to get started with Google Adsense
Relevant Tutorials of Google Adsense:
Media.net
A Yahoo and Bing enterprise is widely famous as working with contextual ads powered by Media.net which measures ad impressions of a site and pay money on RPM [Revenue per thousand impression] method. Reasons there are many websites are benefited from Media.nets ads are "people are less likely to click on Ads though the impression rate remains higher so webmasters utilize this effort to monetize their blogs with CPM ads [i.e. Media.net] rather CPC ads [i.e. Adsense]"Here are quite few useful guides to get your started with Media.net
Bidvertiser
Not so famous as the previous twos but yet works better with slow traffic site having quality traffic, reduced bounce rate and quality content. Bidvertiser provides both text, image, animated, flash ads though they wont provide highly targeted and quality ads because of limited advertisers comparing to Adsense or Media.net but you can still pull up maximum earning with websites not approved with Adsense. The minimum payout of Bidvertiser is $100 and they pay through Paypal, Check.Chitika
Over 300K publisher websites are already listed on Chitikas ad inventory which provide highly targeted ads relevant to website content, target audience and traffic. You will have to start with primary membership with Chitika but dont worry once your earnings exceed their minimum limit you will be upgraded to secondary membership providing with high quality ads with more CPC rate.Vibrant Media
Another well-known CPC ad network at this time providing quality ads from a big lists of their brand advertisers. The CPC rates of VM are among the highest in the industry, but the catch is that they just don’t let any website join in the fun. You have to prove your site as a premium publisher with quality content, traffic, and audience. Sites including content like adult, gambling, drugs, profanity, hate speech, violence will never be approved through VM so they have quite few restrictions upon publishers you will get on Terms of use.Infolinks
Infolinks is a CPC based ad network which was on top of the choice to blog publishers but today their CPC rate is recorded as the lowest comparing other ad networks is the reason many blog publishers avoid these ads. If you have blog having thousands of articles and not so more internal links then you can maximize earnings with Infolinks ads but blogs have huge internal links should avoid Infolinks in order to boost CTR.The minimum payout of Infolinks is $50 via Paypal.
Exit Junction
Exit Junction is considered another best CPC ad network which is such an ad network work for many website owners, bounced traffic [when visitors leave your site frequently and never come back]. Exit Junction can supplement your CPC advertising income by showing these visitors clickable ads so that you can generate money. When exit junction is installed on your site your visitors click on the back button after seeing the landing page they don’t go straight back to the search engine page results they usually came from. Instead, they are taken to a list of sponsored results based on the keywords they typed.The installation procedure is quite easy and in handy process.
PocketCents
Its pretty useful ad network with fixed rates of CPC for blog publishers. Theres no sign up or upfront costs but theres restrictions regarding page views per month. You earn more from plain-text, hybrid, banner, and video-advertisements. Pocketcents charges $0.25 for advertisers on rough and pays publishers closely $0.15 per click.Conclusion
Cost per click advertising network works fine with blog publishers because of higher page CTR, RPM rates and more revenue per click. Amongst all the ad networks listed above I recommend you going through Google Adsense first then Media.net and sequentially other networks mainly depend upon your blog site quality.If youre approved with Google Adsense then monetize this ad network otherwise try out Media.net. Do let me know how you liked this article.
Go to link download
Add All Friends To Facebook Group By Single Click 2015
Add All Friends To Facebook Group By Single Click 2015

Steps To Add All Friends in Facebook Groups
- First of all Log in into that whose friends you want to invite.
- Then open your Facebook Group in which you want to add friends.
- Now Click F12 button to open debugger and then select console box.
- Now copy script from below given button.
Get Script
- Copy paste the whole provided code and then paste them into console box.

- Press enter and process will start for sending invitation.
Go to link download
Monday, October 17, 2016
How to Flash or Install S5830XXKPT Firmware Upgrade Samsung Galaxy Ace to Android 2 3 6 Gingerbread
How to Flash or Install S5830XXKPT Firmware Upgrade Samsung Galaxy Ace to Android 2 3 6 Gingerbread
Heres the procedure on how to manually upgrade the Samsung Galaxy Ace GT-S5830 to Android 2.3.6 Gingerbread using the stock ROM S5830XXKPT. This is a Russian official firmware update for Galaxy Ace that has been recently released this March 2012. Some changes is the lock screen features, much more faster than the previous buildS5830XXKPP and S5830XWKT7. Some European languages are included on this packaged, so anyone who prepares an English (UK and US) and European languages can use this ROM. The default language is set in Russian, but you can change it to your desired local language after installation.
Note: This ROM may only flashable for Galaxy Ace GT-S5830 only.
Download the stock ROM S5830XXKPT
firmware info:
PDA: S5830XXKPT
CSC: S5830SERKPT
Phone: S5830XXKPT
Version: Android 2.3.6 Gingerbread
Country: Russia
Build date: March 03, 2012
stock ROM GT-S830_SER_S5830XXKPT_S5830SERKPT_S5830XXKPT
Grab the ODIN Multi Downloader and OPS File: Cooper_v1.0.ops
Samsung Galaxy Ace Odin flashing S5830XXKPT Android 2.3.6 stock firmware
- Make sure you are running Windows on your PC with USB driver installed or have Kies installed.
A USB cable wire of your device, a good working USB serial port, sometimes the connection issues occurs because of a bad USB port of your PC and the USB cable.
- Make a back up copy of all important files stored on your phone, the file is a none wipe but it is better to have an extra precautions if something went wrong.
- Disable any antivirus and Kies installed, this program might also interrupt Odin while in flashing process.
1. After youve done downloaded theS5830XXKPT stock ROM, just simply extract it using winrar, winzip, 7zip or any rar file extractor program you have. Then you in the folder you can see the file
S5830XXKPT_S5830XXKPT_S5830SERKPT_HOME.tar.md5
SS_DL.dll
we dont need this SS_DL.dll on this flashing, but dont delete it.
2. Extract and run also the Odin v4.38 on your desktop.
3. On ODIN clickt the OPS button and load the Cooper_v1.0.ops file on it.
4. Hit the One packaged in the checkboxes options (the Auto reboot and protect OPS remain checked,
then at the lower part of Odin click on the One Packaged button then select and load the
S5830XXKPT_S5830XXKPT_S5830SERKPT_HOME.tar.md5

5. Set the Samsung Galaxy Ace inDownload Mode:
Turn the OFF the phone or remove the battery for a couple of seconds then put it back again. By pressing Volume Down+Power+ Middle buttonssimultaneously the phone will then reboot into download mode.

7. Once the connection set up is okay, begin the flashing by hitting the Startbutton.
It only takes around 4 to 5 minutes to complete, a progress bar on the left side of ODIN will show you the downloading progress. A word "PASS" will display once it finishes.
Its time to unplug the phone from PC, then do a factory data reset to clean all data caches and have a fresh firmware installed, you can do this by Recovery Mode button - Home + Power Button, then toggle on using the volume button and select Wipe Data/ Factory Reset or by typing this code *2767*3855#.
To check the newly installed firmware update - by typing *#1234#.
Change the default Russian language to your Region, go to settings and then locate the locale and text icon, then find your native language. You may then also often check out the Samsung Galaxy Ace stock ROM list for future firmware updates.
Go to link download
Sunday, October 16, 2016
How to Print Headings on Every Page in Excel
How to Print Headings on Every Page in Excel

Sometimes you may need to print same column headers on every page in Microsoft Excel. And to do so, you dont need to manually copy the headers on every page. You can simply set a command from page setup option to print column headers on every page automatically!
In my previous post, I discussed about how to lock or freeze column headers. By freezing rows or columns, you can just show headers at the time of scrolling. But they will be printed on the first page only. In this tutorial, you will learn - how to print same column headers on every page automatically . . .
Applies to:
- MS Excel 2000/ XP
- MS Excel 2007/ 2010/ 2013
Note: This tutorial has been prepared using Excel 2013. So, few options may differ slightly.
Lets start -
- Open a previously saved worksheet or create a new one in MS Excel.
- Go to the Page Setup option from Page Layout Tab (Office XP/ 2000 users should find it under Edit Menu).
- Go to the Sheet tab from Page Setup.
- Look at the Print titles option: Rows to repeat and Columns to repeat.
- To repeat the headers at the top, click on the first one. Or click on the second one to repeat the columns.
- After clicking the box, select the area of your sheet which needs to be repeated. Follow the image below.
- Hit OK to close the Page Setup. Done! Now check by printing or look at the print preview.

Here I showed the process for rows only. You can also choose columns to repeat by the same way. And Ive also uploaded a same sheet for you. Download the sheet from the link below:
Download Sample Sheet - Rows to Repeat
Open the above sheet. You will find a worksheet named Rows to Repeat. Ive set top 3 rows to be repeated on every page. You can directly check it by printing this two-page worksheet. Or simply check it in Print Preview.
Hopefully, todays topic will be helpful for your study or office work . . . :)
Stay with Marks PC Solution to get more interesting IT topics!
Go to link download
HOW TO MAKE Easy Cable RJ45 To USB converter For Volcano Tested On SPD 6531
HOW TO MAKE Easy Cable RJ45 To USB converter For Volcano Tested On SPD 6531
HOW TO MAKE Easy Cable RJ45 To USB converter For Volcano(Tested On SPD 6531)
Requirement
(1)usb cable NOKIA 5130
(2)any RJ45 Cable
(3)Iron
(4)Solding Wire
first remove usb jig FROM USB CABLE and sold with any rj45 cable All five wire .volcano box will detect auto pin D+ D-

MAKE THIS TYPE EASY CABLE OTHER JIGS AND TEST IT WITH VOLCANO BOX AND SHEAR HERE YOUR EXPERIENCE
VIDEO LINK
Easy Cable RJ45 To USB converter For Volcano - Download - 4shared
http://www.4shared.com/rar/BC2UC61N/...B_convert.html

rj45 tx rx find to easy .
but rj45 usb D+ D- how to do
pls clear which rj45 8pin use usb 5 pin.

Go to link download
Saturday, October 15, 2016
Adding Border to Word Document
Adding Border to Word Document

To decorate your word document, you can put border around the page. You can put the border either in the first page, section or whole document. Not everywhere page border is applicable. Only use it where necessary.
Page Border in Earlier Versions of MS Word
Same feature is also available on Office XP or 2003. As people are not using them anymore, Ill just focus on running versions. If youre using Office XP or 2003, just follow the steps below -
Format Menu > Borders & Shading > Page Border
After getting the Borders & Shading dialogue box, things are almost similar!
This Tutorial Applies to -
- Microsoft Word 2007
- Microsoft Word 2010
- Microsoft Word 2013
Note: Images, screenshots and instructions used in this document are based on Office 2013.
About Borders & Shading > Page Borders
With page borders, you can create stylish borders around your pages. MS Word allows you to create normal borders as well as many stylish borders. And you have the option to adjust the thickness, size, distance from the text, and color of the border.
Adding a Simple Page Border/ Art Border
- Open an existing word document or create a new one.
- Go to the Design tab and find Page Borders option from the right.

- Hit on the Page Borders to get Borders and Shading window.
- Make sure Page Border tab is selected.

- Choose either Box or Shadow from located under Settings > Choose a border style > Change Color if necessary > You can also choose stylish border from the drop down list of Art option > Adjust the width > Choose Apply to - Whole Document/ Section/ First page only > Then hit OK.
If everything is okay, you will get your selected border/ art border around your page.
Customizing the Art Border - Tips n Tricks
- Color - You can only change the color of black borders.
- Width - Art borders have different widths - 20 to 31 pt. I dont prefer more than 10 pt.
- Preview - You can remove the border from any of the side. If you click on left, the left border will be removed. If you hit on bottom, the bottom border will be removed. Clicking again will take the border back.
- Apply to - Choose whether the border will be applied to Whole Document/ First page/ current section.
- Option > Measure from - Edge of page will put the border at the edge of page. Text will bring the border closer to your text. You can also manually adjust the values from margin. I think you should choose 5 pt for every sides.
After you complete these tasks hit OK > OK.
Creating Section
Section helps you to differentiate some settings from other part of your document. Suppose you need page border for first 5 pages of your document. To do this, you need a section break. Otherwise the border will be added to the whole document.
If your document has no section, then you have to create one. Suppose your first section will include the first 5 pages. From the 6th page, you want the next section.
Put your cursor at the end of page 5. Then create section break as -
Now you can use different settings for different sections. And you can create as many sections as you need.
Creating Section
Section helps you to differentiate some settings from other part of your document. Suppose you need page border for first 5 pages of your document. To do this, you need a section break. Otherwise the border will be added to the whole document.
If your document has no section, then you have to create one. Suppose your first section will include the first 5 pages. From the 6th page, you want the next section.
Put your cursor at the end of page 5. Then create section break as -
Page Layout Tab > Page Setup Section > Breaks > Section Breaks > Next Page > To check the section, double click on header or footer.
Now you can use different settings for different sections. And you can create as many sections as you need.
Removing the Border
Its really embarrassing when you need to remove the border but you dont know how! Its just how did you put the border. Follow the steps below -
- Design > Page Borders > Borders and Shading
- Make sure Page Border tab is selected
- Under the Settings, choose None > hit Enter/ OK > Everything will be clear!
Hopefully its a complete tutorial on MS Word Page Border. If youre having any sort of problem regarding this issue, please knock me . . .
Stay with Marks PC Solution to get more interesting IT topics!
Go to link download
Board ID Inet 86vz rev03 firmware to unbrick your tablet
Board ID Inet 86vz rev03 firmware to unbrick your tablet
This firmware is for BOARD ID Inet 86vz rev03. This tablet usually have a A13 cpu or chip. Already tried this firmware and it is working well. Back Camera, Front Camera, Sensors, Wifi all is working. If something is not working in your tablet then maybe it is not supported in this firmware. So just try another firmware ;)

Phoenixsuit -->Download Phoenixsuit Here
Firmware --> Board ID Inet 86vz rev03 Part 1
Firmware --> Board ID Inet 86vz rev03 Part 2
Firmware --> Board ID Inet 86vz rev03 Part 3
"You can use file joiner or 7zip to extract the file"
For tutorial on how to flash your tablet, when you download phoenixsuit. The tutorial is in there. Credits to AndroidXDA for the tutorial. I cant write a tutorial as of the moment because I do not have a tablet to flash.
Go to link download
Friday, October 14, 2016
Download Introduction to first aid for free
Download Introduction to first aid for free

Introduction to first aid
Health & Fitness
[Download Link >>]
version:1.4.1
rating: 4.5
rating count: 344
updated: 2015-01-28
size: 283 KB
installs: 500
cost: UAH8.00
Go to link download
Stop Smoking to Improve Personal Life
Stop Smoking to Improve Personal Life
I know that if you are a smoker it can be hard to quite. However, if you want to stop you will. You will acquire the willpower to take control. Smoking is not good for anyone. Second hand, smoke has proven to be worse than smoking. For those around you, when you smoke you are hurting them too. Many people smoke for yrs, which make it difficult to quite. Nevertheless, you have help and hope, especially if you want to quite bad enough.
Avoiding unhlthy living: Why do people start smoking? Some people start smoking because they think it is something cool and their friends are impressed. They believe it makes them look mature. Unfortunately, many people start smoking rly in life. Many people unfortunately end up with bronchitis, brthing problems, cancer, lung disse and so on. As teenagers, we thought it was the cool thing to do, since all of our friends were doing it. We may have picked up the habit watching parents or grandparents smoke.
How to stop smoking: When you want to stop smoking, there is help. You just have to want to stop. You have go to want to stop before anyone or anybody can help you. You can go to your family doctor and he/she will give you something to help you to stop. On the other hand, maybe you want to do it on your own. Everyone has there own id for trying to quite smoking. Some think hard candy will help, while others think that chewing gum will help, then some think chewing on something will help. You have to figure out what you want to try to go from there. We all have different id. Prayer is the ultimate answer. When you pray to improve your life, God will answer your prayers.
How smoking affects you: No one knows what would happen to you if you don’t quite until the time comes for you to know. You can get cancer in your mouth, in your lungs, you could have a hard time brthing, fast hrtbt, you may have problems walking across the room. Many things could happen to you if you do not quite. Ironically, however, some people smoke for yrs and nothing happens to them. Yet, throughout the yrs these people feel sluggish, tired, and often get colds more frequently.
The benefits of stopping smoking: Just think if you quite smoking you won’t have to worry about the smell in your house, in your car or on your clothes. You won’t have those nasty ash trays to empty or wash out. You won’t have to smell nothing but the air you brthe. If you quite now you will start to get back your self. You will be able to walk across the floor or be able to brthe without using oxy to help you there are a lot of rson to quite I wish you the best.
Some of the rsons people do not quite smoking are because they believe they will gain weight.
Contrary to your notions, smoking will make you gain weight as you start to age. To improve personal life you must take msures to protect your overall hlth, which includes maintaining weight, stop smoking and so on. The steps you take will ld you to a hlthier future and a successful conclusion.
If you are finding it difficult to bt the habit, we encourage you to lrn about the drugs inside cigarettes. If it isn’t enough to scare you into stopping now, then consider your future, living on life-support or oxy tanks.
Go to link download
Wednesday, October 12, 2016
Samsung Galaxy J1 2016 J120F firmware stock rom to unbrick your phone
Samsung Galaxy J1 2016 J120F firmware stock rom to unbrick your phone
This firmware is for Samsung Galaxy J1 2016 J120F.
I have already tried and tested this firmware.
This tutorial is same with the new Galaxy J1 2016, just follow it and replace the firmware that you downloaded below.
For other variant of Galaxy J1, I will post it in another article. The file in this post consist of PIT, BOOTLOADER, PDA, MODEM and CSC file.
Download These Files First before proceeding
"If you are having hard time downloading the file in datafilehost make sure to UNCHECK "DOWNLOAD WITH SECURED DOWNLOAD MANAGER" below DOWNLOAD button"
Odin --> Odin 3.07
Firmware -- > J120F XXU1AOL2 OXE1AOL3.part01
Firmware -- > J120F XXU1AOL2 OXE1AOL3.part02
Firmware -- > J120F XXU1AOL2 OXE1AOL3.part03
Firmware -- > J120F XXU1AOL2 OXE1AOL3.part04
Firmware -- > J120F XXU1AOL2 OXE1AOL3.part05
Firmware -- > J120F XXU1AOL2 OXE1AOL3.part06
Firmware -- > J120F XXU1AOL2 OXE1AOL3.part06
"Extract these files in your desired folder"
Installing the driver
1. Install driver first just keep on hitting next. (Open/Execute/Run SamsungDrivePack)
2. After installing the driver Press and Hold Volume Down + Home Key + Power Button, a selection will appear if you would like to go in Download Mode, Press Volume Up to proceed in Download Mode.
3. Connect your phone in the PC via USB Cable
4. Wait for it to finish installing the driver.
"Note: Sometimes it is better to reboot your PC. After installing the driver."
BEFORE PROCEEDING IN FLASHING MAKE SURE THAT THE BATTERY IS FULLY CHARGED OR 50% CHARGED.
Flashing your Phone
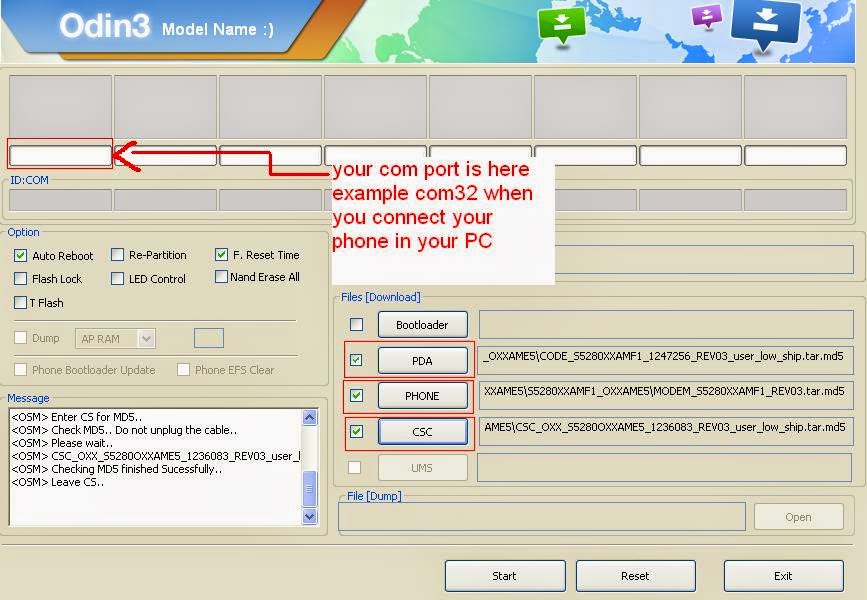
1. Open Odin 3.07
2. Load the file (PDA, Phone, CSC). Click on PDA then look for the firmware that you had extracted. Same with Phone and CSC. Bootloader is optional.
*** For Rebootloop you can only check PDA, PHONE and CSC. (This is only base on my experience, because flashing PIT is dangerous too. You might brick your phone.)
PIT --> J13G.pit
BOOLOADER --> BOOTLOADER_BL_J100HXXU0AOA1_CL333157_QB3542504_REV01_user_low_ship.tar
PDA --> PDA_AP_J100HXXU0AOA1_CL333157_QB3542504_REV01_user_low_ship.tar.md5
PHONE --> MODEM_CP_J100HXXU0AOA1_CL333157_QB3542504_REV01_user_low_ship.tar.md5
CSC --> CSC_OXE_J100HOXE0AOA1_CL333157_QB3542504_REV01_user_low_ship.tar.md5
 |
| Picture is example only. |
3. Do not check repartition.
4. When you are ready to flash your phone, Press and Hold Volume Down + Home Key + Power Button, a selection will appear if you would like to go in Download Mode, Press Volume Up to proceed in Download Mode.
5. Connect your phone in the PC via USB Cable, wait for a value in the ID:COM to appear. It will turn yellow with number example: COM32, if it nothing appear close Odin an open it again and load the file again.
6. Press START to proceed flashing your phone. Wait until it is done, the phone will reboot after flashing.
I hope this tutorial help you. Drop a comment if there is something is not clear to you. Cheers! ^_^
Make sure to leave a feedback ;)
Go to link download
how to download nokia applications on ovi website using pc without using your mobile non OTA
how to download nokia applications on ovi website using pc without using your mobile non OTA
1. Go to the ovi site..http://store.ovi.com/#/applications.
2. click on the application you want to download.
3. now click on "Send to Friend"

4. you will arrive here.

5. change the "send-to-friend" to download

6. a pop up will appear like this.

7. click save.

8. done..
hope this helps.
note. you must have an account in ovi..
--------------------------------------------------------------------
update
if after step 6 you are presented with this.

it means that you are downloading a jad file.
so heres the step after you save the jad file.
1. open the jad file in notepad

2. look for the "midlet jar url:" line and copy the url (encircled in red).
3. paste the url in your browser and press enter.

4. click save.
---------------------------------------------------------------
if after step 6 you are presented with this.

it means that you are downloading a dm file.
heres the step after you save the dm file.
1. open the dm file in notepad.

2. note the "content" line it says that the application is in sisx format.
3. delete the four lines (including the blank fourth line) encircled in red, so that you will come up with this.

4. save the file with the sisx extension.

done..
hope this helps...
Go to link download
Tuesday, October 11, 2016
Add your Business to Google Maps!
Add your Business to Google Maps!

Google Maps is a great communication app developed by Google. Millions of entities are already listed on it. But your own business may be missing here. If youd like to add your business to Google Maps, follow this post . . .
Necessary Tools
- Android Phone with GPS & Data Connection
- Google Account
- Google Maps App
- My Business App (Optional)
Adding your Business to Maps
- Get your Android Phone and turn on its GPS & Data Connection.
- Make sure youre signed into your Google Account and its services.
- Run Google Maps from your Phone.
- I guess youre exactly on your business spot. Make sure the location indicator is in exact position.
- Now click on the menu button from the upper left corner.
- Scroll down and choose Add a Missing Business.
- Add a Place > Enter your business Name, Address, Category, Phone Number, Web Address, Photos etc.
- If the location indicator doesnt locate your position exactly, then you can use this option (Mark Location on Map) from address.
- Make sure everything is done properly. And finally, hit on the Submit button from the upper right corner.
- Immediately Google will confirm your submission through email.

Now go to the Maps again and find your business there. Write reviews and add photos of your business to make it more attractive to public.
In my next tutorial, you will know about claiming your business . . .
In my next tutorial, you will know about claiming your business . . .
Stay with Marks PC Solution to get more interesting IT topics!
Go to link download
Monday, October 10, 2016
My Journey to building Linux From Scratch LFS system PART3
My Journey to building Linux From Scratch LFS system PART3
CHAPTER 3
Now that we have the bootable USB flash drive, we can continue now by creating a partition onto which we will install our LFS system.
According to the book, we create a linux native partition and a swap partition using either cfdisk or fdisk.
using fdisk, I created a 40GB primary partition and a 2GB swap partition.
Now we will create a file system on the newly created partition. According to
the book, we should create an ext3 file system using the E2fsprogs
utilities. Specifically mke2fs.
#mke2fs -jv /dev/sda1where:
sda1 is my first partition.
mke2fs - is a program that creates an ext2/ext3 filesystem
- the "-j" means the create the filesystem with an
Then we initialize our swap partition.
#mkswap /dev/sda2
where: /dev/sda2 is our swap partition
To check, type blkid at the prompt, there should be an entry about /dev/sda1
and /dev/sda2
To access the partition, we mount it at /mnt/lfs.
#export LFS=/mnt/lfs -sets a variable LFS equal to /mnt/lfs
#mkdir -pv $LFS -create a directory /mnt/lfs
-"-p" means parent, "-v" means verbose
#mount -v -t ext3 /dev/sda1 $LFS
-mount our first partition to /mnt/lfs
-meaning we can access our first partition via
/mnt/lfs
note: make sure that the partition is mounted without too many restrictions
e.g. nosuid,nodev or noatime options, by using mount command.
#mount
the /dev/sda1 line should not show (nosuid,nodev,noatime)
Enable the swap partition using the swapon command
#/sbin/swapon -v /dev/sda2
Now we can download the packages and patches needed to build the basic LFS system. But since we are using the livecd as our base system, we dont need to download the packages, we just copy the packages from the /lfs-sources/ directory of the livecd to our newly created partition.
We need to create first a directory where we will install the packages and the patches.
#mkdir -v $LFS/sources
then we make this directory writable and sticky. sticky means multiple user
have write permission but only the owner can delete a file within this
directory.
#chmod -v a+wt $LFS/sources
where: a+w - means all have write access
t - means sticky
Now we download, or in our case, copy all the contents of /lfs-sources
directory to $LFS/sources.
inside /lfs-sources directory:
root[ /lfs-sources ]# cp * $LFS/sources
where: cp - the copy command
After copying the files and patches:
CHAPTER 4 - Final preparations
According to the book, we will create a $LFS/tools directory. This directory
will contain the installed programs compiled in CHAPTER 5 to separate them from the programs compiled in CHAPTER 6. The programs compiled here are temporary tools only and will not be a part of the final LFS system.
as root:
#mkdir -v $LFS/tools
then we create a /tools symlink on the host system that will point to the
$LFS/tools directory we just created
#ln -sv $LFS/tools /
the command ln above creates a link between the two files. The target file is
$LFS/tools (/mnt/lfs/tools), with a link name that is the same as the target
file and is located at the / (root) directory. The -s means create a symbolic
(or soft) link. So from the command above a soft link with a name /tools is
created that is linked to the directory $LFS/tools (or /mnt/lfs/tools).
Then we add user/group both named lfs
#groupadd lfs
#useradd -s /bin/bash -g lfs -m -k /dev/null lfs
where: -s /bin/bash : makes bash the default shell for the user
-g lfs : adds user to the group lfs
-m : create a home directory for user lfs
-k /dev/null : the skeleton directory that contains the files and
directories to be copied to the home directory.
/dev/null contains nothing. The significance of -k
option is that if it is not specified the default
/etc/skel files and directories will be copied to the
home directory.
lfs : is the name of the user
then give lfs user a password
#passwd lfs
grant user lfs ownership of $LFS/tools and $LFS/sources directory
#chown -v lfs $LFS/tools
#chown -v lfs $LFS/sources
then we login as user lfs
#su - lfs
where: su : switch user
- : start a login shell as opposed to only switch to user
lfs : switch as user lfs
then we setup a clean working environment from which building the temporary lfs system is based.
while logged in as user create two startup files, .bash_profile and .bashrc, for the bash shell.
lfs [~]$cat > ~/.bash_profile <<"EOF"
exec env -i HOME=$HOME TERM=$TERM PS1=u:w$ bin/bash
EOF
where: exec env -i.. /bin/bash -
means replace the shell with a new one with an empty environment except the variables HOME,TERM and PS1
lfs [~]$ cat > ~/.bashrc << "EOF"
set +h
umask 022
LFS=/mnt/lfs
LC_ALL=POSIX
path=/tools/bin;/bin;/usr/bin
export LFS LC_ALL PATH
EOF
then source the just created user profile:
lfs [~]$ source ~/.bash_profile
next: CHAPTER 5
Go to link download
Subscribe to:
Posts (Atom)