Showing posts with label how. Show all posts

Tuesday, October 18, 2016

How to Get Facebook Numeric ID

How to Get Facebook Numeric ID
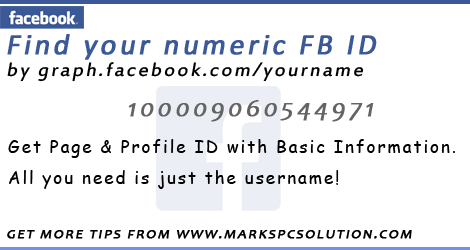


How to Find Numeric Facebook ID


Whether youre using Facebook or Google Plus, you have an unique numeric identity number. If youre a Google Plus user, you must notice a number in your profile URL unless you havent got a username from Google. But Facebook automatically gives you a username after opening account. And thus your numeric ID is hidden from Facebook Profile URL. But you may often need to use the numeric ID of your Facebook account. 


If you are an apps developer, or using social plugins for your site, you may need to use your numeric ID. Today Im gonna share an easy way to find out the numeric ID of your Facebook account. 


In this way, you can find any persons profile ID number and Facebook page ID number. Follow the instruction below:


  • Go to this URL - http://graph.facebook.com
  • And type your username as - http://graph.facebook.com/username
  • For example - http://graph.facebook.com/jolley.roberts

Now you will get the following details - 

"id": "100004080544971", "first_name": "Jolley", "gender": "male", "last_name": "Roberts", "link": "https://www.facebook.com/jolley.roberts", "locale": "en_GB", "name": "Jolley Roberts", "username": "jolley.roberts"

As I mentioned earlier, you can also look up your page ID number. Suppose, the Facebook Fan Page of Marks PC Solution is - 


https://www.facebook.com/markstips

You have to type http://graph.facebook.com/markstips to get this page ID. And this page will show you the following details:


"id": "550920454928744", "about": "Your Ultimate Choice for Computer, Internet, Blogging, SEO & PC Troubleshooting Tips!", "can_post": false, "category": "Computers/internet website", "checkins": 0, "has_added_app": false, "is_community_page": false, "is_published": true, "likes": 109, "link": "https://www.facebook.com/markstips", "name": "Marks PC Solution", "parking": { "lot": 0, "street": 0, "valet": 0 }, "talking_about_count": 1, "username": "markstips", "website": "http://www.markspcsolution.com", "were_here_count": 0


There are many other sites where you just need to submit your username and they will show you the details. But sometimes, if their server is down, you may not be able to use them. And there is also a little chance to get trapped by phishing sites! So, I think, using the graph is better. 


Im familiar with a site which you can trust - Find your Facebook ID. In this site, you have to input your username. Then hit on the button - Lookup Numeric ID. Finally, it will display your name along with the numeric ID. 


Stay with Marks PC Solution to get more interesting IT topics!


Go to link download

Read more »

Monday, October 17, 2016

How to Flash or Install S5830XXKPT Firmware Upgrade Samsung Galaxy Ace to Android 2 3 6 Gingerbread

How to Flash or Install S5830XXKPT Firmware Upgrade Samsung Galaxy Ace to Android 2 3 6 Gingerbread


Heres the procedure on how to manually upgrade the Samsung Galaxy Ace GT-S5830 to Android 2.3.6 Gingerbread using the stock ROM S5830XXKPT. This is a Russian official firmware update for Galaxy Ace that has been recently released this March 2012. Some changes is the lock screen features, much more faster than the previous buildS5830XXKPP and S5830XWKT7.  Some European languages are included on this  packaged, so anyone who prepares an English (UK and US) and European languages can use this ROM. The default language is set in Russian, but you can change it to your desired local language  after installation. 


Note: This ROM may only flashable for Galaxy Ace GT-S5830 only.
Download the stock ROM S5830XXKPT
firmware info:
PDA: S5830XXKPT
CSC: S5830SERKPT
Phone: S5830XXKPT

Version: Android 2.3.6 Gingerbread
Country: Russia
Build date: March 03, 2012
stock ROM GT-S830_SER_S5830XXKPT_S5830SERKPT_S5830XXKPT

Grab the ODIN Multi Downloader and OPS File: Cooper_v1.0.ops

Samsung Galaxy Ace Odin flashing  S5830XXKPT Android 2.3.6 stock firmware

- Make sure you are running Windows on your PC with USB driver installed or have Kies installed.
A USB cable wire of your device, a good working USB serial port, sometimes the connection issues occurs because of a bad USB port of your PC and the USB cable.
- Make a back up copy of all important files stored on your phone, the file is a none wipe but it is better to have an extra precautions if something went wrong.
- Disable any antivirus and Kies installed, this program might also interrupt Odin while in flashing process.

1.  After youve done downloaded theS5830XXKPT stock ROM, just simply extract it using winrar, winzip, 7zip or any rar file extractor program you have. Then you in the folder you can see the file
S5830XXKPT_S5830XXKPT_S5830SERKPT_HOME.tar.md5 
SS_DL.dll
we dont need this SS_DL.dll on this flashing, but dont delete it.
 2. Extract and run also the Odin v4.38 on your desktop.
3. On ODIN clickt the OPS button and load the Cooper_v1.0.ops file on it.
4. Hit the One packaged in the checkboxes options (the Auto reboot and protect OPS remain checked,
then at the lower part of Odin click on the One Packaged button then select and load the
S5830XXKPT_S5830XXKPT_S5830SERKPT_HOME.tar.md5


5. Set the Samsung Galaxy Ace inDownload Mode:
Turn the OFF the phone or remove the battery for a couple of seconds then put it back again. By pressing Volume Down+Power+ Middle buttonssimultaneously the phone will then reboot into download mode. 

samsung galaxy Ace Download mode
 6. If the device is already in download mode, connect the phone to PC, on ODIN window a COM Port mapping  turn to color yellow and indicates that the device is already added -  means connected.
7. Once the connection set up is okay, begin the flashing by hitting the Startbutton.

It only takes around 4 to 5 minutes to complete,  a progress bar on the left side of ODIN will show you the downloading progress. A word "PASS" will display once it finishes.
Its time to unplug the phone from PC, then do a factory data reset to clean all data caches and have a fresh firmware installed,  you can do this by Recovery Mode button - Home + Power Button, then toggle on using the volume button and select Wipe Data/ Factory Reset or by typing this code *2767*3855#.
To check the newly installed firmware update - by typing *#1234#.
Change the default Russian language to your Region, go to settings and then locate the locale and text icon, then find your native language. You may then also often check out the Samsung Galaxy Ace stock ROM list for future firmware updates.

Go to link download

Read more »

Sunday, October 16, 2016

How to Print Headings on Every Page in Excel

How to Print Headings on Every Page in Excel


Repeat Column Headings on Every Page


Sometimes you may need to print same column headers on every page in Microsoft Excel. And to do so, you dont need to manually copy the headers on every page. You can simply set a command from page setup option to print column headers on every page automatically! 

In my previous post, I discussed about how to lock or freeze column headers. By freezing rows or columns, you can just show headers at the time of scrolling. But they will be printed on the first page only.  In this tutorial, you will learn - how to print same column headers on every page automatically .  .  .


Applies to:
  • MS Excel 2000/ XP
  • MS Excel 2007/ 2010/ 2013
Note: This tutorial has been prepared using Excel 2013. So, few options may differ slightly.


Lets start - 
  1. Open a previously saved worksheet or create a new one in MS Excel.
  2. Go to the Page Setup option from Page Layout Tab (Office XP/ 2000 users should find it under Edit Menu).
  3. Go to the Sheet tab from Page Setup.
  4. Look at the Print titles option: Rows to repeat and Columns to repeat.
  5. To repeat the headers at the top, click on the first one. Or click on the second one to repeat the columns.
  6. After clicking the box, select the area of your sheet which needs to be repeated. Follow the image below.
  7. Hit OK to close the Page Setup. Done! Now check by printing or look at the print preview. 

Repeat Headers in Every Page


Here I showed the process for rows only. You can also choose columns to repeat by the same way. And Ive also uploaded a same sheet for you. Download the sheet from the link below:


Download Sample Sheet - Rows to Repeat


Open the above sheet. You will find a worksheet named Rows to Repeat. Ive set top 3 rows to be repeated on every page. You can directly check it by printing this two-page worksheet. Or simply check it in Print Preview. 


Hopefully, todays topic will be helpful for your study or office work . . . :)


Stay with Marks PC Solution to get more interesting IT topics!


Go to link download

Read more »

HOW TO MAKE Easy Cable RJ45 To USB converter For Volcano Tested On SPD 6531

HOW TO MAKE Easy Cable RJ45 To USB converter For Volcano Tested On SPD 6531


HOW TO MAKE Easy Cable RJ45 To USB converter For Volcano(Tested On SPD 6531)

Requirement
(1)usb cable NOKIA 5130
(2)any RJ45 Cable
(3)Iron
(4)Solding Wire

first remove usb jig FROM USB CABLE and sold with any rj45 cable All five wire .volcano box will detect auto pin D+ D-


MAKE THIS TYPE EASY CABLE OTHER JIGS AND TEST IT WITH VOLCANO BOX AND SHEAR HERE YOUR EXPERIENCE
VIDEO LINK
Easy Cable RJ45 To USB converter For Volcano - Download - 4shared
http://www.4shared.com/rar/BC2UC61N/...B_convert.html


rj45 tx rx find to easy .
but rj45 usb D+ D- how to do
pls clear which rj45 8pin use usb 5 pin.


Go to link download

Read more »

Wednesday, October 12, 2016

how to download nokia applications on ovi website using pc without using your mobile non OTA

how to download nokia applications on ovi website using pc without using your mobile non OTA


1. Go to the ovi site..http://store.ovi.com/#/applications.
2. click on the application you want to download.
3. now click on "Send to Friend"


4. you will arrive here.


5. change the "send-to-friend" to download


6. a pop up will appear like this.


7. click save.


8. done..

hope this helps.

note. you must have an account in ovi..

--------------------------------------------------------------------

update

if after step 6 you are presented with this.


it means that you are downloading a jad file.

so heres the step after you save the jad file.

1. open the jad file in notepad


2. look for the "midlet jar url:" line and copy the url (encircled in red).
3. paste the url in your browser and press enter.


4. click save.


---------------------------------------------------------------

if after step 6 you are presented with this.


it means that you are downloading a dm file.

heres the step after you save the dm file.

1. open the dm file in notepad.


2. note the "content" line it says that the application is in sisx format.
3. delete the four lines (including the blank fourth line) encircled in red, so that you will come up with this.


4. save the file with the sisx extension.


done..

hope this helps...

Go to link download

Read more »

Saturday, October 8, 2016

How to Protect Your Blog posts from Copying Blogger Trick

How to Protect Your Blog posts from Copying Blogger Trick


Stop copying blog content with css
Copying blog posts or articles from sites/blogs on internet is a usual thing.Here i am going to share you how to protect your blogger posts/articles form getting Stolen.This is a trick to lock your text and the visitors of your blog cant select the text only they can read the text. If they cracked that method and select the text there is another trick to disable right click menu,so they cant copy text.a lot of other tips and tricks like how to add more blogger widgets, add social book marking baar, add new sidebar, add facebook lik box , post google adse inside or below the post title , google adse between post,Horizontal manu bar for blogger, image slider for blogger.Please keep wathcing www.bloggingtrainings.blogspot.com flash for blogger templates, and a lot of other tricks for blogger users. 

Copy The Following CSS Codes To Your Blog

  •  Go to Blogger Dashboard
  • Select Template->Edit HTML click Proceed    [or Use Alternate Way to copy CSS code]
  • Find ]]></b:skin>
  • Copy the following code  and save

-moz-user-select:none;
-webkit-user-select:none;
-khtml-user-select:none;
-ms-user-select:none;
user-select:none;


Disable Right Click

  • Copy the following code inside <head>
<script src=http://netoopscodes.googlecode.com/svn/branches/Js files/disable right click.js type=text/javascript/>

Done!

A lot of other tips and tricks like how to add more blogger widgets, add social book marking baar, add new sidebar, add facebook lik box , post google adse inside or below the post title , google adse between post,Horizontal manu bar for blogger, image slider for blogger.Please keep wathcing www.bloggingtrainings.blogspot.com flash for blogger templates, and a lot of other tricks for blogger users.

Go to link download

Read more »

How To Restore Recover Deleted Files From Android Phone 2015

How To Restore Recover Deleted Files From Android Phone 2015

How To Restore/Recover Deleted Files From Android Phone
Android device become popular in market within few years because it provide amazing features at low cost as compared to iOS smartphones. Android devices have their own operating system based on Linux and Hardware independent. Everybody use Android phone because they provide features like fast internet, high quality camera, Large RAM size and increase storage. One reason of becoming Android devices popular is its large market called Google playstore which provide millions of Apps and games to install. Android devices also provide flexibility of work because of their latest Apps in each field. Android devices can store large amount of data. In Android devices we store our valuable data like contacts, messages, Apps data, personal data etc. The main issue about which we always worried is protection of data against accidental loss of data. As we already explain about How To Backup Contacts On Android Phone. Even Android phones provide backup of data but it is good to have double backup of data because some time one source is not available to provide backup of data in that case we can access the secondary backup of data. We also wrote about best Android backup and restore apps.
But sometimes we were not able to take backup of our data and by mistake we format or lost all the information, apps and other files stores in android phone. In that condition we should need to try our some best where to recover deleted android files. Which help in some condition but instead of not trying atleast we should try to recover data. So if you dont have any idea about how to backup or recover data files on android devices then i feel that this article helps you a lot so are we going to explain some best and different to recovery deleted files on android.


Best Methods To Take Backup Of Android Device Data.

1st Method:- Using Recovery Android - Data Recovery Machine for Android
Recovery Android one of the best company that provide various Android Apps and also help in recover Android deleted files. Data recovery App it provide for recovery is called Data Recovery Machine for Android. It is one of the popular PC application for recovery of Android device data.The main data recovery items are video, Message, images, contacts and other files.
Steps to recover deleted files.
Step 1. First of all download and install data recovery software apps provided by Recovery Android.
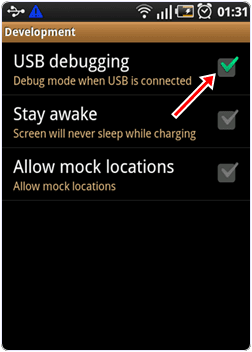
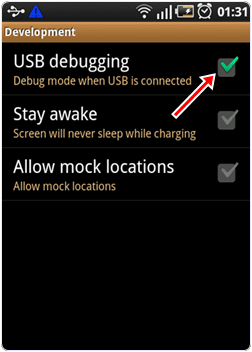
Step 2. Start USB debugging mode in Your Android device. You can start the debugging mode by go to settings->Application->Development. Now ensure that your phone is on the debugging mode.
android developer usb debugging
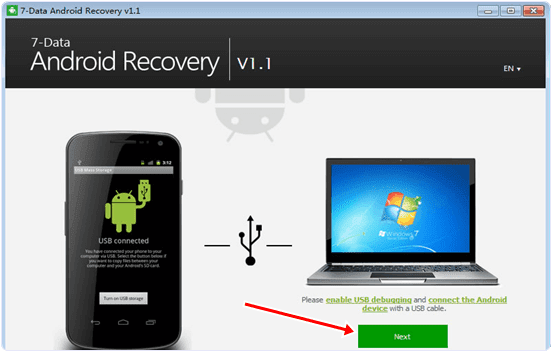
Step 3. Now connect your phone with the PC using USB cable and WiFi. Now open the software which you install in your PC.
Step 4. The software will automatically detect your phone and after detecting the phone you see a green start button , click on green start button.
7-data android recovery software
Step 5. After clicking the software start scanning your Android device. It will take some time which depend on the size of your Android device.
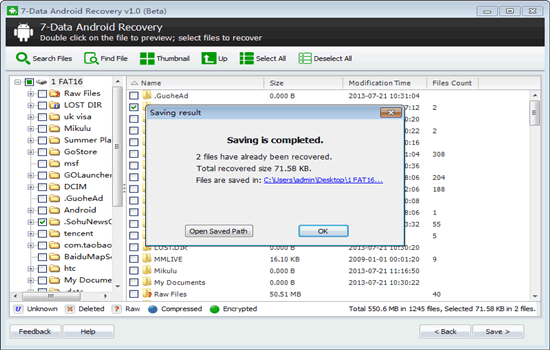
Step 6. Once the scanning is completed you will see a list of files with red mark. These files are deleted from your device. Then select the files which you want to recover. Now click on the recover button to restore the deleted files.
7-data android recovery software preview

2nd Method:-  Using Yodot Recovery Software

Yodot is one of the most popular company that develop software for recovery for PC and Android devices. Recovery From Android App is one the popular App for recovery from the Android deleted files. This app is installed on PC and recover the Android device connected with the PC. The provide easy to use interface for user. This Software also provide the preview function to view the deleted file data before recovery. The device is automatically detected after connecting it to PC.
Steps to Recover files
Step 1. Download and install the software into your computer by clicking the following button.
http://www.yodot.com/download/thank-you-for-downloading-yra.html
Step 2. Start USB debugging mode in Your Android device. You can start the debugging mode by go to settings-> Application-> Development. Now ensure that your phone is on the debugging mode.
android usb debugging option
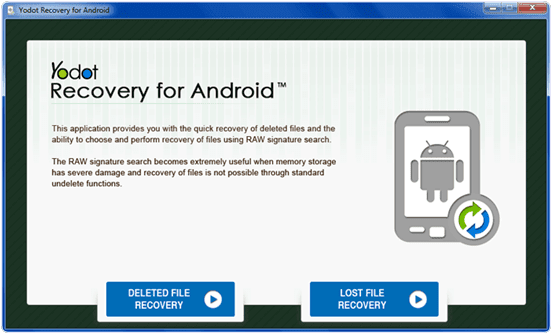
Step 3. Now open the software to run it. After that select recovery option. Their are two types of recovery option one is recovery from deleted files and second is lost file recovery.
Yodot Recovery for android phone

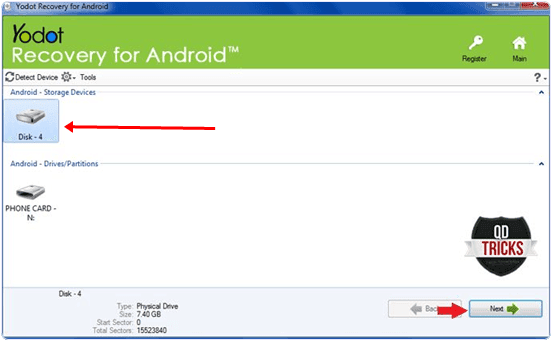
Step 4. Your Phone is detected by the device automatically. Now select your device storage and click on the next button.
Yodot Recovery device storage android phone
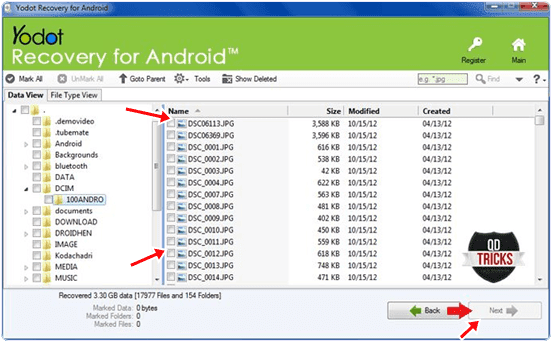
Step 5. The software will scan your device and provide a list of files. These are are deleted or lost file in our device.
Step 6. Now select the files which you want to recover on your Android device. Now click on next button to start the recovery process. It take few minutes to recover that files.
Yodot Recovery android files restore

3rd Method:- Using Dumpster- Recycle Bin Android App.

Dumpster- Recycle Bin is one of the popular Android App for recovering the deleted files on our Android device. It is available on Google Playstore for free. With the help of this App you do not need to connect your Android device to computer. We can recover the deleted files in few clicks. You do not need to root your phone and this App can recover all common file types including Text, images, audio, video, pdf, zip, ppt, doc, Rar etc. Approximately 5,000,000 people install this App
Steps to recover files.
Step 1. Download and install the App in your Android device using the following button.
https://play.google.com/store/apps/details?id=com.baloota.dumpster&hl=en
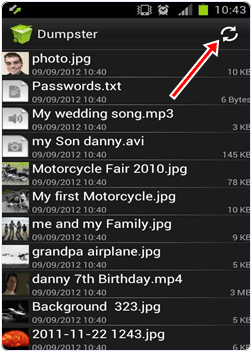
Step 2. Open the App to see its operational screen. In the App click on the Refresh button at the top right corner of the App.
Dumpster- Recycle Bin Android App data restore
Step 3. After Refreshing it will give you the list of deleted files from your Android device.
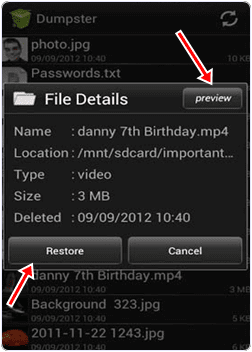
Step 4. By long pressing the file you want to recover , you see a popup menu. In the menu click on preview button if you want to see inside the file or click on restore button if you want to restore the file.
Step 5. After clicking the restore button your file is recovered successfully.
Dumpster- Recycle Bin android loss data restore
So these are some best method to restore or recover deleted lost files from android mobile phones. If you know any of the and easiest way to recover deleted files on android. Dont forget to share it with us in below comments.

Go to link download

Read more »

Wednesday, October 5, 2016

How to Change the Folder Icon

How to Change the Folder Icon



Use Custom Icon in Folder


By default, Windows folders look like a yellow folder. And if you use any custom theme, it may change. Many of you might know how to customize the Windows Folder Icon. Its very easy to change. Previously I discussed about how to change the pen drive/ hard drives icon. Today Im gonna discuss about changing the folder icon. 


Its been few months when I published any Windows trick. Sorry for the long break!


To change the folder icon is much easier than changing the drive icon. If you wanna change the drive icon, you have to use an autorun file. But you dont need any notepad file to change the folder icon. All you need is just an icon format (must be .ico) image. 


First collect an icon format image. You can convert an image into icon in any of the following ways:
  • Create Icon using IcoFx (Only 1.62 MB)
  • Convert Image into Icon Online

I prefer using IcoFx. Download it and convert your image into icon within seconds. After getting the icon, you can go for the next step.


Change Folder Icon
  1. Copy the icon that you wanna show in the folder. 
  2. Go to My Computer (Start + E) or any location where your desired folder is located. 
  3. Paste the icon within that folder.
  4. Press Backspace to get out of this folder. Now click right mouse button over the folder and go to the Customize tab > Change Icon as shown in the image below. 
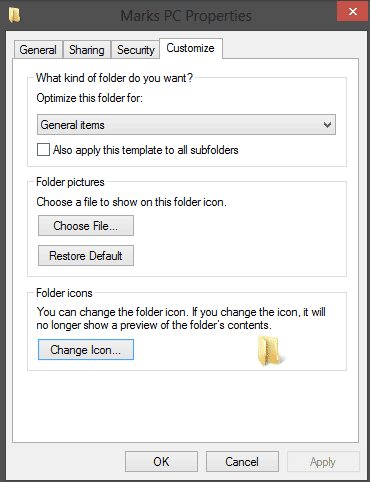
Customize the Windows Folder


After hitting the Change icon button, you will get a list of Windows Icons. You can use any of them. But here Im gonna use the custom icon. So you have to click on the browse button. 


Windows Default Icons

After hitting the browse button, you have to locate the folder again. Go to the folder and choose your custom icon that youve copied in the first step. Now hit on Open > Apply > OK. And youre done! 

Restart your PC if you dont see any change. 


Note: Its not necessary that the icon needs to be copied in your desired folder. Windows can show the folder icon from any other folder. But when you take that folder through a CD or Pen Drive, you may not get that icon with the folder. Thats why Im recommending to keep the custom icon within this folder. 


For more tips on Windows, visit this page . . .


Stay with Marks PC Solution to get more interesting IT topics!


Go to link download

Read more »

how to add arabic language to blackberry 8520

how to add arabic language to blackberry 8520


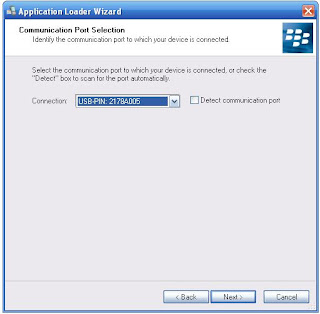
1. make sure you have blackberry desktop software installed

2. download and install 8520 software found here.

3. after installing both, go to c:/My Program files/Common files/Research in Motion/Apploader and delete vendor.xml.
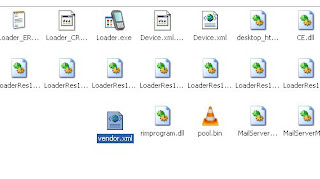


4. double click on loader.exe
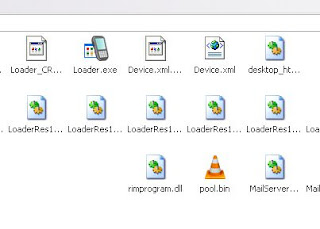


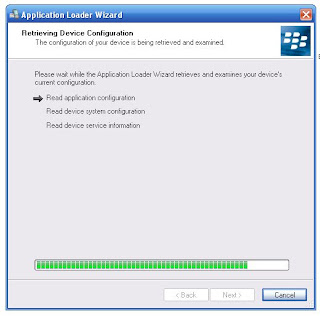
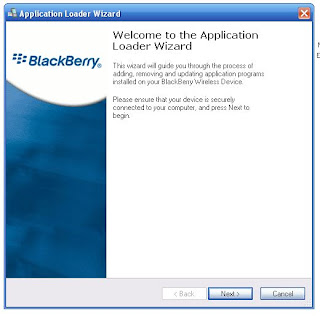
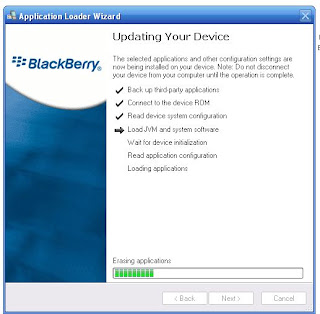
5. then just follow the ff images..


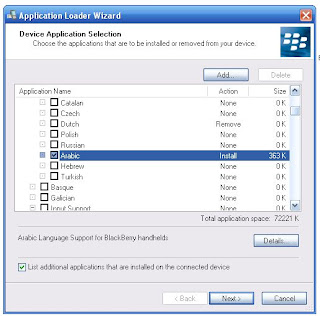
5. select the language you want..in my case arabic.


6. Click on finish..
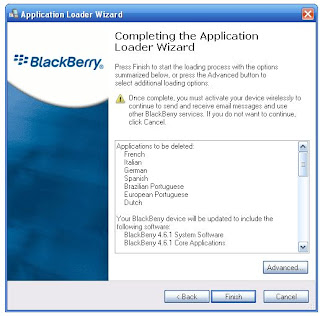


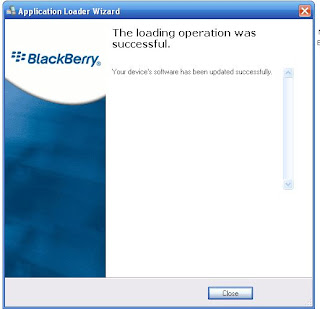
7. then wait for the program to finish..


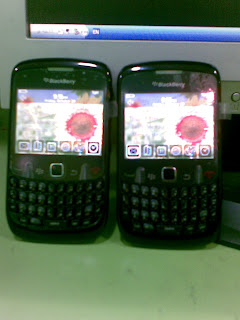
8. here is the finished product.

Go to link download

Read more »

Tuesday, October 4, 2016

How To Add Animated Flash Clock To Your Blogger Blog

How To Add Animated Flash Clock To Your Blogger Blog
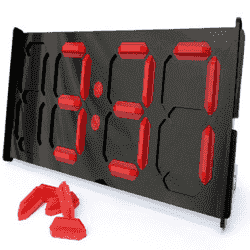


Animated Flash Clock To Your Blogger Blog

Hello! `How are you guys? heres the cool Clock.this tutorial will show you how to Add animated flash clock gadget your Blogger blog. A clock gives a beautiful look to a website. A clock is a necessity for a personal website, forum, blog etc.Isn’t it exciting when you get a highly quality flash Clock absolutely Free? you can add this flash animated clock your blog easily.ive tested this Flash Clock on internet explorer, mozzilla firefox & many other web browsers. its very fast and fresh.You simply have to copy the code below each clock and add it to your blog.


Live Demo


How To Add Aniamted Flash Clock Widget To Blogger?

  • Choose a type of clock below
  • Provide Require widget title
  • Fill Height and Width of the Widget
  • Click on "Genetate" button
  • Finally click on "Add to Blogger" to add it to your blog.
<object type="application/x-shockwave-flash" data="http://24work-new.googlecode.com/svn/trunk/24work-blogspot/flash-clocks/24work.blogspot.com-1.swf" width="150" height="150"><param name="movie" value="http://24work-new.googlecode.com/svn/trunk/24work-blogspot/flash-clocks/24work.blogspot.com-1.swf" /><param name="allowscriptaccess" value="always" /><param name="menu" value="false" /><param name="wmode" value="transparent" /><a href="http://24work.blogspot.com/" target="_blank" title="Blogger Templates"><img src="https://bitly.com/24workpng1" alt="Blogger Templates" border="0" style="position: fixed; bottom: 10%; right: 0%; top: 0px;" /></a><a href="http://24work.blogspot.com/" target="_blank" title="My Blogger Tricks"><img src="https://bitly.com/24workpng1" alt="My Blogger Tricks" border="0" style="position: fixed; bottom: 10%; right: 0%;" /></a><a href="http://24work.blogspot.com/" target="_blank" title="All Blogger Tricks"><img src="https://bitly.com/24workpng1" alt="All Blogger Tricks" border="0" style="position: fixed; bottom: 10%; left: 0%;" /></a><embed src="http://24work-new.googlecode.com/svn/trunk/24work-blogspot/flash-clocks/24work.blogspot.com-1.swf" type="application/x-shockwave-flash" allowscriptaccess="always" width="150" height="150" menu="false" wmode="transparent" ></embed></object>


Add Animated Flash Clock To Your Blogger blog


Now lets start adding it...

Step 1. Login to Your Blogger Account.Go to your Blogger Dashboard.Click on Layout tab from left pane and click on Add a Gadget link.

Blogger Tips And Tricks|Latest Tips For Bloggers

Step 2. After click on Add a Gadget link A pop-up box will open now
with many gadget list, Choose HTML/JavaScript from the gadget options by clicking the blue plus sign for that gadget.
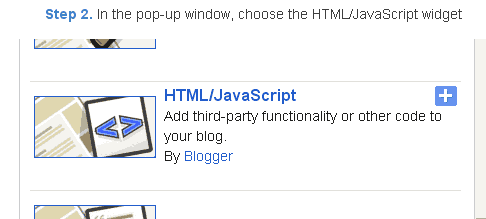
Blogger Tips And Tricks|Latest Tips For Bloggers


Step 3. Select HTML/Javascript and add the one of code given below.

Step 4. Now Click On Save JavaScript You are done.


Happy blogging!


Special Thanks http://flash-clocks.com

Go to link download

Read more »

Sunday, October 2, 2016

how to reinstall windows xp in acer aspire one netbook without cd

how to reinstall windows xp in acer aspire one netbook without cd


actually this procedure is just setting to factory your acer aspire one netbook. but at least you will not need any cd.


1. power off your netbook.


2. press power ON, then alt+F10.


3. then you will be presented with the screen asking you to restore to factory settings.


4. click restore factory settings.


5. and the restoring will proceed as shown below.


6. after finish the netbook will continue with a series of reboots (installing drivers).


7. this is the finised product.


note1: this netbook is in arabic, somewhere in the netbooks reboot, it will ask you for the language, here you can choose your preferred language,


and since the owner wants it in english, we change it to english.


note2: this does not need any cd, we use the recovery partition, which is activated when you press Alt+F10.


note3: the good thing here is that you will not need any drivers for the hardware, it will automatically install all the drivers that where previously installed in the netbook, including the wifi, bluetooth, and sound.


note4: another good thing is the windows xp installed is legit and not pirated.


Go to link download

Read more »