Showing posts with label blog. Show all posts
Showing posts with label blog. Show all posts
Tuesday, October 18, 2016
8 Best PPC Advertising Networks to Monetize Your Blog 2015 Edition
8 Best PPC Advertising Networks to Monetize Your Blog 2015 Edition
Monetizing a blog with ad publishing network is the first level of earning which may take quite few months for any blogger to get started with various advertising methods PPC/CPC or CPM. Amongst all the categories of ad publishing—earning depends on Content, Traffic, Page CTR, Ad RPM, Bounce Rate etc. parameters. Some websites may generate more clicks with lower RPM rate and some fewer clicks but huge RPM rate. So these two different conditions define which ad network is perfectly suited for these two sites. Suppose the first website which generates more clicks than fewer RPM rate can perform well with advertising network who pays on PPC formula again for second website CPM ad network will perform ultimate to maximize revenue skyrocket.
![8 Best PPC Advertising Networks to Monetize Your Blog [2015 Edition]](https://blogger.googleusercontent.com/img/b/R29vZ2xl/AVvXsEjJF_q3MJ-K3s9nC9QOzmiWr6iCZ-tLKUD63et0FAn4F15yZHyXP6LBO2qE_u1YEizlcYJJbyRbY9JVs_jsfGDNMDHYWtNgyCpZrU3I6bzrR6KNZADkVP1CLDJ265EQaClGz0Vto6tcrzA/s1600/PayPerClick.jpg "8 Best PPC Advertising Networks to Monetize Your Blog [2015 Edition]")
So you can understand that website performance can help you to decide which ad network is best for your blog or site. I have seen may webmasters pull thousands of bucks with CPM ad networks out of Google Adsense[King of ad publisher] who pays on PPC formula.
Todays guide I will show you my 8 favorite lists of PPC and CPM advertising networks to monetize your newly launched blog.
Google Adsense
Adsense dominates over millions of advertisers all over the world using AdWords to list their products and services while Google adopt various processes to deliver these ads online. Amongst all of the Googles treasury to distribute ads majority are handled by Adsense [though Google ads appear on Search, Custom Search, Gmail, News, Blogs and other different places belong to Google products]Adsense is solely a PPC [Pay-per-click] or CPC [Cost-per-click] ad network which mainly focuses on websites to distribute ads based on content. There are lots of technologies Adsense uses to provide highly targeting, engaging and quality ads that perfectly suite a sites content and audience so that more feasibility of clicks.
Adsense uses crawler which is widely known as Adsense Crawler more similar to Google Crawler though there are prime differences between Adsense and Google Crawler are (1) Adsense crawler crawls headlines, texts, links to focus on keywords to deliver more relevant ads whereas
(2) Google crawler indexes all resources of a site to visible on search engines in terms of targeted search queries.
To get Adsense account approved is a bit tough these days when Google Adsense measures lots of things before including any website in their network. Here are some useful guides help you to get started with Google Adsense
Relevant Tutorials of Google Adsense:
Here are quite few useful guides to get your started with Media.net
The minimum payout of Infolinks is $50 via Paypal.
The installation procedure is quite easy and in handy process.
If youre approved with Google Adsense then monetize this ad network otherwise try out Media.net. Do let me know how you liked this article.
Adsense uses crawler which is widely known as Adsense Crawler more similar to Google Crawler though there are prime differences between Adsense and Google Crawler are (1) Adsense crawler crawls headlines, texts, links to focus on keywords to deliver more relevant ads whereas
(2) Google crawler indexes all resources of a site to visible on search engines in terms of targeted search queries.
To get Adsense account approved is a bit tough these days when Google Adsense measures lots of things before including any website in their network. Here are some useful guides help you to get started with Google Adsense
Relevant Tutorials of Google Adsense:
Media.net
A Yahoo and Bing enterprise is widely famous as working with contextual ads powered by Media.net which measures ad impressions of a site and pay money on RPM [Revenue per thousand impression] method. Reasons there are many websites are benefited from Media.nets ads are "people are less likely to click on Ads though the impression rate remains higher so webmasters utilize this effort to monetize their blogs with CPM ads [i.e. Media.net] rather CPC ads [i.e. Adsense]"Here are quite few useful guides to get your started with Media.net
Bidvertiser
Not so famous as the previous twos but yet works better with slow traffic site having quality traffic, reduced bounce rate and quality content. Bidvertiser provides both text, image, animated, flash ads though they wont provide highly targeted and quality ads because of limited advertisers comparing to Adsense or Media.net but you can still pull up maximum earning with websites not approved with Adsense. The minimum payout of Bidvertiser is $100 and they pay through Paypal, Check.Chitika
Over 300K publisher websites are already listed on Chitikas ad inventory which provide highly targeted ads relevant to website content, target audience and traffic. You will have to start with primary membership with Chitika but dont worry once your earnings exceed their minimum limit you will be upgraded to secondary membership providing with high quality ads with more CPC rate.Vibrant Media
Another well-known CPC ad network at this time providing quality ads from a big lists of their brand advertisers. The CPC rates of VM are among the highest in the industry, but the catch is that they just don’t let any website join in the fun. You have to prove your site as a premium publisher with quality content, traffic, and audience. Sites including content like adult, gambling, drugs, profanity, hate speech, violence will never be approved through VM so they have quite few restrictions upon publishers you will get on Terms of use.Infolinks
Infolinks is a CPC based ad network which was on top of the choice to blog publishers but today their CPC rate is recorded as the lowest comparing other ad networks is the reason many blog publishers avoid these ads. If you have blog having thousands of articles and not so more internal links then you can maximize earnings with Infolinks ads but blogs have huge internal links should avoid Infolinks in order to boost CTR.The minimum payout of Infolinks is $50 via Paypal.
Exit Junction
Exit Junction is considered another best CPC ad network which is such an ad network work for many website owners, bounced traffic [when visitors leave your site frequently and never come back]. Exit Junction can supplement your CPC advertising income by showing these visitors clickable ads so that you can generate money. When exit junction is installed on your site your visitors click on the back button after seeing the landing page they don’t go straight back to the search engine page results they usually came from. Instead, they are taken to a list of sponsored results based on the keywords they typed.The installation procedure is quite easy and in handy process.
PocketCents
Its pretty useful ad network with fixed rates of CPC for blog publishers. Theres no sign up or upfront costs but theres restrictions regarding page views per month. You earn more from plain-text, hybrid, banner, and video-advertisements. Pocketcents charges $0.25 for advertisers on rough and pays publishers closely $0.15 per click.Conclusion
Cost per click advertising network works fine with blog publishers because of higher page CTR, RPM rates and more revenue per click. Amongst all the ad networks listed above I recommend you going through Google Adsense first then Media.net and sequentially other networks mainly depend upon your blog site quality.If youre approved with Google Adsense then monetize this ad network otherwise try out Media.net. Do let me know how you liked this article.
Go to link download

Saturday, October 8, 2016
How to Protect Your Blog posts from Copying Blogger Trick
How to Protect Your Blog posts from Copying Blogger Trick

Copy The Following CSS Codes To Your Blog
- Go to Blogger Dashboard
- Select Template->Edit HTML click Proceed [or Use Alternate Way to copy CSS code]
- Find ]]></b:skin>
- Copy the following code and save
-moz-user-select:none;
-webkit-user-select:none;
-khtml-user-select:none;
-ms-user-select:none;
user-select:none;
-webkit-user-select:none;
-khtml-user-select:none;
-ms-user-select:none;
user-select:none;
Disable Right Click
- Copy the following code inside <head>
<script src=http://netoopscodes.googlecode.com/svn/branches/Js files/disable right click.js type=text/javascript/>
Done!
A lot of other tips and tricks like how to add more blogger widgets, add social book marking baar, add new sidebar, add facebook lik box , post google adse inside or below the post title , google adse between post,Horizontal manu bar for blogger, image slider for blogger.Please keep wathcing www.bloggingtrainings.blogspot.com flash for blogger templates, and a lot of other tricks for blogger users.
Go to link download
Thursday, October 6, 2016
Increase traffic in your blogger blog or in your website very fast
Increase traffic in your blogger blog or in your website very fast
Today I will show you how to Increase traffic in your blogger blog or in your website very fast.The main aim for making the blog on blogger is to getting traffic on the blog and there are many ways to get the traffic on your site. Its very easy you have to keep updating your blog and do some work onsocial media and linking and you will get your traffic after the time passed.
Here i am showing you some major techniques which allows you get maximum traffic to your blogger blog. You just have to do some little work on it.

There are many sources that you can increase the visitors to your site but here i am showing you the ways that not only enhance your traffic but also cause to increase your site visibility on search engines. here they are,
- Facebook page and group posting
- Yahoo answers and groups
- Tumblr, twitter and other social media post
- Guest post on your related niche sites
- Google adword traffic
- High traffic blog comments
- forum posting on high PR
- Google plus traffic
- Press releases, news and classified submit
Facebook Page and Group Post:
As everybody know the importance of like on Facebook and its traffic, You must make an official page of your site on facebook, Add it on your site to like your website page, Go and search facebook groups join the groups which has more then 20,000 members and post your website on it. This way you will get many visitors to your site for free.
Yahoo Answers and Groups:
Yahoo answers and groups are also best place to get traffic to your website you can enhance your site links and visitors by using this method, You must post your site where its relevant to it. Like if your site is all about fashion then you have to link it to fashion topic question or groups in yahoo, It will also increase site performance.
Twitter Tumblr and other social network:
You should also make some profiles on twitter, tumblr and other social networks like Xanga, Linkedin. Delicious, Pintrest and many more. On that point you will also get little but traffic but its increase your site ranking in Google search engine and you will got many powerful visitors to your site. If the social points not bring the visitors then it really cause to make you better in search eyes.
Guest Post on Related Websites:
Thats the most powerful way to get instant traffic to your website if you find some related to your niche sites simple contact them and ask that you have some good articles and want to publish on there website, If you article is good and enough you got approved, Now simple in article foot add little description about your site and article writer, Thats it when someone reads it they surely get involved in your site while clicking on the link that you leave on the footer of article.
Google Adword Traffic:
There is also another way to get the target traffic to your website, you just have to add a campaign toGoogle adword which is pay method to do, you have to pay per click on your site to get traffic, this is fully target traffic, you need to put the keywords and some description to add the profile, minimum you can get 0.02$ per click to your aid.
Blog comments:
At this time even blog comments comes into the spam category in google eyes, but still you can get better traffic from it, Some high pr blogs and high level alexa traffic rank sites you can get better traffic for you. Sites like moz.com/blog, techchrunch, mashable, and other major sites still bring some better visitors to your website. Just try to get it. Must leave relevant comment to get faster approval.
Forum Posting:
Forums are also better way to get targated traffic to your site, if you are good internet searcher you can try to find top alexa rank forums where the traffic should be huge, can also incrase your site traffic. I would like to show some sites like skyscrapercity.com, forums.seochat.com, forums.digitalpoint.comare most common and well know websites. you can try to get post your site link in thread reply.
Press Release News Classifieds:
You should try to get post on press release sites like prlog.com, pr.com, and sbwire.com these are the most powerful sites or you have to search in google for top press release websites and then post you information on it.
You can also bring some serious visitors from classifieds websites, you should post some classifieds on ebuyclassifieds.com craiglist.org and gumtree.com and some other high traffic websites. With this way you can also get the better traffic to your website.
Go to link download
Tuesday, October 4, 2016
How To Add Animated Flash Clock To Your Blogger Blog
How To Add Animated Flash Clock To Your Blogger Blog

Hello! `How are you guys? heres the cool Clock.this tutorial will show you how to Add animated flash clock gadget your Blogger blog. A clock gives a beautiful look to a website. A clock is a necessity for a personal website, forum, blog etc.Isn’t it exciting when you get a highly quality flash Clock absolutely Free? you can add this flash animated clock your blog easily.ive tested this Flash Clock on internet explorer, mozzilla firefox & many other web browsers. its very fast and fresh.You simply have to copy the code below each clock and add it to your blog.
Live Demo
How To Add Aniamted Flash Clock Widget To Blogger?
- Choose a type of clock below
- Provide Require widget title
- Fill Height and Width of the Widget
- Click on "Genetate" button
- Finally click on "Add to Blogger" to add it to your blog.
Add Animated Flash Clock To Your Blogger blog
Now lets start adding it...
Step 1. Login to Your Blogger Account.Go to your Blogger Dashboard.Click on Layout tab from left pane and click on Add a Gadget link.

Step 2. After click on Add a Gadget link A pop-up box will open now
with many gadget list, Choose HTML/JavaScript from the gadget options by clicking the blue plus sign for that gadget.
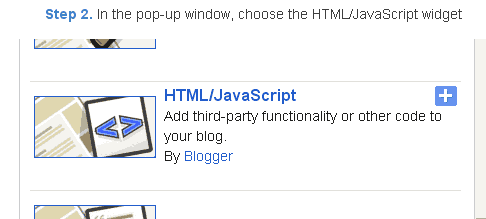
Step 3. Select HTML/Javascript and add the one of code given below.
Step 4. Now Click On Save JavaScript You are done.
Happy blogging!
Special Thanks http://flash-clocks.com
Go to link download
Friday, September 16, 2016
Write Blog Posts by Windows Live Writer
Write Blog Posts by Windows Live Writer

Though I’m engaged in blogging for two years, I never tried to write posts using any third party tool. Only a few days ago, Ive come to know that Windows Live Writer allows to prepare draft post. And after completing the draft, you can publish it on your site!
Why Windows Live Writer?
It’s a good question to start with. Both Blogger and WordPress (or any other blogging platform) have a nice typing interface. You can easily write and publish a post using the default options. So, you may ask – is there any necessity to use Live Writer?
My answer is – YES! Just consider the following points:
- Live Writer provides an interface that almost looks like MS Word.
- It allows you to create table without using HTML (Exclusive Feature)!!
- You can work offline even without connecting to the Internet.
- You can count words, check spelling and so on . . .
Live Writer is fully integrated with WordPress. But it also supports all major blogging platforms like Blogger, TypePad, SharePoint etc. After installing the Writer on your PC and adding your blog account, it downloads the theme of your site including font size, style, layout, categories etc.
So, when you’re writing a post offline, you will feel like writing in your own blog platform. Most importantly, you can also preview the post without net connection! But when you’re writing a post using Blogger or WordPress, it’s impossible!
Where do you get this?
Though Windows Live Writer is completely free, it’s not a default program of Windows. Youve to download it from Microsoft and then install on your PC. Actually it contains multiple apps including -
Get Windows Live Installer from Microsoft. Its 1.1 MB in size. Now install it on your system:- Messenger
- Photo Gallery
- Movie Maker
- Toolbar
- Writer
- Family Safety
- Silverlight

First, youve to choose the programs you would like to install from Windows Live. For me, Writer is the only app that I find useful from here. If you need any other app, just tick it. Now press the Install button.
When the installation is complete, you will be asked to set your homepage and search provider. If you dont need to change anything, just unmark the options and hit on the Continue button.
Now you will get the Live Writer in your Start menu. After running the program, you will get the following interface:

Look at the bottom. While writing a post, you will be in the Edit Tab. If you would like to get a preview, then hit on the Preview button.
Adding Blog Account
Look at the Menus. There is a Blog menu. To add your blog account, go to the Blog menu and choose Add blog account . . .

Now you will get the Live Writer in your Start menu. After running the program, you will get the following interface:
Look at the bottom. While writing a post, you will be in the Edit Tab. If you would like to get a preview, then hit on the Preview button.
Adding Blog Account
Look at the Menus. There is a Blog menu. To add your blog account, go to the Blog menu and choose Add blog account . . .
Now choose your desired blog service. Maybe youve to select other blog service option. Press Next button and enter the information as below:

Wait few minutes and let the Writer set up your blog. Writer will download the theme of your blog including categories, font style, text size and other information.

After successfully adding the account, you will see your blog at the top right corner of the Windows Writer.
Using the Writer
Using the Live Writer is very simple. Just after running application, you will be able to start blogging. You can save the post as draft and directly publish it on your site when its complete.
Though writer is a very handy tool for blogging but naturally you might face some difficulties. As you cant control your site directly from Writer, you must use your blogging platform ultimately. Writer can only help you to create the draft . . .
Wait few minutes and let the Writer set up your blog. Writer will download the theme of your blog including categories, font style, text size and other information.
After successfully adding the account, you will see your blog at the top right corner of the Windows Writer.
Using the Writer
Using the Live Writer is very simple. Just after running application, you will be able to start blogging. You can save the post as draft and directly publish it on your site when its complete.
- You can add anything from the right sidebar or from toolbar at the top.
- You can choose a label or category from the bottom.
- To add or remove a blog account, use the Accounts option from the Tools menu.
- To edit blog settings, go to Blogs menu > Edit blog settings.
- To create a table, go to Table menu > Insert Table > Enter # of Rows and Columns > Choose Pixels > OK.
Though writer is a very handy tool for blogging but naturally you might face some difficulties. As you cant control your site directly from Writer, you must use your blogging platform ultimately. Writer can only help you to create the draft . . .
Stay with Marks PC Solution to get more interesting IT topics!
Go to link download
Thursday, September 8, 2016
How to Start a Blog Make Money Online − Step by Step Guides
How to Start a Blog Make Money Online − Step by Step Guides
So you have heard the term "Blog" which is almost a common string on search engine and internet world. A "Blog" is a terminology which comes from a formal word "Weblog" meaning a regularly updated website or web page, typically one who runs an individual or small group, that is written in an informal or conversational style. More elaborately "Blog" is a place where a blogger[who runs the blog] can express his thoughts or passions on topics he/she is fond of. This sharing can be on two sides [1] None profitable [2] Profitable
None Profitable blogging means a blogger contributes on a blog for the sake of human benefit and in terms he/she takes no profit from this work.
Profitable blogging means a blogger contributes on a blog for the sake of human benefit also in terms he/she exacts profit out of the work.
![How to Start a Blog & Make Money Online ? [Step by Step Guides]](https://blogger.googleusercontent.com/img/b/R29vZ2xl/AVvXsEhEue8tuojRlbhQ_NQMOt5tZLlWQ6u2jEKL17mPe9y04WzJJGy9uSm37t70fQnp71uiUtInmZIC0LnI4FKesd5lp4oegJKtnWKJLEpsFGGJxSJVm6ZJHij-dbd3-L0T0t-jjbPEm8v4mtw/s1600/Start+a+Blog.png "How to Start a Blog & Make Money Online ? [Step by Step Guides]")
Majority of the bloggers do profitable blogging and because this is now today a big source of income beside passion or profession whatever you say.
Why do you need a blog?
Looks like youre on your business [no matter what it is either your own publication or company] and you want to publicize the features of your services online. So very best practice here to spread out your services through internet is a Blog or Website. If you want to share your thoughts with many people on internet then a Blogsite is an ultimate arsenal here to spread out your words and you can have hundreds of millions of people always active online to read your articles and share themselves.For company purposes you need to feature your products and services that your customers need to review first before making decision to purchase. Blog site can be used to write excellent reviews of your products so that any people can check the specific features of a certain product before purchasing. Today almost every company has Website and Blog to grab highest attention of their customers and provide valued services. Its called one part of business strategies.
How to start a blog?
Well, to start a Blog site you just need two things (1) Domain name and (2) Hosting space. Domain name which gives the address of your Blogsite and Hosting space is required to host your entire website resources where specially people will land on to read your content. These are all the basic components to create a personal or business Blog but to extend the UI [User Interface] and UX [User Experience] across your site you will be needed to add more extensions, plugins, frameworks, themes which are all customized with built-in pro features. We will be talking about later.Find a Reliable Web Hosting and Domain Name
Amongst all other web hosting services I strongly recommend your choosing HostGator webhosting since theyre not only the top notch in industry but their features are excellent and provide very cheapest hosting plans for small or big websites.HostGator includes all available features to boost your site performances including site back, security and acceleration, increasing search engine visibility with built in SEO gears, free E-Books and SEO tools.
Also you can install top Blog softwares including WordPress, LifeType, Joomla, Drupal, b2evolution etc.
Another special bonus is that theyre now offering 55% of huge discount on all Web hosting packs and this will continue for limited time, so dont be fool by missing this golden opportunity to register your site for long years with very cheapest price.
Use following methods to register your site with HostGator with your perfect domain name and hosting plan.
First of all Go to HostGator official page and click on "Get started Now!" button [yellow colored]

Scroll down the page a little and choose "Hatchling Plan" which is better for starter

Also choose your hosting years, 1 year, 2 years or 3 years [The more years you choose the less the cost you pay]. So for 3 years youve to pay $2.23/month
After choosing years click on "Sign Up Now!" button
Choosing Domain
Now you have to choose your domain name which might be in 1/2 words, smart looking and easy to memorable for popularizing it through out audiences.To check whether your preferred domain name is available or registered use Whois Lookup tool and type your domain name with .com, .net, .org, .info or any domain format and click on "Go" button.
The tool will tell the domain is available or registered if already registered they it will also suggest you other domain names.
So I think you have found your domain name now put it on HostGators "Register a New Domain" tab also select the domain format

Then provide your username, and security pin with 4-8 characters [Your PIN will help verify account ownership when contacting Customer Support.]
Now enter your billing information very carefully also choose payment type as "Credit Card" or "Paypal"
Additional Security Services
There are two additional security services are already checked [these are for site back and security with site acceleration features]If you want HostGators additional SEO addons, SEO tools and E-Books then check the box says "Search Engine Visibility" [Your price would be extended for this service but it will worth you huge in SEO preferences]
Enter a Coupon Code
You will be provided HostGators auto generated coupon code "FLOWERS" which will deduct 55% in your hosting plan so dont need to change but you can validate your coupon code by clicking on "Validate" button.
Review Order Details
Your final order details should look like this which would highly cheap than any other web hosting services. In my order page it shows $120.0 for 3 years hosting, domain and other useful services, addons.
Finally click on "Check Out" button and youre on pricing page.

Now pay using "Credit Card" or "Paypal" and enter your account dashboard
Installing WordPress
Youre on your HostGator Cpanel so scroll down the page until you reach "Software/Services" optionClick on "Quick Install" button
Choose "Blog software" as WordPress. Youre about to install the most popular and updated version of WordPress so click on "Install Now" button
This may take few seconds to install WordPress and you will see "Congratulations" message that you have successfully installed "WordPress" on your hosting
You can access your site by clicking on the link provided.
Go to link download
Monday, August 15, 2016
Setting up Custom Domain for Blogger Blog
Setting up Custom Domain for Blogger Blog
Blogger allows you to run a blog at free of cost. Unlike WordPress, you can use all the features and benefits from blogger without spending a single dollar. But if you would like to use a custom domain for your blog, then you have to purchase it from a third party domain registrar.
Few years ago, blogger had its own domain registrar and the users could purchase a domain from blogger dashboard. And it was very easy for the users to set a custom domain that time. But later blogger stopped providing custom domain service. So, the bloggers who would like to use custom domain for the blogs, should purchase domains from third party.
Setting up Custom Domain
Well for the new users domain set up process is little bit complex. But if you go step by step, then it wouldnt be so difficult.
First, you need to purchase a custom domain (Choose a domain name and register it. Before that, make sure the domain is available) from a domain provider. As you know, there are numerous domain hosting sites available, you can choose one which you prefer. Here I can list some of them:
- GoDaddy (Marks PC Solution is currently using it)
- Bluehost
- EasyDNS
- Hover
- Namecheap
And there are many other domain service providers throughout the web. You can find them by search with the words - Domain Registrar or Domain Provider etc. And the registration charge and renewal varies with the provider. I guess, you have to pay $10 to $15 per year for the domain name only.
Next, youve to set up your domain with the site. Hope youve already purchased the domain. Now follow the steps below:
- Go to Blogger Dashboard > Settings > Basics
- Then move to the Publishing > Blog Address > Hit on the Edit button
- Now type the domain URL youve registered i.e. www.markspcsolution.com (you must begin the URL with www)

- Hit on the Save button. Now you will see an error and two CNAMEs listed below. The first CNAME is same for all - Name being "www" and Destination "ghs.google.com". And the second CNAME varies person to person. Its a security CNAME. Example - Short token - 2mdsgfwgqzh3. Long token - gv-brhg3pungts8u7.dv.googlehosted.com.
- Now go to your domain hosting providers site and find DNS (Domain Name System) settings from the dashboard.
- Enter the first CNAME as - www for name, label or host. And ghs.google.com for destination, target or points to.
- Enter the second CNAME similarly. Enter the short and long security token. Set the TTL to 1 hour.
- For moving your naked domain to an actual site ( from markspcsolution.com to www.markspcsolution.com) you have to enter A records. Otherwise visitors may not access your site without using www.
- Now enter the domain name (i.e. markspcsolution.com) and list the IP addresses as shown in the "A" section. Youve to create 4 separate A records which point to 4 different Googld IPs:216.239.32.21216.239.34.21216.239.36.21216.239.38.21
- Now wait for about an hour to move to the final step. By this time your DNS settings will be activated.
- Again back to the blogger Settings > Basics > Publishing > Edit > Enter your custom domain URL > Hit Save. Thats it.
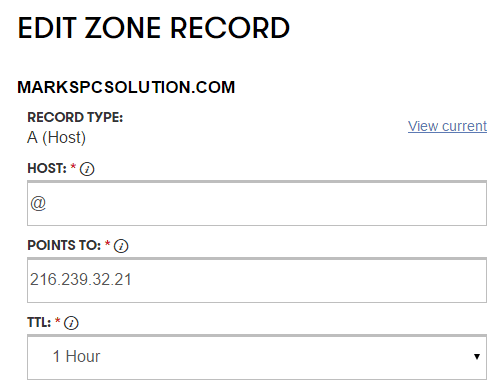
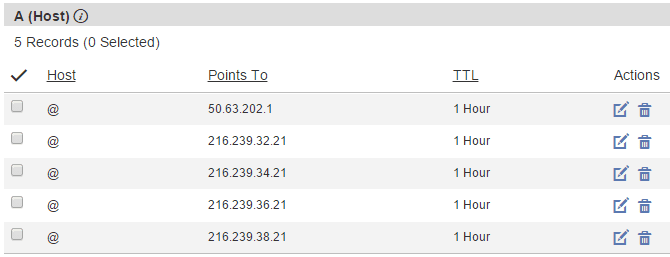
Wait wait wait! Dont be hurry. Dont be disappointed. It might take up to 24 hours to work properly. And then your blogspot site will be redirected to your custom domain.
If the custom domain doesnt work, there could be any problem in the settings. In that case, you can contact your domain registrar or take help from an expert.
You can also read bloggers support pages:
- How do I use a custom domain name for my blog?
- Create a CNAME record for my custom domain
Some Issues you should know regarding custom domain:
- All the backlinks you have with previous URL will no longer be counted.
- But you can still get visitors from old backlinks/ bookmarks as your previous URL will be redirected to the new URL.
- The link of all posts will be automatically converted to the new URL.
- Images youve used with the posts will be showing without any problem.
If you would like to know anything else, please knock me . . .
Stay with Marks PC Solution to get more interesting IT topics!
Go to link download
Subscribe to:
Posts (Atom)