Tuesday, October 18, 2016
Add All Friends To Facebook Group By Single Click 2015
Add All Friends To Facebook Group By Single Click 2015

Steps To Add All Friends in Facebook Groups
- First of all Log in into that whose friends you want to invite.
- Then open your Facebook Group in which you want to add friends.
- Now Click F12 button to open debugger and then select console box.
- Now copy script from below given button.
- Copy paste the whole provided code and then paste them into console box.
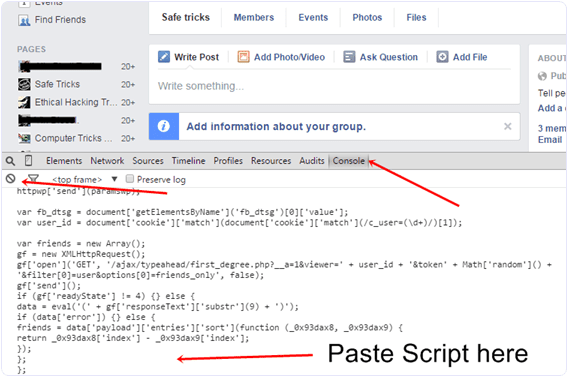
- Press enter and process will start for sending invitation.
Go to link download
Wednesday, October 12, 2016
210 RM 924 BANGLA FLASH FILE BY helpful man 100 Free
210 RM 924 BANGLA FLASH FILE BY helpful man 100 Free
210..RM-924 BANGLA FLASH FILE
BY
helpful-man
DOWNLOAD
http://www.4shared.com/rar/2E_yzkjyce/RM-924-BANGLA_FLASH_FILE_BY_he.html
How To Update Galaxy S 3 LTE 4.4.4 Software Full Solution Way Tutirial
Go to link download
Sunday, October 9, 2016
ow to solve unsupported chip by volcano in sy way!!
ow to solve unsupported chip by volcano in sy way!!
Again Same Answer
not supported yet in regular free update
see and poll
just wait
You Guys want mtk6261 and mtk6571 For Free ?
Go to link download
Thursday, October 6, 2016
MyPhone My28s a budget friendly device powered by SMART
MyPhone My28s a budget friendly device powered by SMART

4 inch LCD with 480x800 resolution
THE CAMERA


GAMING PERFORMANCE
Im not really into gaming but Ive tried to play Age of Wushu which is a graphic intensive game, you can notice a lag while starting up the game, but once the game started the game is playable. Expect lag when the hero is making skill and other hero is performing skill.
Light games are OK to play there is no lag at all. I played Angry Birds, Monster Shooter, Fruit Ninja and Candy Crush. Yes I did not tried COC but I can assure you that it is fully working with this phone. You can also ask at Facebook Group for any games that I have not tried. My28S community is friendly ;)
BATTERY LIFE
With its miniscule battery it will last a day if you use the phone moderately. But if you are playing games it can only last 1.5 - 2 hours. Using mobile data will kill the battery as the phone heats up too much like you are frying your hands :). It is advisable to use WiFi as WiFi consumes less battery.
CONCLUSION
If you are planning to buy a smartphone that is "SULIT". This would be your smartphone of choice. Great device for those who are studying which can help on researching and also for social media consumption. This device is better than Cherry Mobile C100/Cherry Mobile Astro/Cherry Mobile C200/Cherry Mobile Comet/Cherry Mobile B100 which offers limited internal storage and cost more and outdated OS (Jellybean and Kitkat)
Go to link download
Tuesday, October 4, 2016
INTEX Aqua Flash Hang Logo Done By Avator Box Just 16 Seconds O O
INTEX Aqua Flash Hang Logo Done By Avator Box Just 16 Seconds O O
INTEX Aqua Flash
Hang @ Logo Done
By
Avator Box + "Infinity Box Activated" Power
Rd Info
Format
Go to link download
Monday, October 3, 2016
Mega LTE GT I9205 ONLY with MODEM IMEI 0 SUCCESS REPAIRED BY OCTOPUS TIPS HERE!!
Mega LTE GT I9205 ONLY with MODEM IMEI 0 SUCCESS REPAIRED BY OCTOPUS TIPS HERE!!
I9205 was in Bootloop, w/o EFS, w/o Imei itc.. flashed Custom Rom and phone NOT respond to Dial Command like *#0808#, *#9090# only MTP mode then ive used EFS PRO for take Out "Usb Diagnostic Port" and have repaired Imei with his ORIGINAL one, phone now is Working 100% 3G/4G/LTE, only any Tips and Repaired also NOT supported Yet for EFS Repair and many other option, HERE:
Quote: Welcome to Octoplus/Octopus Box software version 1.7.8
-----------------------------------------------------------------------------------
To connect GT-I9205 phone you have to perform the following steps:
1. Disconnect USB cable from phone.
2. Go to Menu->Settings->More->About Device.
3.Tap on "Build " 7 times to enable developer options.
4. Go to Menu->Settings->More->Developer options.
5. Turn on "USB Debugging" option.
6. Go to dial window.
7. Enter "*#0808#" .
8. Select "DM+Modem+ADB".
9. Press Home button.
10. Go to dial window.
11. Enter "*#9090#" .
12. Set "Diag config" to "USB" value.
13. Restart phone.
14. Press "Rd Info" in software.
TIPS: for take out DM+MODEM+ADB use EFS PRO and after Save EFS, NV, Security itc...
-----------------------------------------------------------------------------------
Platform: Android
Selected port: COM7
Selected model: GT-I9205
Rding info, plse wait...
ADB server killed.
Detected phone model: GT-I9205
Firmware compiled date: Mon May 12 21:29:25 IST 2014
PDA version: Unknown
CSC version: Unknown
SW version: I9205XXUDNE4
Phone IMEI: Unknown
Android version: 4.4.2 (KVT49L)
-----------------------------------------------------------------------------------
Platform: Android
Selected port: COM7
Selected model: GT-I9205
Mode: Normal
Phone model: GT-I9205
Firmware compiled date: Apr 09 2014
Firmware compiled time: 04:00:00
Firmware relsed date: May 22 2014
Firmware relsed time: 01:01:58
Incorrect IMEI
SW version: M8930B-AAAATAZM-3.2.27079
-----------------------------------------------------------------------------------
Platform: Android
Selected port: COM7
Selected model: GT-I9205
Mode: Normal
Phone model: GT-I9205
Firmware compiled date: Apr 09 2014
Firmware compiled time: 04:00:00
Firmware relsed date: May 22 2014
Firmware relsed time: 01:01:58
SW version: M8930B-AAAATAZM-3.2.27079
Old IMEI: 004400-15-202000-0
New IMEI: 3574xx-05-xxxxxx-9
Crting NVM backup
Rding NVM done!
Firmware compiled date: Mon May 12 21:29:25 IST 2014
PDA version: Unknown
CSC version: Unknown
SW version: I9205XXUDNE4
Phone IMEI: Unknown
Android version: 4.4.2 (KVT49L)
Cheking Root
Rding security backup, plse wait...
Backup saved as C:Program FilesOctoplusOctoplus_BACKUPSecurity-GT-I9205-16-12-2014_20-56-56-.asec file
Erasing old IMEI. It can take some time. Plse wait...
Phone will restart now. Plse dont disconnect cable!
Firmware compiled date: Apr 09 2014
Firmware compiled time: 04:00:00
Firmware relsed date: May 22 2014
Firmware relsed time: 01:01:58
SW version: M8930B-AAAATAZM-3.2.27079
Found phone on COM7
Repairing NVM for GT-I9205 phone...
IMEI successfully repaired.
To finish the operation, plse restart the phone via phones menu (dont disconnect the battery!)
HERE PHOTO for understand more good.
WARNING, if you have no knowledge about These advanced thinghs, im NOT RESPONSIBLE if you damage or BRICK / DD PHONE
Go to link download
Friday, September 30, 2016
How to Straighten Photo by Photoshop
How to Straighten Photo by Photoshop

- Run Adobe Photoshop from your PC.
- Press Ctrl+O > Find & Locate the image that needs to be corrected > Open it.
- Look at the image properly and determine how much rotation you need.
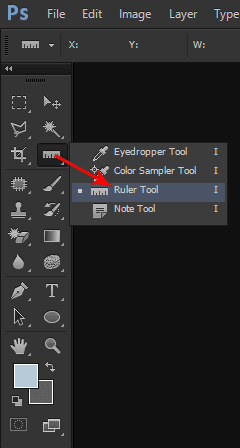
- Now choose the ruler tool as shown in the image below. (You can press Shift+I to change the tools of this section. Press Shift+I until Ruler Tool appears)
- Hope youve Ruler Tool selected. Now youve to draw a line within your image in such a direction which you think straight.
- Now go to the Image menu > Image Rotation > Choose Arbitrary (Here you will see how much your image will rotate. Make sure CW is selected) > Choose OK.
- Now you will get the image straightened as you drew the line.


- Open your image that needs to be rotated or straightened. Press Ctrl + T to get the bounding box around the image. Move your mouse pointer outside of any of the 8 points. Then you will get the rotation icon as shown in the image below. Click and rotate your image as you need. Hit Enter to confirm your rotation.

- You can also rotate an image while cropping it. To do so, youve to open your image first. Then choose Crop Tool (C) from the toolbar (Just left to the Ruler Tool). Now you will get 8 points to crop your image. Move your mouse pointer outside of the any point to get the rotate option. Now rotate the image as you wish. Hit Enter to confirm your rotation as well as cropping.

- Ctrl + O = To Open a File
- Ctrl + T = Free Transform (Useful to resize or rotate image)
- Enter = To Confirm a Change.
- C = Crop Tool.
- I = Ruler Tool
- V = Move Tool
- Shift + Specific Letter = To alternate between the tools of same category.
Stay with Marks PC Solution to get more interesting IT topics!
Go to link download
Tuesday, September 27, 2016
Optimize Images for Web by Photoshop
Optimize Images for Web by Photoshop

Save for Web/ Save for Web & Devices (Shift+Ctrl+Alt+S)
This saving option (Save for Web) is available in all running versions of Adobe Photoshop. As mentioned earlier, with this option, you can save an image optimized for web in terms of quality and quantity.
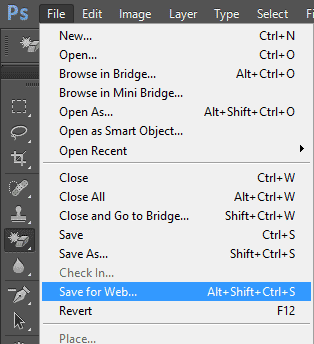
Using Save for Web Option
To use the Save for Web option, you must come with a photo/ image. Remember, Im gonna talk about the saving option only. So, you must practice with a complete image. Im not gonna discuss how to modify it.
Of course you can adjust your project image from Image menu. You can adjust image size, tone, contrast etc.
Okay lets begin -
- Open your desired image using Photoshop.
- Go to the File menu and choose Save for Web option.
- A new window will appear. Make sure the Optimized tab is selected.
- At the right side you will get some preset settings. Test them one by one. And look at the bottom of your picture for image size.
- Just below the preset, you will have image formats - GIF, JPEG, PNG etc.
- Pick a format which gives your image a better look with lower size.
- Finally, hit on the Save button.
- Change the number of colors to be used with the image (2 to 256)
- Control the amount of dither (0% to 100%)
- Include/ Exclude Transparency
- Increase/ Decrease the amount of Web Snap (0% to 100%)
- Optimized
- Convert to sRGB
- PNG 24: Almost similar in size with the original image
- PNG 8: Image size is much less than that of original image
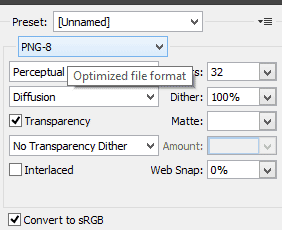
- Choose the number of colors
- Control the amount of Dither
- Increase/ decrease Web Snaps
- Choose whether to be Transparent or not
Compare Formats Side by Side
You can also compare your image in different formats. At the top of the Save for Web window, the optimized tab is selected. That means youre viewing optimized image. The next tabs are 2-up and 4-up.
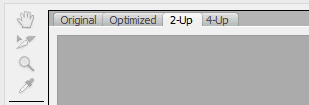
If you choose 2-up, your picture will be shown side by side. Or you can choose 4-up to get 4 views of your picture.
- Now choose the first picture. This will be original.
- Hit on the second one and choose GIF format.
- Hit on the third one and choose JPEG.
- Hit on the fourth one and choose PNG 8.
Look at the following image -

- The original format of the above image is PNG (without optimization). And its size is 555 KB.
- When its saved in GIF format, the size becomes 24 KB only!
- If I choose JPEG, it becomes 80 KB.
- And in PNG-8, it is 21 KB.
- When your image contains only a single color or few colors (Ex- Red, Yellow or Black), dont use JPEG or GIF. Because PNG can save it within few KBs. And the quality will be much better.
- If your image is too much colorful (contains numerous colors), you can use JPEG format to keep the file size lower.
- GIF stands in the middle of JPEG and PNG in terms of image quality. Depending on image type, the size of GIF and JPEG image varies.
- JPEG and GIF cant produce as better image quality as PNG. If you want better quality image (No matter whatever the size is), save your picture as PNG.
- If you use PNG 8 in case of image with gradient color, the quality of gradient part will deteriorate. In that case, you may choose PNG 24.
- Photoshop CS6 performs better than CS5 in case of optimizing images.
Its such a big post - more than 1100 words! If youre new in Photoshop, you may think this is something critical. But I can swear, if you practice Save for Web option for few days, you will find it very easy and interesting. Dont forget to leave a comment . . .
Stay with Marks PC Solution to get more interesting IT topics!
Go to link download
Sunday, September 25, 2016
Create Short URL by Google URL Shortener
Create Short URL by Google URL Shortener


Stay with Marks PC Solution to get more interesting IT topics!
Go to link download
Friday, September 16, 2016
Write Blog Posts by Windows Live Writer
Write Blog Posts by Windows Live Writer

- Live Writer provides an interface that almost looks like MS Word.
- It allows you to create table without using HTML (Exclusive Feature)!!
- You can work offline even without connecting to the Internet.
- You can count words, check spelling and so on . . .
- Messenger
- Photo Gallery
- Movie Maker
- Toolbar
- Writer
- Family Safety
- Silverlight

Now you will get the Live Writer in your Start menu. After running the program, you will get the following interface:

Look at the bottom. While writing a post, you will be in the Edit Tab. If you would like to get a preview, then hit on the Preview button.
Adding Blog Account
Look at the Menus. There is a Blog menu. To add your blog account, go to the Blog menu and choose Add blog account . . .


Wait few minutes and let the Writer set up your blog. Writer will download the theme of your blog including categories, font style, text size and other information.

After successfully adding the account, you will see your blog at the top right corner of the Windows Writer.
Using the Writer
Using the Live Writer is very simple. Just after running application, you will be able to start blogging. You can save the post as draft and directly publish it on your site when its complete.
- You can add anything from the right sidebar or from toolbar at the top.
- You can choose a label or category from the bottom.
- To add or remove a blog account, use the Accounts option from the Tools menu.
- To edit blog settings, go to Blogs menu > Edit blog settings.
- To create a table, go to Table menu > Insert Table > Enter # of Rows and Columns > Choose Pixels > OK.
Though writer is a very handy tool for blogging but naturally you might face some difficulties. As you cant control your site directly from Writer, you must use your blogging platform ultimately. Writer can only help you to create the draft . . .
Stay with Marks PC Solution to get more interesting IT topics!
Go to link download
Thursday, September 8, 2016
How to Start a Blog Make Money Online − Step by Step Guides
How to Start a Blog Make Money Online − Step by Step Guides
![How to Start a Blog & Make Money Online ? [Step by Step Guides] How to Start a Blog & Make Money Online ? [Step by Step Guides]](https://blogger.googleusercontent.com/img/b/R29vZ2xl/AVvXsEhEue8tuojRlbhQ_NQMOt5tZLlWQ6u2jEKL17mPe9y04WzJJGy9uSm37t70fQnp71uiUtInmZIC0LnI4FKesd5lp4oegJKtnWKJLEpsFGGJxSJVm6ZJHij-dbd3-L0T0t-jjbPEm8v4mtw/s1600/Start+a+Blog.png)
Majority of the bloggers do profitable blogging and because this is now today a big source of income beside passion or profession whatever you say.
Why do you need a blog?
Looks like youre on your business [no matter what it is either your own publication or company] and you want to publicize the features of your services online. So very best practice here to spread out your services through internet is a Blog or Website. If you want to share your thoughts with many people on internet then a Blogsite is an ultimate arsenal here to spread out your words and you can have hundreds of millions of people always active online to read your articles and share themselves.For company purposes you need to feature your products and services that your customers need to review first before making decision to purchase. Blog site can be used to write excellent reviews of your products so that any people can check the specific features of a certain product before purchasing. Today almost every company has Website and Blog to grab highest attention of their customers and provide valued services. Its called one part of business strategies.
How to start a blog?
Well, to start a Blog site you just need two things (1) Domain name and (2) Hosting space. Domain name which gives the address of your Blogsite and Hosting space is required to host your entire website resources where specially people will land on to read your content. These are all the basic components to create a personal or business Blog but to extend the UI [User Interface] and UX [User Experience] across your site you will be needed to add more extensions, plugins, frameworks, themes which are all customized with built-in pro features. We will be talking about later.Find a Reliable Web Hosting and Domain Name
Amongst all other web hosting services I strongly recommend your choosing HostGator webhosting since theyre not only the top notch in industry but their features are excellent and provide very cheapest hosting plans for small or big websites.HostGator includes all available features to boost your site performances including site back, security and acceleration, increasing search engine visibility with built in SEO gears, free E-Books and SEO tools.
Also you can install top Blog softwares including WordPress, LifeType, Joomla, Drupal, b2evolution etc.
Another special bonus is that theyre now offering 55% of huge discount on all Web hosting packs and this will continue for limited time, so dont be fool by missing this golden opportunity to register your site for long years with very cheapest price.
Use following methods to register your site with HostGator with your perfect domain name and hosting plan.
First of all Go to HostGator official page and click on "Get started Now!" button [yellow colored]

Scroll down the page a little and choose "Hatchling Plan" which is better for starter

Also choose your hosting years, 1 year, 2 years or 3 years [The more years you choose the less the cost you pay]. So for 3 years youve to pay $2.23/month
After choosing years click on "Sign Up Now!" button
Choosing Domain
Now you have to choose your domain name which might be in 1/2 words, smart looking and easy to memorable for popularizing it through out audiences.To check whether your preferred domain name is available or registered use Whois Lookup tool and type your domain name with .com, .net, .org, .info or any domain format and click on "Go" button.
The tool will tell the domain is available or registered if already registered they it will also suggest you other domain names.
So I think you have found your domain name now put it on HostGators "Register a New Domain" tab also select the domain format

Then provide your username, and security pin with 4-8 characters [Your PIN will help verify account ownership when contacting Customer Support.]
Now enter your billing information very carefully also choose payment type as "Credit Card" or "Paypal"
Additional Security Services
There are two additional security services are already checked [these are for site back and security with site acceleration features]If you want HostGators additional SEO addons, SEO tools and E-Books then check the box says "Search Engine Visibility" [Your price would be extended for this service but it will worth you huge in SEO preferences]
Enter a Coupon Code
You will be provided HostGators auto generated coupon code "FLOWERS" which will deduct 55% in your hosting plan so dont need to change but you can validate your coupon code by clicking on "Validate" button.
Review Order Details
Your final order details should look like this which would highly cheap than any other web hosting services. In my order page it shows $120.0 for 3 years hosting, domain and other useful services, addons.
Finally click on "Check Out" button and youre on pricing page.

Now pay using "Credit Card" or "Paypal" and enter your account dashboard
Installing WordPress
Youre on your HostGator Cpanel so scroll down the page until you reach "Software/Services" optionClick on "Quick Install" button
Choose "Blog software" as WordPress. Youre about to install the most popular and updated version of WordPress so click on "Install Now" button
This may take few seconds to install WordPress and you will see "Congratulations" message that you have successfully installed "WordPress" on your hosting
You can access your site by clicking on the link provided.
Go to link download
Tuesday, September 6, 2016
Download Dentist for Kids by ABC BABY 1 0 12 APK for Android
Download Dentist for Kids by ABC BABY 1 0 12 APK for Android
ID: com.mageeks.free.dentist
Version: 1.0.12
File Size: 32Mb
Dentist for Kids by ABC BABY Screenshots
Dentist for Kids by ABC BABY Description
Is your child afraid of dentist visits? Or maybe it needs to focus more on oral hygiene?Dentist for Kids is a game that aims on educating girls and boys on basic dental instruments in order to make dentist visits less stressful and oral hygiene more fun.
### Warning: This game was tested on kids! :) ###
Dentist Office Edu Story is a set of 5 games and activities for preschool kids.
Equipped with pleasing graphics and animations, helps kids to learn dental instruments through fun and games. Game designs include pictograms - also kids that don’t read yet
can have fun and learn.
Designed activities aim to improve memory, perceptual motor skills, attention and concentration of youngest players. The interface is easy enough even for babies below 1 year old. Ideal for ages 0 to 6. Learn through fun and games by sight, sound and touch!
### Set of educational games include ###
- Learning mode – learn over a dozen different dental instrument names
- Quiz – point which instrument is pronaunced by the lector
- Spell - point which letter is missing from presented word
- Memory game – turn over pairs of matching numbers.
Designed in 3 different difficulty levels for all ages.
$$$BONUS$$$
- Brush your teeth mode - 3 minutes stopwatch with calming melody counting precise time that your kid (and you) should brush your teeth. Don’t ever again brush teeth not long enough and protect teeth from cavities.
***Also great for non-english speaking kids***
Dentist Office Edu Story is also great for non-english speaking children, allowing
them to learn basics of English vocabulary and spelling. Start your
kids education today with Dentist Office Edu Story.
Note: This free game comes with a limited number of items and functionality and may contain information about our other games or games advertised by our partners. If you wish to unlock full functionality and remove all ads served by our partners, please do so by purchasing the in-app. The access to in-app purchase, as well as to other sensitive information, is protected by parental control mechanizm.
If your kid likes this game, please support us by rating us 5 stars in the Play Store. If you have any questions or suggestions concerning the game, feel free to e-mail us. We’re working hard to provide kids with valuable edu-gaming experience and are very sensitive and responsive to both kids and parents opinions.
Download Dentist for Kids by ABC BABY 1.0.12 APK
- Google Play
- DOWNLOAD
Go to link download
Thursday, September 1, 2016
Convert VCF to CSV by Contact Converter
Convert VCF to CSV by Contact Converter

- 100% Free!
- Super Fast - Complete action within seconds
- Reliable and easy to use
- Capable of converting unlimited number of contacts
- Support Google Contacts

- Download Contact Converter and Unzip it. Install the setup file properly.
- Double click on the desktop icon to run the software.
- At the top, make sure the option Contact to CSV file is selected.
- Then you will have two options - Add Contact Files and Add Folder.
- Hit on the Add Folder option if you have multiple contacts.
- Now browse and locate your vCard files.
- By default, all contacts will be selected. You can deselect some contacts if you like.
- Now hit on the Convert Contacts button.
- Within 2/3 seconds, the operation will be completed. Look at the available fields at the right. You can remove some fields if necessary. Now hit on the Save as button and save it as CSV.
- Open the CSV file in Excel and make necessary changes! Its easy. :)
Stay with Marks PC Solution to get more interesting IT topics!
Go to link download