Showing posts with label photoshop. Show all posts
Showing posts with label photoshop. Show all posts
Friday, September 30, 2016
How to Straighten Photo by Photoshop
How to Straighten Photo by Photoshop
When you scan an image, most of the times it may not be straight. Or when you take a shot, the photo may not be straight along with the horizon. In that case, you can automatically correct the deviation using Photoshop. You have to use both Ruler Tool and Image Rotation option.
Applies to
Ive tested this tutorial on Adobe Photoshop CS5 and CS6. And I think it will work fine with previous versions of Photoshop.
Lets Start -
- Run Adobe Photoshop from your PC.
- Press Ctrl+O > Find & Locate the image that needs to be corrected > Open it.
- Look at the image properly and determine how much rotation you need.
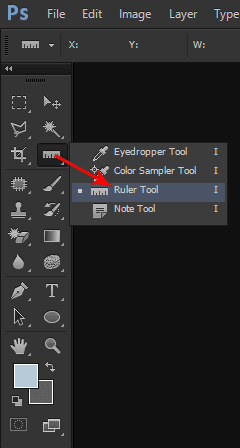
- Now choose the ruler tool as shown in the image below. (You can press Shift+I to change the tools of this section. Press Shift+I until Ruler Tool appears)
- Hope youve Ruler Tool selected. Now youve to draw a line within your image in such a direction which you think straight.
- Now go to the Image menu > Image Rotation > Choose Arbitrary (Here you will see how much your image will rotate. Make sure CW is selected) > Choose OK.
- Now you will get the image straightened as you drew the line.
Illustration
Suppose youve scanned the following image. But it needs to be straightened. Open the image in Adobe Photoshop. Choose Ruler Tool and draw the line as shown in the image above.

Now go to the Image menu > Image Rotation > Choose Arbitrary > Choose OK. Now your image will be automatically straightened. And you will get the following result -

Note: you can draw the line through Ruler Tool at any part of the image. Not necessary that you must draw the line at the top. But choose a part to draw the line that helps you understand how much rotation is needed.
Rotate/ Straighten Image Manually . . .
You can also rotate image manually. There are several ways you can follow for this purpose:
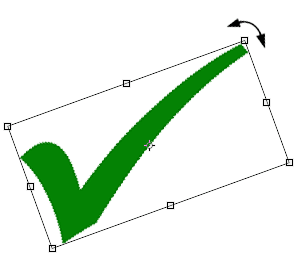
- Open your image that needs to be rotated or straightened. Press Ctrl + T to get the bounding box around the image. Move your mouse pointer outside of any of the 8 points. Then you will get the rotation icon as shown in the image below. Click and rotate your image as you need. Hit Enter to confirm your rotation.
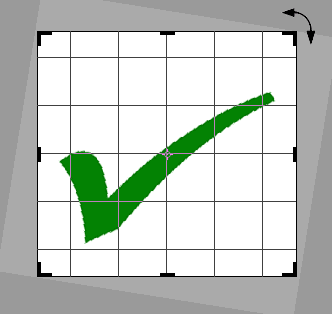
- You can also rotate an image while cropping it. To do so, youve to open your image first. Then choose Crop Tool (C) from the toolbar (Just left to the Ruler Tool). Now you will get 8 points to crop your image. Move your mouse pointer outside of the any point to get the rotate option. Now rotate the image as you wish. Hit Enter to confirm your rotation as well as cropping.
Keyboard Shortcuts Used in this Tutorial
- Ctrl + O = To Open a File
- Ctrl + T = Free Transform (Useful to resize or rotate image)
- Enter = To Confirm a Change.
- C = Crop Tool.
- I = Ruler Tool
- V = Move Tool
- Shift + Specific Letter = To alternate between the tools of same category.
Hope youve enjoyed this post. If you face any problem, dont hesitate to leave a comment below . . .
Stay with Marks PC Solution to get more interesting IT topics!
Go to link download
Wednesday, September 28, 2016
Working with Photoshop History Brush Tool
Working with Photoshop History Brush Tool
Adobe Photoshop has been famous for some exclusive tools. History Brush Tool is one of them. With this tool you can switch between the different states of an image during the current working session. And this tool is mush if you wanna change the color of dress of a person. Lets explore this tool . . .
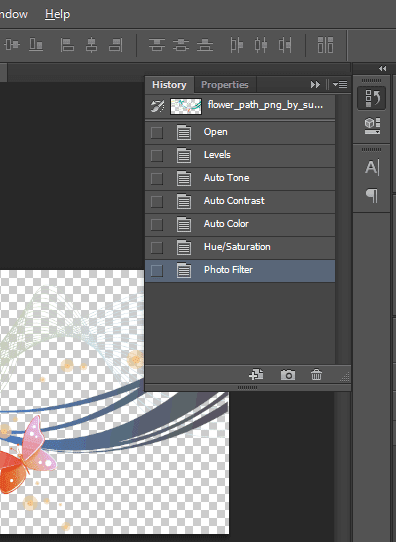
Photoshop History Option - Window > History
After opening a new Photoshop Document, it creates a history of it. And every time you make a change to this document, it creates a new history. And Photoshop is capable of saving last 20 histories of your document.
Suppose youve opened an image in Photoshop. If you change its color, it will be history 1. If you type something, it will be history 2. If you erase any part or add something, it will be history 3.
Another thing is, Photoshop is not good for undo (Ctrl + Z). By pressing Ctrl + Z, you can go one step back at best. History Brush Tool is the actual way to go back to your previous states.
Go to Window Menu > and Choose History to check your document histories.
History Brush Tool - Y
History Brush Tool is marked on the following image. Keyboard shortcut for this tool is Y. There are two tools. Our focus is the first one.
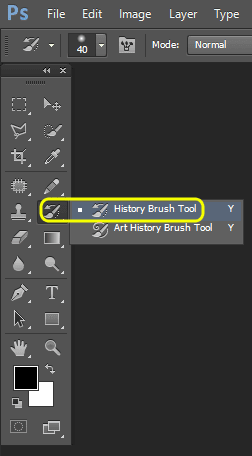
With this tool, you can go back to previous states of an image. When you need to use this tool, simply click on it and your mouse pointer will be turned into a circle. You have to paint using this circle.
The portion of your image gets the touch, it will be back to its original states. You can increase the circle size by pressing ] key. And [ key will decrease its size.
Always Remember
History Brush Tool will not work if you increase or decrease the size of your image during the current working session. So, before working with History Brush Tool, make sure that your image size is okay.
If you need to change the image size, do it first. Then save the image. And open it again using Photoshop.
How Do you Use it?
Ive already illustrated the use of History Brush Tool in my previous post - Changing Dress Color. And here you will learn how to choose a specific history.
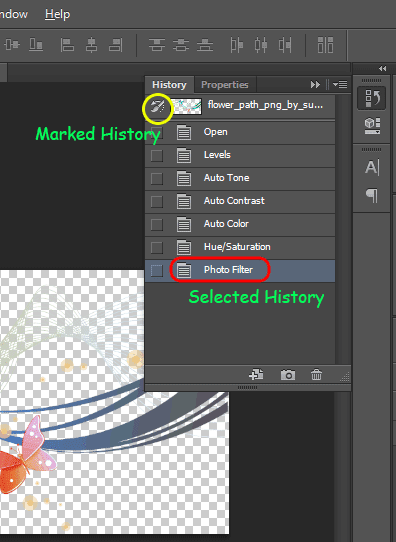
Look at the above image again. There are 07 histories of an image except the original state. And Photoshop has also named the each history properly. And the last history is selected automatically.
If you click on any previous history, your image will go back to that state.
And also notice that every history got a check box at the left. And the check box of original state is selected by history brush tool icon. That means, if you start painting by history brush tool, the painted area will go back to the original state.
Keep two things in your mind.
- Which history is selected
- Which history is marked
The selected history is your current look. And your image will take the look of marked history if you paint using using history brush tool.
I know its bit tough to understand without video tutorial. But I think you will find it easy after trying few times. Good luck . . .
Stay with Marks PC Solution to get more interesting IT topics!
Go to link download
Tuesday, September 27, 2016
Optimize Images for Web by Photoshop
Optimize Images for Web by Photoshop

Adobe Photoshop is a widely accepted tool for working with photos and images. For better printing and viewing experience we save images with high quality and resolution. And it makes the image large in size. If you use heavy images in website, blog or social networking sites, that causes the site to load slower. But you can easily optimize the images before uploading without sacrificing quality!
Today Im gonna write about the Save for Web option of Photoshop. With this saving option, you can optimize your images. You can also reduce the size of those images which are unnecessarily large.
And definitely optimized images will save internet bandwidth as well as time. And if youre a site owner, you must practice using optimized images on your site. If your site loads faster, you will get more traffic. And always keep in mind - slower sites are always boring for the users and thus they cant retain visitors.
Save for Web/ Save for Web & Devices (Shift+Ctrl+Alt+S)
This saving option (Save for Web) is available in all running versions of Adobe Photoshop. As mentioned earlier, with this option, you can save an image optimized for web in terms of quality and quantity.
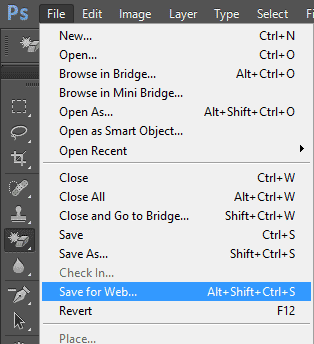
Using Save for Web Option
To use the Save for Web option, you must come with a photo/ image. Remember, Im gonna talk about the saving option only. So, you must practice with a complete image. Im not gonna discuss how to modify it.
Of course you can adjust your project image from Image menu. You can adjust image size, tone, contrast etc.
Okay lets begin -
Compare Formats Side by Side
You can also compare your image in different formats. At the top of the Save for Web window, the optimized tab is selected. That means youre viewing optimized image. The next tabs are 2-up and 4-up.
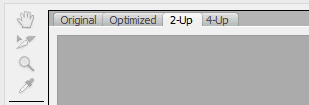
If you choose 2-up, your picture will be shown side by side. Or you can choose 4-up to get 4 views of your picture.
Its such a big post - more than 1100 words! If youre new in Photoshop, you may think this is something critical. But I can swear, if you practice Save for Web option for few days, you will find it very easy and interesting. Dont forget to leave a comment . . .
Save for Web/ Save for Web & Devices (Shift+Ctrl+Alt+S)
This saving option (Save for Web) is available in all running versions of Adobe Photoshop. As mentioned earlier, with this option, you can save an image optimized for web in terms of quality and quantity.

Using Save for Web Option
To use the Save for Web option, you must come with a photo/ image. Remember, Im gonna talk about the saving option only. So, you must practice with a complete image. Im not gonna discuss how to modify it.
Of course you can adjust your project image from Image menu. You can adjust image size, tone, contrast etc.
Okay lets begin -
- Open your desired image using Photoshop.
- Go to the File menu and choose Save for Web option.
- A new window will appear. Make sure the Optimized tab is selected.
- At the right side you will get some preset settings. Test them one by one. And look at the bottom of your picture for image size.
- Just below the preset, you will have image formats - GIF, JPEG, PNG etc.
- Pick a format which gives your image a better look with lower size.
- Finally, hit on the Save button.
Now I would like to discuss about image formats:
GIF - Graphics Interchange Format
One of the most common image formats used by the webmasters. GIF is great for saving animated images. You can also save images with transparent background through GIF. If you choose GIF format you can -
- Change the number of colors to be used with the image (2 to 256)
- Control the amount of dither (0% to 100%)
- Include/ Exclude Transparency
- Increase/ Decrease the amount of Web Snap (0% to 100%)
And you should mark the Convert to sRGB check box.
Try each option by yourself. You must focus both on image quality and file size. Before saving the image, you can hit on the preview button just at the bottom of the window.
JPEG - Joint Photographic Experts Group
The most widely used image format all over the world. JPEG is an image format which is supported by everywhere. If a website supports only one image format, definitely it will be JPEG. If a device can display only a single image format, it will be JPEG. So, you can easily understand how popular it is.
If you use JPEG, you can control the image quality from 0 to 100 (Low to Maximum). And you should select the following options:
- Optimized
- Convert to sRGB
PNG - Portable Network Graphics (My Personal Choice)
PNG is a very common format for saving icons or logos. Its also great for saving pictures with transparent background. PNG produces much better quality than GIF or JPEG. Thats why I prefer PNG format.
In Save for Web option, you will find two types of PNG -
- PNG 24: Almost similar in size with the original image
- PNG 8: Image size is much less than that of original image
So, I suggest you to use PNG 8. Because PNG 24 will save your image normally without any optimization.
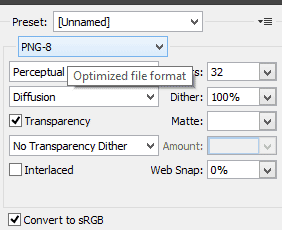

If you choose PNG 8, you can -
- Choose the number of colors
- Control the amount of Dither
- Increase/ decrease Web Snaps
- Choose whether to be Transparent or not
And dont forget to mark the option - Convert to sRGB.
Compare Formats Side by Side
You can also compare your image in different formats. At the top of the Save for Web window, the optimized tab is selected. That means youre viewing optimized image. The next tabs are 2-up and 4-up.

If you choose 2-up, your picture will be shown side by side. Or you can choose 4-up to get 4 views of your picture.
- Now choose the first picture. This will be original.
- Hit on the second one and choose GIF format.
- Hit on the third one and choose JPEG.
- Hit on the fourth one and choose PNG 8.
Now you can compare the 4 views. Check which one is better in quality and lower in size. Select one which is better. And then save the picture.
Look at the following image -

Look at the following image -

- The original format of the above image is PNG (without optimization). And its size is 555 KB.
- When its saved in GIF format, the size becomes 24 KB only!
- If I choose JPEG, it becomes 80 KB.
- And in PNG-8, it is 21 KB.
Of course the file size may vary depending on the number of colors, Amount of Dither, Web Snap etc.
You must know some facts: (My personal experience)
- When your image contains only a single color or few colors (Ex- Red, Yellow or Black), dont use JPEG or GIF. Because PNG can save it within few KBs. And the quality will be much better.
- If your image is too much colorful (contains numerous colors), you can use JPEG format to keep the file size lower.
- GIF stands in the middle of JPEG and PNG in terms of image quality. Depending on image type, the size of GIF and JPEG image varies.
- JPEG and GIF cant produce as better image quality as PNG. If you want better quality image (No matter whatever the size is), save your picture as PNG.
- If you use PNG 8 in case of image with gradient color, the quality of gradient part will deteriorate. In that case, you may choose PNG 24.
- Photoshop CS6 performs better than CS5 in case of optimizing images.
Its such a big post - more than 1100 words! If youre new in Photoshop, you may think this is something critical. But I can swear, if you practice Save for Web option for few days, you will find it very easy and interesting. Dont forget to leave a comment . . .
Stay with Marks PC Solution to get more interesting IT topics!
Go to link download
Friday, September 23, 2016
Change Dress Color Using Photoshop!!
Change Dress Color Using Photoshop!!

Some little tricks of Adobe Photoshop may enable you to perform extraordinary works. Even you can prove yourself as magician to common people. Today Ive come with such tricks which will help you to change the color of dress without hurting the background and subject of the image . . .
Before you start, please have a look at this post also -
Use Hue/ Saturation to Modify Color in Photoshop
Requirements:
- Adobe Photoshop (Im using version CS6)
- A good quality photo of a person
- Basic knowledge of Photoshop
Step 1 | Choose an Image

Step 2 | Change the Color
Open your image using Photoshop. And do the following tasks -
- Go to the Image Menu > Adjustment > Hue/ Saturation [Ctrl + U]
- Move the Hue slider to left or right.
- Also move the Saturation and Lightness slider (Optional)
When you get the desired dress color, hit OK.

Ive used 100 in Hue option and left the other fields as they are. It brings me the following result:

Now compare it with the first image. This lady got a completely new dress. But Oh My God! What happened to her face and skin? And what about the background?
Okay weve nothing to worry about until we have Photoshop. Now Ive to take some parts of this image back to its original look.
Step 3 | History Brush Tool
At this step, weve to do some works manually. Except the dress, other parts of the image (Face, Hair, Skin & Image background) should be taken to their previous stage.

Look at the above Tool of Photoshop. This is our Trump Card. With this History Brush Tool, you can simply paint the area that needs to be backed to its previous stage.
The keyboard shortcut of this tool is Y.
As soon as you choose History Brush Tool, you will get a circle. Start painting over your image. Press this key [ to decrease the brush size and press this ] to increase.

Here Ive just touched the upper left corner of the image. After painting the whole area except the dress, the final result is as below -

Ive edited this image within a very short time. But if you practice properly and spend little more time, hopefully you will get much better result.
Hope it will help you all. In my next post, I will write more on History Brush Tool. Till then, stay with Marks PC . . .
Caution!
No photo of this tutorial can be used anywhere in the web, print or any other media.
Model: Rizwana, Computer Engineer.
Stay with Marks PC Solution to get more interesting IT topics!
Go to link download
Friday, September 16, 2016
Photoshop Typing Techniques
Photoshop Typing Techniques

The general thinking about Photoshop is its a photo and image editing tool. The notion is not wrong at all. But Photoshop also allows you to work with text. Believe it or not, Photoshop has some extraordinary options which are not available even in Microsoft Word! Today Im gonna share some tips on Photoshop Typing.
Type Tool (T)
If youre familiar with the Photoshop Interface, you should know about type tool. Its found in the tools panel and it looks like T. Look at the image below:

Here you can see the type tool along with its four variations. But the first one, I mean Horizontal Type Tool is the mostly used option here. And you can use Vertical Type Tool when the text needs to be typed vertically.
You can also see Type Mask Tool. When you type something normally, the text appears in a new layer. But if you type something using the type mask tool, the text will appear in the background layer. It prevents the text to create a new layer!
Using the Type Tool
To start typing in Photoshop, first you have to create a new document. Now press T to enable the type tool or you can simply hit the type tool icon through mouse.
Now your mouse pointer will take the shape of an I beam. Hit on the any part of your document and you will get a cursor. Start typing!

Just below the Menu bar, you will get the text formatting options. Here you can change font, font style, font size, text alignment etc. And look at the marked icon at the right - T with a Curve below. Its the wrap text option. Just select your text and hit on this button. Choose different styles and see the magic!
Note: Type tool must be selected to get the formatting bar below the Menus. Or you will not get this bar.
Type as Text Box
Word users know well about text box. Type tool can also be used as text box. After choosing the Type tool, press and hold down the mouse pointer in the document and then drag it. You will get a bounding box with cursor. Now you can type within this box.


Now you can format the above text easily. Choose Move Tool (V) to move the text. Press Ctrl+T to get the bounding box back, and you can increase or decrease the text size just by dragging the corner. You can also rotate the whole text through rotation dragging it from any corner.
If you wanna edit the text, simply press T, and you will get the cursor back. After editing the text, you can simply press the move tool to commit changes. Or you can hit on the Tick Mark (Commit any current change) to make changes. If you wanna cancel then hit on the cancel button. (These two options will be available just below the cross button at the upper right corner)
Choosing the Color
To choose a desired color for your text, you have to use the color picker from the toolbar. You will get the color picker at the bottom of the left toolbar.
First, select your text > Hit on the Color picker > Select a color area you want > Hit OK.
Or you can simply select the text layer > choose color from Color Picker > Hit OK > Now press Alt+Del key to change the color.
Working with Paragraph and Character Panel
These two options will give you more options to format your text. You can enable character and paragraph options from shortcut icons as shown below -

The shortcuts for these options are marked here. But if your interface is missing of these icons anyhow, you can directly go to the Window menu. Then choose Character or Paragraph which you need.

Select your text and try the each option of the character by yourself. There are some great options for your text like - Vertical Scale, Horizontal Scale, Subscript, Superscript etc. Just try each button one by one.
You can also try the options of Paragraph window. Its a great tool to adjust your text and fix the text alignment.
Wrap Text
Its somewhat like Word Art option of Microsoft Word. But of the effects of wrap text are not available in Word Art. Look at the Wrap Text option in Photoshop Formatting bar -

First you have to select your text. Then click on the above icon to get Wrap Text window. Now you can try each option.

Choose the effects from the Style. Then adjust bend, horizontal distortion and vertical distortion to get a more customized look. Hit OK when youre done.
Hope this post will guide you when typing in Photoshop. If you face any problem, please knock me . . .
Note: All options and images of this post are compatible with Adobe Photoshop CS5. Older versions of Photoshop may slightly vary.
If you wanna edit the text, simply press T, and you will get the cursor back. After editing the text, you can simply press the move tool to commit changes. Or you can hit on the Tick Mark (Commit any current change) to make changes. If you wanna cancel then hit on the cancel button. (These two options will be available just below the cross button at the upper right corner)
Choosing the Color
To choose a desired color for your text, you have to use the color picker from the toolbar. You will get the color picker at the bottom of the left toolbar.
First, select your text > Hit on the Color picker > Select a color area you want > Hit OK.
Or you can simply select the text layer > choose color from Color Picker > Hit OK > Now press Alt+Del key to change the color.
Working with Paragraph and Character Panel
These two options will give you more options to format your text. You can enable character and paragraph options from shortcut icons as shown below -

The shortcuts for these options are marked here. But if your interface is missing of these icons anyhow, you can directly go to the Window menu. Then choose Character or Paragraph which you need.

Select your text and try the each option of the character by yourself. There are some great options for your text like - Vertical Scale, Horizontal Scale, Subscript, Superscript etc. Just try each button one by one.
You can also try the options of Paragraph window. Its a great tool to adjust your text and fix the text alignment.
Wrap Text
Its somewhat like Word Art option of Microsoft Word. But of the effects of wrap text are not available in Word Art. Look at the Wrap Text option in Photoshop Formatting bar -
First you have to select your text. Then click on the above icon to get Wrap Text window. Now you can try each option.

Choose the effects from the Style. Then adjust bend, horizontal distortion and vertical distortion to get a more customized look. Hit OK when youre done.
Hope this post will guide you when typing in Photoshop. If you face any problem, please knock me . . .
Note: All options and images of this post are compatible with Adobe Photoshop CS5. Older versions of Photoshop may slightly vary.
Stay with Marks PC Solution to get more interesting IT topics!
Go to link download
Thursday, September 8, 2016
Use Hue Saturation to Modify Color in Photoshop
Use Hue Saturation to Modify Color in Photoshop

Adobe Photoshop offers some extraordinary photo editing tools that make it a great program to the users. Hue/ Saturation is one of them. With this tool you can modify the color of your photos and images. Lets explore this tool . . .
Necessary Tools
- Adobe Photoshop (I prefer CS5 or 6)
- Some photos or images (I prefer flowers)

Using Hue/ Saturation
- Open Photoshop.
- Go to the File Menu > Open an image you need to modify.
- Now go to the Image Menu > Adjustment > Hue/ Saturation (Keyboard Shortcut: Ctrl+U)
- You will get three options: Hue to modify the color, Saturation to adjust the amount of color > Lightness to adjust the lighting.
- Move the slider of Hue (left to right or right to left) and observe the changes.
- You can also try other options here (at your own responsibility).
- Finally, press OK and Save your image. Thats it!
Showing you some Illustrations:
Example 1

Open it using photoshop > Image > Adjustment > Hue/ Saturation > Change the value of Hue from 0 to -55. And you will get the following view:

Example 2

Here Ive used -75 in Hue and got the following image -

Modify the Color of a Part . . .
If you dont need to modify the color of whole picture then you can select the part you wanna modify. Simply use the Marquee tool by press M.

Lots of flowers ha? You can download them all!!
Keyboard Shortcuts used in this tutorial -
- Hue/Saturation: Ctrl + U
- Open: Ctrl + O
- Marquee Tool: Ctrl + M
- Crop: C
- Polygonal Lasso Tool: L
- Move Tool: V
Glad to get you here. Keep reading . . .
Stay with Marks PC Solution to get more interesting IT topics!
Go to link download
Saturday, August 27, 2016
Blending Text with Brick Wall by Photoshop!!
Blending Text with Brick Wall by Photoshop!!

You can surprise your friends by writing their names on a brick texture. To make them surprised, you work must be accurate and realistic. Today Im gonna show how to blend text with a brick wall through Adobe Photoshop . . .
Note: This tutorial is prepared on Photoshop CS6. Some options may not be similar if youre using older versions of Photoshop.
The Brick Wall
The very first thing you need is a brick wall. You can easily find one through Google search - Brick Texture or Brick Wall.
Or you can simply use the same brick wall which Im gonna use in this tutorial -
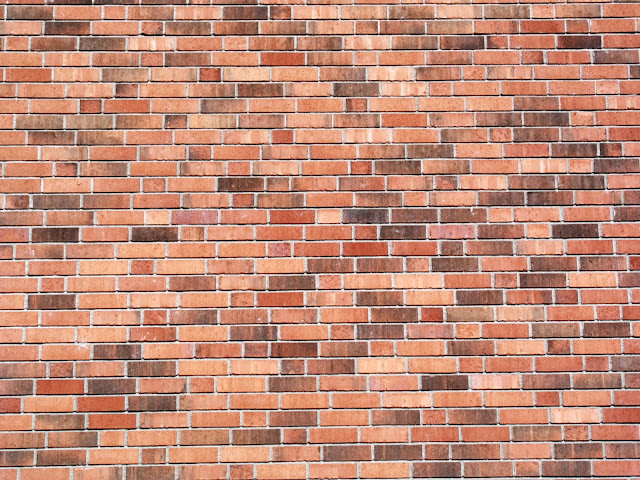
Image Information -
- File Type: JPEG
- Dimensions: 1200 x 800
- DPI: 96
- Image Size: 276 KB
Using a better image is very important since it may affect your output quality. A poor quality image may not generate a realistic view. So you can either use this image in your project, or find a better one.
Choosing a Font
Choose a font which is thick enough. Our purpose is to capture as many bricks as possible in our text background.
I would like to suggest you 2 fonts - 1. Cooper Black 2. Hobo Std
Or you can choose any other font which you prefer. But my suggestion will be - choose a thick or bold font.
First Phase
- Run Photoshop from your PC.
- Press Ctrl + O > Choose brick wall and open it.
- Press T to enable Type Tool. Choose a font - Cooper Black.
- Choose a brown color. Color code is # 990000.
- Now type your text.
At this point, your document will look like this -
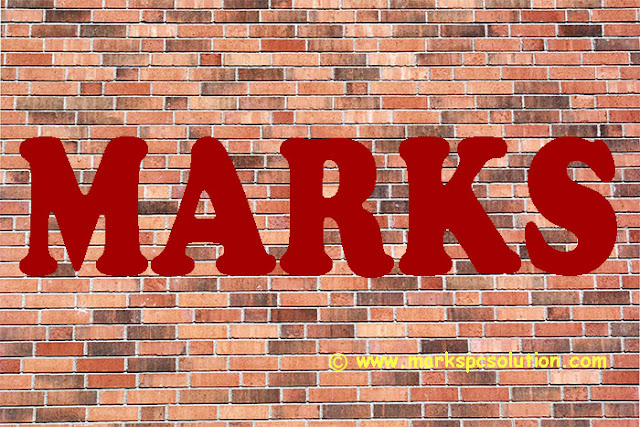
Second Phase
Make sure your text layer is selected in the layer panel. Now hit on the fx button from the bottom of the layer panel > Choose Blending Options > Now you will get the Layer Style window.
Now select the very first option - Blending Options: Custom
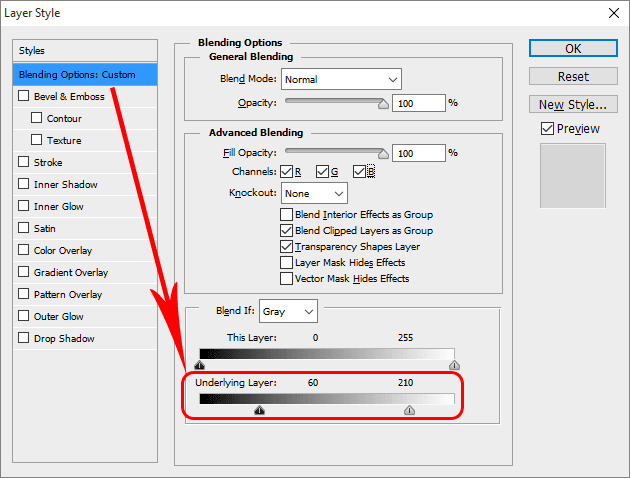
Look at the above image, youve to use the Underlying Layer. Set the left slider to 60 and right slider to 210.
(You can set different values if you think it looks better)
After completing the second phase, your document will have this look -
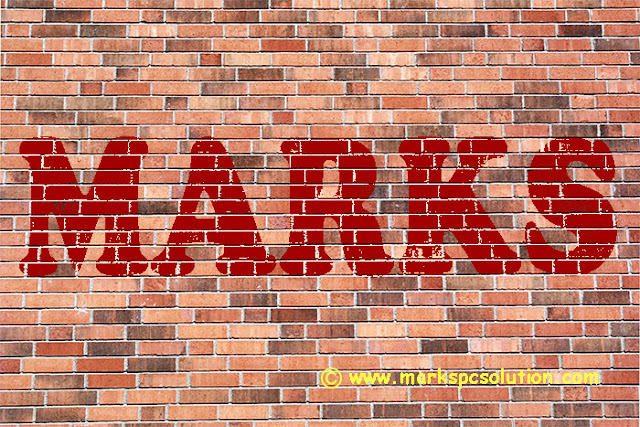
After completing the second phase, your document will have this look -

Third Phase - Optimize the look . . .
Our main task has been completed in the previous step. But you can look it better through -
- Bevel & Emboss
- Inner Shadow
- Drop Shadow etc.
Lets back to the work -
- Hit on the Bevel & Emboss | Style - Inner Bevel, Technique - Smooth, Depth - 100, Direction - Up, Size - 5. Keep the Shading part untouched.
- Hit on the Drop Shadow | Blend Mode - Multiply, Opacity - 75 to 100, Angle - 1450, Check Use Global Right, Distance - 8, Spread - 5, Size - 9.
All done! Hit on the OK button.
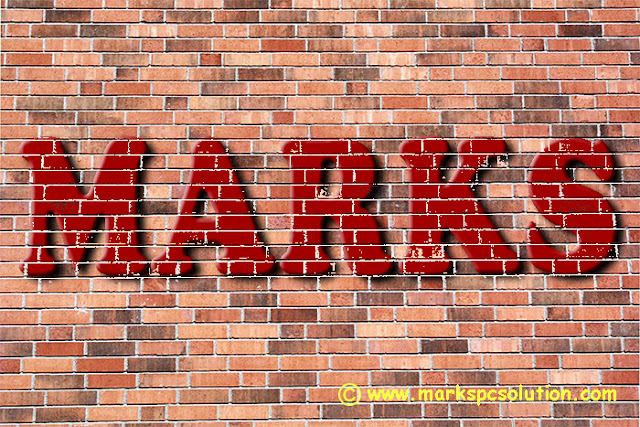
This is your final view. From the Layer Style window, you can set different values for different options and get different result.
Final Phase - Wait a minute!
Final touch is still waiting. Have a look at the image below -
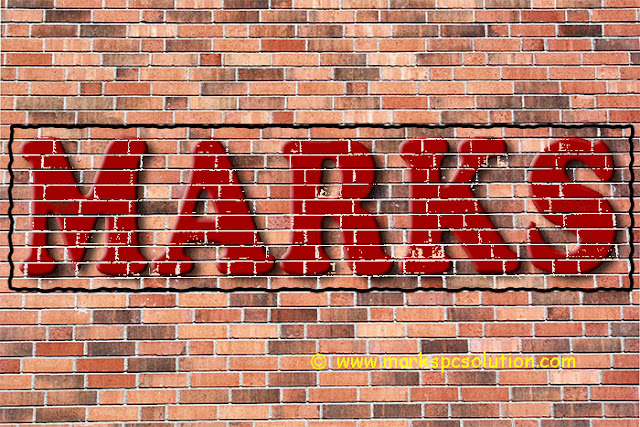
Wanna get a view like this? Simply draw a rectangle around your text.
- Set the Fill value to 0%.
- Make a right click and choose Blending Options.
- Choose Stroke | Size 4, Outside, 100% Opacity > Hit OK.
- Go to Filter > Distort > Ripple > OK. Thats it!
Download the Project File
You should download this project file for better understanding. Thank you for visiting us . . .
Stay with Marks PC Solution to get more interesting IT topics!
Go to link download
Subscribe to:
Posts (Atom)