Showing posts with label photo. Show all posts
Showing posts with label photo. Show all posts
Friday, September 30, 2016
How to Straighten Photo by Photoshop
How to Straighten Photo by Photoshop

When you scan an image, most of the times it may not be straight. Or when you take a shot, the photo may not be straight along with the horizon. In that case, you can automatically correct the deviation using Photoshop. You have to use both Ruler Tool and Image Rotation option.
Applies to
Ive tested this tutorial on Adobe Photoshop CS5 and CS6. And I think it will work fine with previous versions of Photoshop.
Lets Start -
- Run Adobe Photoshop from your PC.
- Press Ctrl+O > Find & Locate the image that needs to be corrected > Open it.
- Look at the image properly and determine how much rotation you need.
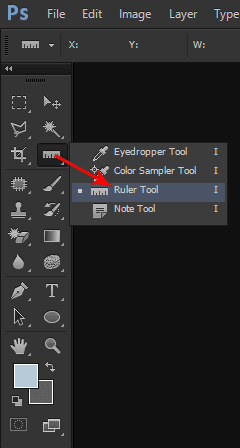
- Now choose the ruler tool as shown in the image below. (You can press Shift+I to change the tools of this section. Press Shift+I until Ruler Tool appears)
- Hope youve Ruler Tool selected. Now youve to draw a line within your image in such a direction which you think straight.
- Now go to the Image menu > Image Rotation > Choose Arbitrary (Here you will see how much your image will rotate. Make sure CW is selected) > Choose OK.
- Now you will get the image straightened as you drew the line.
Illustration
Suppose youve scanned the following image. But it needs to be straightened. Open the image in Adobe Photoshop. Choose Ruler Tool and draw the line as shown in the image above.

Now go to the Image menu > Image Rotation > Choose Arbitrary > Choose OK. Now your image will be automatically straightened. And you will get the following result -

Note: you can draw the line through Ruler Tool at any part of the image. Not necessary that you must draw the line at the top. But choose a part to draw the line that helps you understand how much rotation is needed.
Rotate/ Straighten Image Manually . . .
You can also rotate image manually. There are several ways you can follow for this purpose:
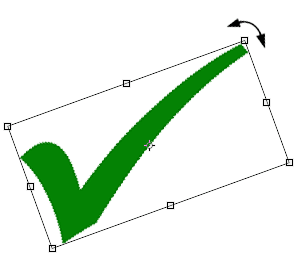
- Open your image that needs to be rotated or straightened. Press Ctrl + T to get the bounding box around the image. Move your mouse pointer outside of any of the 8 points. Then you will get the rotation icon as shown in the image below. Click and rotate your image as you need. Hit Enter to confirm your rotation.
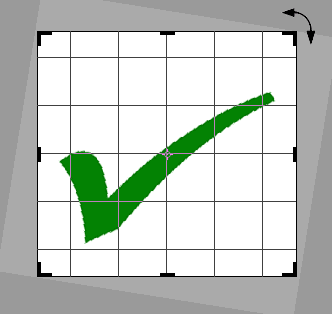
- You can also rotate an image while cropping it. To do so, youve to open your image first. Then choose Crop Tool (C) from the toolbar (Just left to the Ruler Tool). Now you will get 8 points to crop your image. Move your mouse pointer outside of the any point to get the rotate option. Now rotate the image as you wish. Hit Enter to confirm your rotation as well as cropping.
Keyboard Shortcuts Used in this Tutorial
- Ctrl + O = To Open a File
- Ctrl + T = Free Transform (Useful to resize or rotate image)
- Enter = To Confirm a Change.
- C = Crop Tool.
- I = Ruler Tool
- V = Move Tool
- Shift + Specific Letter = To alternate between the tools of same category.
Hope youve enjoyed this post. If you face any problem, dont hesitate to leave a comment below . . .
Stay with Marks PC Solution to get more interesting IT topics!
Go to link download

Wednesday, August 24, 2016
Get Photo Viewer Back in Windows 10 !!
Get Photo Viewer Back in Windows 10 !!

Microsoft is playing with the users. Theyve made so many stupid changes that puzzled the Windows 10 users. By default, Windows 10 users are not allowed to use Windows Photo Viewer. Instead, were forced to use a new app called - Photos! Though it provides a number of options for image editing, as a viewer, its not good at all.
The most funny thing is that, Microsoft hasnt removed the Windows Photo Viewer at all. Its just disabled. By adding a small registry file, you can easily re-enable it! My question is - what is the logic behind hiding it? Whats the benefit of Microsoft??
Enable Windows Photo Viewer
- Download the Registry Key from here. Less than 100 KB!
- Unzip it.
- Double click on the file WPV.reg and hit Yes > Yes > OK.
- Youre done and Good to go!
Open Photos/ Images through Photo Viewer
- Right click on any image.
- Open with > Choose another app
- Click on More apps to see the full app list
- Select Windows Photo Viewer
- Mark the option - Always use this app
- Hit OK.

In the above example, you can see only .JPG files to be viewed through Photo Viewer. But you can run the same operation for PNG, GIF or any other image format. Then those pictures will also be displayed via Windows Photo Viewer.
The Registry File
The Registry File
The registry file Im sharing is -
Windows Registry Editor Version 5.00
[HKEY_CLASSES_ROOTApplicationsphotoviewer.dll]
[HKEY_CLASSES_ROOTApplicationsphotoviewer.dllshell]
[HKEY_CLASSES_ROOTApplicationsphotoviewer.dllshellopen]"MuiVerb"="@photoviewer.dll,-3043"
[HKEY_CLASSES_ROOTApplicationsphotoviewer.dllshellopencommand]@=hex(2):25,00,53,00,79,00,73,00,74,00,65,00,6d,00,52,00,6f,00,6f,00,74,00,25,00,5c,00,53,00,79,00,73,00,74,00,65,00,6d,00,33,00,32,00,5c,00,72,00,75,00,6e,00,64,00,6c,00,6c,00,33,00,32,00,2e,00,65,00,78,00,65,00,20,00,22,00,25,00,50,00,72,00,6f,00,67,00,72,00,61,00,6d,00,46,00,69,00,6c,00,65,00,73,00,25,00,5c,00,57,00,69,00,6e,00,64,00,6f,00,77,00,73,00,20,00,50,00,68,00,6f,00,74,00,6f,00,20,00,56,00,69,00,65,00,77,00,65,00,72,00,5c,00,50,00,68,00,6f,00,74,00,6f,00,56,00,69,00,65,00,77,00,65,00,72,00,2e,00,64,00,6c,00,6c,00,22,00,2c,00,20,00,49,00,6d,00,61,00,67,00,65,00,56,00,69,00,65,00,77,00,5f,00,46,00,75,00,6c,00,6c,00,73,00,63,00,72,00,65,00,65,00,6e,00,20,00,25,00,31,00,00,00
[HKEY_CLASSES_ROOTApplicationsphotoviewer.dllshellopenDropTarget]"Clsid"="{FFE2A43C-56B9-4bf5-9A79-CC6D4285608A}"
[HKEY_CLASSES_ROOTApplicationsphotoviewer.dllshellprint]
[HKEY_CLASSES_ROOTApplicationsphotoviewer.dllshellprintcommand]@=hex(2):25,00,53,00,79,00,73,00,74,00,65,00,6d,00,52,00,6f,00,6f,00,74,00,25,00,5c,00,53,00,79,00,73,00,74,00,65,00,6d,00,33,00,32,00,5c,00,72,00,75,00,6e,00,64,00,6c,00,6c,00,33,00,32,00,2e,00,65,00,78,00,65,00,20,00,22,00,25,00,50,00,72,00,6f,00,67,00,72,00,61,00,6d,00,46,00,69,00,6c,00,65,00,73,00,25,00,5c,00,57,00,69,00,6e,00,64,00,6f,00,77,00,73,00,20,00,50,00,68,00,6f,00,74,00,6f,00,20,00,56,00,69,00,65,00,77,00,65,00,72,00,5c,00,50,00,68,00,6f,00,74,00,6f,00,56,00,69,00,65,00,77,00,65,00,72,00,2e,00,64,00,6c,00,6c,00,22,00,2c,00,20,00,49,00,6d,00,61,00,67,00,65,00,56,00,69,00,65,00,77,00,5f,00,46,00,75,00,6c,00,6c,00,73,00,63,00,72,00,65,00,65,00,6e,00,20,00,25,00,31,00,00,00
[HKEY_CLASSES_ROOTApplicationsphotoviewer.dllshellprintDropTarget]"Clsid"="{60fd46de-f830-4894-a628-6fa81bc0190d}"
If you dont like to download the registry file, then -
- Right click on your desktop
- New > Text Document
- Copy the above script as it is and paste it in the newly created text document
- Save it with a new name - WPV.reg
- Double click on the file > Hit Yes > Yes > OK. Thats it!
Hope this will work great for you. Still if you face any problem, please knock me . . .
Stay with Marks PC Solution to get more interesting IT topics!
Go to link download
Sunday, August 21, 2016
XnView Lightweight Photo Editor
XnView Lightweight Photo Editor

XnView is lightweight photo editor by which you can view, edit and convert your photos and images. Though very small in size, XnView is a powerful image editor and supports over 500 image formats! Its really a handy tool for those users who are not comfortable with Adobe Photoshop.
You know Adobe Photoshop is the universally accepted tool for working with photos and images. But most of the users are not comfortable with Photoshop as its somewhat complicated. As there are numerous image editing options available on Photoshop, its really difficult to work on it without proper guidance.
If you are not capable of working in Photoshop, there are many other tools which you can use to process your images. If you just need to re-size or convert your images, you can use Free Image Converter.
In this post, I would like to talk about XnView which is a very powerful image processor. This is a very handy tool for working with images. Have a look at the features below:
- Photo Viewer & Browser
- Converter
- Editor
- Supports Over 500 Image Formats
- Filter Effects
- Screen Capture
- Scanner
- All Other Basic Tools
I will share the portable version of XnView with you. So you just need to download and install it once. And save the installation file in a safe location. Then you will never need to install it again!
Download & Installation
- Download XnView Portable. Its a zipped folder and only 4.45 MB in size.
- Unzip the folder and double click on XnView Portable 2.25.exe to begin setup.
- Choose a location to install the software. Dont use C:/ drive. Because you can use it always even when you re-install your Windows.
- Complete the setup procedure.
- Open your installation folder and make a shortcut of XnViewPortable.exe on your desktop or taskbar for quick access.
Instructions
This is a very simple photo editing tool. If you begin using XnView, you will learn the basics within few minutes. I am just gonna show how to begin -
- Run XnView from your PC and you will get the list of your folders at the left.
- Click on those folders and XnView will automatically detect images from there.
- You will have both Menu and Toolbar to work with.
- Choose an image to start working.
- You will notice a change in the Menus after choosing the image. You will have Image and Filter menu after selecting an image.
- On Filter Menu, you will get some amazing effects same as Adobe Photoshop.
- From the Image menu, you can adjust your image (Brightness, Contrast, Color Level), resize, rotate, convert etc.
- Also try the toolbar icons. There you will get many handy tools i.e red eye removal tool, scan, print, save, rotate, flip, zoom etc.
- You can save your picture in lots of formats some of which are not available even on Photoshop.
Take a look at the XnView below:
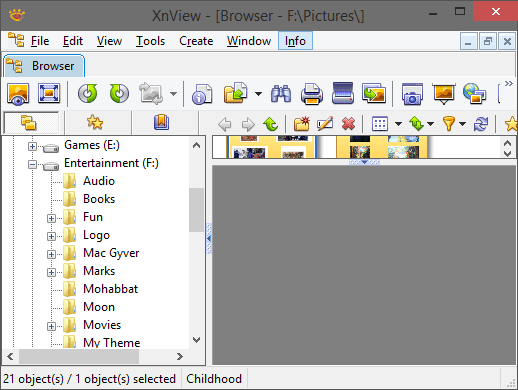
In only 4.5 MB, you get a lot of things. I hope you will like the tool. Just give it a try . . .
Stay with Marks PC Solution to get more interesting IT topics!
Go to link download
Subscribe to:
Posts (Atom)