Friday, September 30, 2016
How to Straighten Photo by Photoshop
How to Straighten Photo by Photoshop

When you scan an image, most of the times it may not be straight. Or when you take a shot, the photo may not be straight along with the horizon. In that case, you can automatically correct the deviation using Photoshop. You have to use both Ruler Tool and Image Rotation option.
Applies to
Ive tested this tutorial on Adobe Photoshop CS5 and CS6. And I think it will work fine with previous versions of Photoshop.
Lets Start -
- Run Adobe Photoshop from your PC.
- Press Ctrl+O > Find & Locate the image that needs to be corrected > Open it.
- Look at the image properly and determine how much rotation you need.
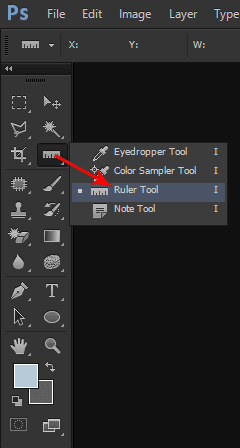
- Now choose the ruler tool as shown in the image below. (You can press Shift+I to change the tools of this section. Press Shift+I until Ruler Tool appears)
- Hope youve Ruler Tool selected. Now youve to draw a line within your image in such a direction which you think straight.
- Now go to the Image menu > Image Rotation > Choose Arbitrary (Here you will see how much your image will rotate. Make sure CW is selected) > Choose OK.
- Now you will get the image straightened as you drew the line.

Illustration
Suppose youve scanned the following image. But it needs to be straightened. Open the image in Adobe Photoshop. Choose Ruler Tool and draw the line as shown in the image above.

Now go to the Image menu > Image Rotation > Choose Arbitrary > Choose OK. Now your image will be automatically straightened. And you will get the following result -

Note: you can draw the line through Ruler Tool at any part of the image. Not necessary that you must draw the line at the top. But choose a part to draw the line that helps you understand how much rotation is needed.
Rotate/ Straighten Image Manually . . .
You can also rotate image manually. There are several ways you can follow for this purpose:
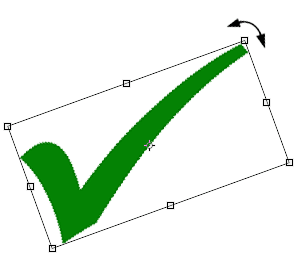
- Open your image that needs to be rotated or straightened. Press Ctrl + T to get the bounding box around the image. Move your mouse pointer outside of any of the 8 points. Then you will get the rotation icon as shown in the image below. Click and rotate your image as you need. Hit Enter to confirm your rotation.

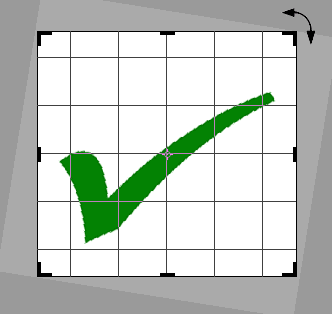
- You can also rotate an image while cropping it. To do so, youve to open your image first. Then choose Crop Tool (C) from the toolbar (Just left to the Ruler Tool). Now you will get 8 points to crop your image. Move your mouse pointer outside of the any point to get the rotate option. Now rotate the image as you wish. Hit Enter to confirm your rotation as well as cropping.

Keyboard Shortcuts Used in this Tutorial
- Ctrl + O = To Open a File
- Ctrl + T = Free Transform (Useful to resize or rotate image)
- Enter = To Confirm a Change.
- C = Crop Tool.
- I = Ruler Tool
- V = Move Tool
- Shift + Specific Letter = To alternate between the tools of same category.
Hope youve enjoyed this post. If you face any problem, dont hesitate to leave a comment below . . .
Stay with Marks PC Solution to get more interesting IT topics!
Go to link download