Showing posts with label using. Show all posts
Showing posts with label using. Show all posts
Wednesday, October 12, 2016
how to download nokia applications on ovi website using pc without using your mobile non OTA
how to download nokia applications on ovi website using pc without using your mobile non OTA
1. Go to the ovi site..http://store.ovi.com/#/applications.
2. click on the application you want to download.
3. now click on "Send to Friend"

4. you will arrive here.

5. change the "send-to-friend" to download

6. a pop up will appear like this.

7. click save.

8. done..
hope this helps.
note. you must have an account in ovi..
--------------------------------------------------------------------
update
if after step 6 you are presented with this.

it means that you are downloading a jad file.
so heres the step after you save the jad file.
1. open the jad file in notepad

2. look for the "midlet jar url:" line and copy the url (encircled in red).
3. paste the url in your browser and press enter.

4. click save.
---------------------------------------------------------------
if after step 6 you are presented with this.

it means that you are downloading a dm file.
heres the step after you save the dm file.
1. open the dm file in notepad.

2. note the "content" line it says that the application is in sisx format.
3. delete the four lines (including the blank fourth line) encircled in red, so that you will come up with this.

4. save the file with the sisx extension.

done..
hope this helps...
Go to link download

Thursday, October 6, 2016
Using Curve Tool in MS Word
Using Curve Tool in MS Word

Most of you may think that MS Word has no free drawing tool like Photoshop or Illustrator. But youre wrong! Word has also a free drawing tool named curve which you can use just like Photoshop Pencil Tool. With curve tool, you can draw shapes freely.
Applies to:
- Word 2007
- Word 2010
- Word 2013

Where do I find Curve Tool?
In fact, Word doesnt consider curve as a tool. Though its a drawing tool, Word names it as a shape. You will find the curve in the Shapes.

Insert Tab > Illustration Section > Shapes > Curve  .
.
. How to Use it?
Its very handy to use the curve tool. To use the tool, run MS Word. Then choose curve from the shapes.
- After choosing the curve tool, click anywhere of your document to start drawing.
- Move your mouse to the left, right or top from the starting point.
- Click left mouse button where you wanna turn around.
- If you would like to stop drawing and keep the shape open, simply click twice.
- If you wanna keep the shape close, simply click on the starting point.
How to Edit the Shape?
You can also edit the shape made by curve tool. After drawing the shape, if you think that you need to change the shape a little, you can edit the points of that shape.
While drawing the shape, you clicked mouse several times. Those clicks are shape points. If you would like to edit the shape points, right click on that shape and choose Edit Points  option.

Now you will see the points. Click on the points and adjust them by dragging.
Designing the Shape
After creating the shape, you can design it like other shapes. You can choose different fill color, outline or give it special effect from the Format tab.
Curve is also Available for -
option. Now you will see the points. Click on the points and adjust them by dragging.
Designing the Shape
After creating the shape, you can design it like other shapes. You can choose different fill color, outline or give it special effect from the Format tab.
Curve is also Available for -
- Excel: Insert > Illustration > Shapes > Curve
- PowerPoint: Insert > Shapes > Curve
- Outlook: Insert > Shapes > Curve
Hope you have understand todays topic properly. If you have any query, please leave a comment . . .
Stay with Marks PC Solution to get more interesting IT topics!
Go to link download
Thursday, September 29, 2016
update restore iphone 5 using linux kali
update restore iphone 5 using linux kali
How to update/restore iPhone 5 using Linux OS.
Requirements:
Linux OS ( in my case Kali)
libimobiledevice
libimobiledevice is a cross-platform software library that talks the protocols to support iPhone®, iPod Touch®, iPad® and Apple TV® devices. It is released under GPL.
More information can be found at http://www.libimobiledevice.org.
To make use of the above-mentioned library, git-clone or download the source of all the files in the repository located at http://cgit.libimobiledevice.org/ , and build it from source.
syntax for restoring.
idevicerestore -e yourIPSW.ipsw
where yourIPSW.ipsw is the latest firmware for the appropriate iDevice.
full credits to the above-mentioned site and the authors/creators of the library.
below is the video of the update/restore process.
Go to link download
Friday, September 23, 2016
Change Dress Color Using Photoshop!!
Change Dress Color Using Photoshop!!

Some little tricks of Adobe Photoshop may enable you to perform extraordinary works. Even you can prove yourself as magician to common people. Today Ive come with such tricks which will help you to change the color of dress without hurting the background and subject of the image . . .
Before you start, please have a look at this post also -
Use Hue/ Saturation to Modify Color in Photoshop
Requirements:
- Adobe Photoshop (Im using version CS6)
- A good quality photo of a person
- Basic knowledge of Photoshop
Step 1 | Choose an Image

Step 2 | Change the Color
Open your image using Photoshop. And do the following tasks -
- Go to the Image Menu > Adjustment > Hue/ Saturation [Ctrl + U]
- Move the Hue slider to left or right.
- Also move the Saturation and Lightness slider (Optional)
When you get the desired dress color, hit OK.

Ive used 100 in Hue option and left the other fields as they are. It brings me the following result:

Now compare it with the first image. This lady got a completely new dress. But Oh My God! What happened to her face and skin? And what about the background?
Okay weve nothing to worry about until we have Photoshop. Now Ive to take some parts of this image back to its original look.
Step 3 | History Brush Tool
At this step, weve to do some works manually. Except the dress, other parts of the image (Face, Hair, Skin & Image background) should be taken to their previous stage.

Look at the above Tool of Photoshop. This is our Trump Card. With this History Brush Tool, you can simply paint the area that needs to be backed to its previous stage.
The keyboard shortcut of this tool is Y.
As soon as you choose History Brush Tool, you will get a circle. Start painting over your image. Press this key [ to decrease the brush size and press this ] to increase.

Here Ive just touched the upper left corner of the image. After painting the whole area except the dress, the final result is as below -

Ive edited this image within a very short time. But if you practice properly and spend little more time, hopefully you will get much better result.
Hope it will help you all. In my next post, I will write more on History Brush Tool. Till then, stay with Marks PC . . .
Caution!
No photo of this tutorial can be used anywhere in the web, print or any other media.
Model: Rizwana, Computer Engineer.
Stay with Marks PC Solution to get more interesting IT topics!
Go to link download
Wednesday, September 21, 2016
Restoring iPhone 4s using idevicerestore in Linux
Restoring iPhone 4s using idevicerestore in Linux
Below is a recording of the restore process of my iPhone 4s as I restore it to the latest version of 9.1 using idevicerestore in Linux. Restore is done at the 7:57 mark.
Go to link download
Saturday, September 10, 2016
Using Online Templates in MS Word
Using Online Templates in MS Word

With the improvement of technology, things are getting easier. You know, as a word processor, MS Word provides all the necessary elements & facilities for preparing any sort of document. Additionally, it has thousands of online templates to enhance the user experience. Lets explore . . .
Applies To -
- Microsoft Office 2007
- Microsoft Office 2010
- Microsoft Office 2013
- Microsoft Office 2016
Template Categories
Actually there are varieties types of online templates in Archive. The prime categories are divided as -
- Business
- Personal
- Industry
- Design Sets
- Education
- Event etc.
But specifically, we may get the following types of templates -
- Letters & Applications
- Wedding/ Birthday Party Invitations
- Party Menu
- Certificates
- Sales Invoice/ Sales Order/ Thanks Letter
- Meeting Minutes
- Survey Formats
- Report Cover
- Business Cards
- Resume
- Business Newsletter
And there are a lot of such stuffs . . . .
Get your Desired Template(s)
- Start MS Word in your PC.
- Go to the File button and choose New.
- Now you can type and search your desired template using the search box.
- For example, type - Certificate. And there will be many samples.
- Choose one that you need. And hit on the create button.
- Now your template will be downloaded.
- Make necessary changes and save it on your hard disk. Its simple!

Look at the above image. Here you can search for your desired types of documents. After entering a search query, you will get the categories on the right side.
And look at the image below. After choosing a template, you will get its details. Then youve to hit on the Create button to download that template.

Hope this trick will help you all. Stay with Marks PC . . .
Stay with Marks PC Solution to get more interesting IT topics!
Go to link download
Monday, August 29, 2016
Using Default Cover Pages in MS Word
Using Default Cover Pages in MS Word
Are you preparing a formal report? Or do you need any cover page sample for any other task? By default, MS Word contains some outstanding cover pages. Each of them will give you different flavor. Today Im gonna talk about using the default cover pages of MS Word . . .
This Tutorial Applies to -
Stuffs you Should Know
Hopefully this post will be of great help if you need to prepare documents frequently. Of if you are engaged with professional writing, these cover pages will reduce your time required to design your report cover.
If you need to know more about adding cover page, then follow this link . . .
This Tutorial Applies to -
- Word 2007
- Word 2010
- Word 2013
- Word 2016
In every new version, Microsoft Office changes their default templates. Same thing happens to Word cover pages. I mean, the default cover pages are not same in every version of MS Word.
Cover pages included in Word 2016 may not be found in the previous versions of Office. Word 2016 has 16 cover pages. But you can discover more from Office.com . . .
Add a Cover Page
- Run MS Word.
- Create a new document or open an existing one.
- Go to the Insert tab.
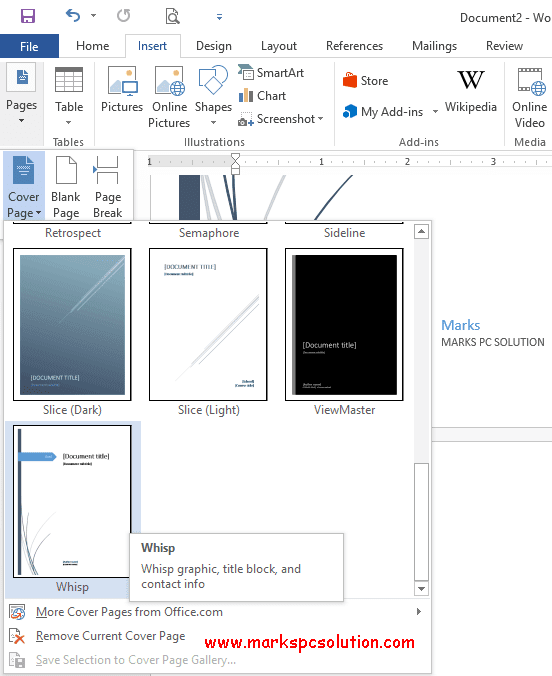
- Hit on the Pages > Cover Page > Click on the cover which you like. Thats it.
Stuffs you Should Know
- When you add a page number in your document, your cover page will be counted as page number 0. So, youve to insert page number at the next page to your cover page.
- If you add a new cover page, it will replace the first one.
- If you need to delete the cover page, Insert Tab > Pages > Cover Page > Remove Current Cover Page (Follow the above image).
- To delete a cover page which was created by the earlier version of word, you must remove it manually.
Hopefully this post will be of great help if you need to prepare documents frequently. Of if you are engaged with professional writing, these cover pages will reduce your time required to design your report cover.
If you need to know more about adding cover page, then follow this link . . .
Stay with Marks PC Solution to get more interesting IT topics!
Go to link download
Subscribe to:
Posts (Atom)