Showing posts with label mobile. Show all posts
Showing posts with label mobile. Show all posts
Tuesday, October 18, 2016
Hard Reset your BS Mobile Stark and remove password pattern lock gmail account
Hard Reset your BS Mobile Stark and remove password pattern lock gmail account
This tutorial is for BS Mobile Stark, follow my guide below.
This phone has Spreadtrum Chip (SPD6825) my gadget do not support this kind of chip. Im lucky that I found out the recovery mode after an hour.
Hopefully this tutorial will help you to unlock or fix your phone.

Hard resetting / factory resetting your phone will solve the following issues:
1. If you forgot your pattern lock
2. If you forgot your gmail account
3. If you forgot your password
4. Apps that automatically force closing
5. Stuck in BS Mobile Logo (sometimes does not work if the firmware is totally damage)
NOTE: Performing hard reset will erase your data.
To hard reset:
1. Turn off your phone
2. Press and Hold Volume Down + Power Button simultaneously. Keep holding the buttons until the phone power up. When you see the BS Mobile Logo immediately Press the HOME Button without releasing VOLUME DOWN + POWER Button.
3. An android Robot with red exclamation mark will appear. Press POWER button to activate Android System Recovery
4. Select wipe data / factory reset, then YES -- delete all user data, press Volume rocker to navigate and press the POWER button to confirm the selection
5. Reboot your phone.
Note:
If performing hard reset did not succeed, you need to wipe the cache first in the android system recovery before performing wipe / factory
reset.
I hope this tutorial helps you.. If you have any question just drop a comment.
Go to link download
Hard Reset your Star Mobile Up and remove password pattern lock gmail account
Hard Reset your Star Mobile Up and remove password pattern lock gmail account
This tutorial is for Star Mobile Up. Just follow the instruction below. I will post my full ROM dump of this phone. Im still uploading the files.

Hard resetting / factory resetting your phone will solve the following issues:
1. If you forgot your pattern lock
2. If you forgot your gmail account
3. If you forgot your password
4. Apps that automatically force closing
5. Stuck in Star Mobile Logo (sometimes does not work if the firmware is totally damage)
NOTE: Performing hard reset will erase your data.
To hard reset:
1. Turn off your phone
2. Press and Hold Volume UP + Power Button simultaneously. Keep holding the buttons until the phone power up and you will see an android robot.
3. An Android with exclamation will appear with "no command." word in it. Press POWER Button to activate android system recovery.
5. Select wipe data / factory reset, press Volume rocker to navigate and press the VOLUME UP to confirm the selection
6. Reboot your phone.
Note:
If performing hard reset did not succeed, you need to wipe the cache
first in the android system recovery before performing wipe / factory
reset.
I hope this tutorial helps you.. If you have any question just drop a comment.
Go to link download
Saturday, October 15, 2016
Hard Reset your Cherry Mobile Bubble and remove password pattern lock and gmail account
Hard Reset your Cherry Mobile Bubble and remove password pattern lock and gmail account
This tutorial is for Cherry Mobile Bubble for board version 1 and version 2, follow my guide below.

Hard resetting / factory resetting your phone will solve the following issues:
1. If you forgot your pattern lock
2. If you forgot your gmail account
3. If you forgot your password
4. Apps that automatically force closing
5. Stuck in Cherry Mobile Logo (sometimes does not work if the firmware is totally damage)
NOTE: Performing hard reset will erase your data.
To hard reset:
1. Turn off your phone
2. Press and Hold Volume Down + Power button simultaneously, keep on pressing until the phone power up.
3. A phone with exclamation mark will appear. Press HOME BUTTON to activate Android System Recovery.
4. Select wipe data / factory reset, then YES -- delete all user data, press Volume rocker to navigate and press the POWER button to confirm the selection
5. Reboot your phone.
Note:
If performing hard reset did not succeed, you need to wipe the cache first in the android system recovery before performing wipe / factory reset.
I hope this tutorial helps you.. If you have any question just drop a comment.
Go to link download
Wednesday, October 12, 2016
how to download nokia applications on ovi website using pc without using your mobile non OTA
how to download nokia applications on ovi website using pc without using your mobile non OTA
1. Go to the ovi site..http://store.ovi.com/#/applications.
2. click on the application you want to download.
3. now click on "Send to Friend"

4. you will arrive here.

5. change the "send-to-friend" to download

6. a pop up will appear like this.

7. click save.

8. done..
hope this helps.
note. you must have an account in ovi..
--------------------------------------------------------------------
update
if after step 6 you are presented with this.

it means that you are downloading a jad file.
so heres the step after you save the jad file.
1. open the jad file in notepad

2. look for the "midlet jar url:" line and copy the url (encircled in red).
3. paste the url in your browser and press enter.

4. click save.
---------------------------------------------------------------
if after step 6 you are presented with this.

it means that you are downloading a dm file.
heres the step after you save the dm file.
1. open the dm file in notepad.

2. note the "content" line it says that the application is in sisx format.
3. delete the four lines (including the blank fourth line) encircled in red, so that you will come up with this.

4. save the file with the sisx extension.

done..
hope this helps...
Go to link download
Sunday, October 9, 2016
Hard Reset your Cherry Mobile Ace Firefox OS and remove password
Hard Reset your Cherry Mobile Ace Firefox OS and remove password
This tutorial is for Cherry Mobile Ace Firefox OS.....

Hard resetting / factory resetting your phone will solve the following issues:
1. If you forgot your password
2. System Instability
NOTE: Performing hard reset will erase your data.
To hard reset:
1. Turn off your phone
2. Press and Hold Volume UP + Power Button simultaneously.
3. Release the buttons when you see the Ace logo and wait until the phone power up.
4. Herese trick. If your phone has password, slide to unlock first then you will see MMI test on your screen.
5. Tap Restore Factory Settings -- Then tap RESET
6. Your phone will automatically REBOOT.
Here is a video tutorial
I hope this tutorial helps you.. If you have any question just drop a comment.
Go to link download
Saturday, October 8, 2016
Cherry Mobile Sonic Stock ROM firmware to unbrick your phone
Cherry Mobile Sonic Stock ROM firmware to unbrick your phone
Hi,
This firmware is for Cherry Mobile Sonic only. This is not compatible with Cherry Mobile Sonic 2.0. So be sure to check your model.

The firmware is rooted already. Make sure that you hard reset your phone after flashing to fix IMEI problem.
1. Bootloop
2. Damaged System UI
3. TP Upgrade only
4. Dead phone but it is detected in computer
5. Remove Gmail Account / Password / Pattern Lock (Alternative Way)
6. Privacy Protection Password Lock up
"DOWNLOAD THESE FILES"
Firmware Here -->Cherry Mobile Sonic
VCOM Driver -->VCOM Manual
Alternative Driver --> AutoInstaller
Alternative Driver --> AutoInstaller
SPFlashTool --> LatestVersion
"Use WinRar or 7zip to extract the firmware"
"Extract the files to your desired folder"
"If you encounter error in flashtool, use different version of it."
"Extract the files to your desired folder"
"If you encounter error in flashtool, use different version of it."
"I suggest to use 32bit Windows OS for compatibility of the driver"
"You can also use 64bit version, just disable driver signing or driver signature before installing the driver."
Installing Driver with AutoInstaller
First try the Alternative Driver, which is the AutoInstaller. Just open the install.exe then it will automatically install the driver. To fully check if the driver is correctly installed in your computer.
Follow these steps:
- Turn off your phone (always powered off is a must)
- Press and hold volume up or down, or you can simple press the two button.
- Insert your USB cable without releasing the VOLUME button(s).
- In your computer, it must detect your phone and it will install the MTK Preloader or Mediatek USB VCOM driver.
- Repeat 1 to 4 if it does not detect your phone.
- If MTK Preloader/Mediatek USB VCOM Driver is installed you are good to go in flashing your phone ^_^
Reference Video using Driver Auto Installer (watch in HD)
Installing Manually using VCOM Driver
When installing it manually your phone must be turned off, then connect it to your computer/laptop while pressing VOLUME UP or VOLUME DOWN. This will detect and look for the driver.

1. This is the first time that you will connect your phone and it will search for the correct driver.

2. Check include this location ... ... and click on browse. Look for USB VCOM Driver and Click on 2K_XP_COM folder if you are using Windows XP or Win7 for Windows 7 and then press OK when you are done picking the right folder for the driver.

3. If the driver is successfully installed MediaTek DA USB VCOM will appear in the New Hardware Wizard.
Video Installing VCOM Driver (please watch in HD)
"Your Phone must be turned off when you are ready to connect and flash your phone"
Flashing1. Launch FlashTool (flash_tool.exe)
2. In Flashtool, Click on Scatter-Loading, and load your scatter file. (see example below)
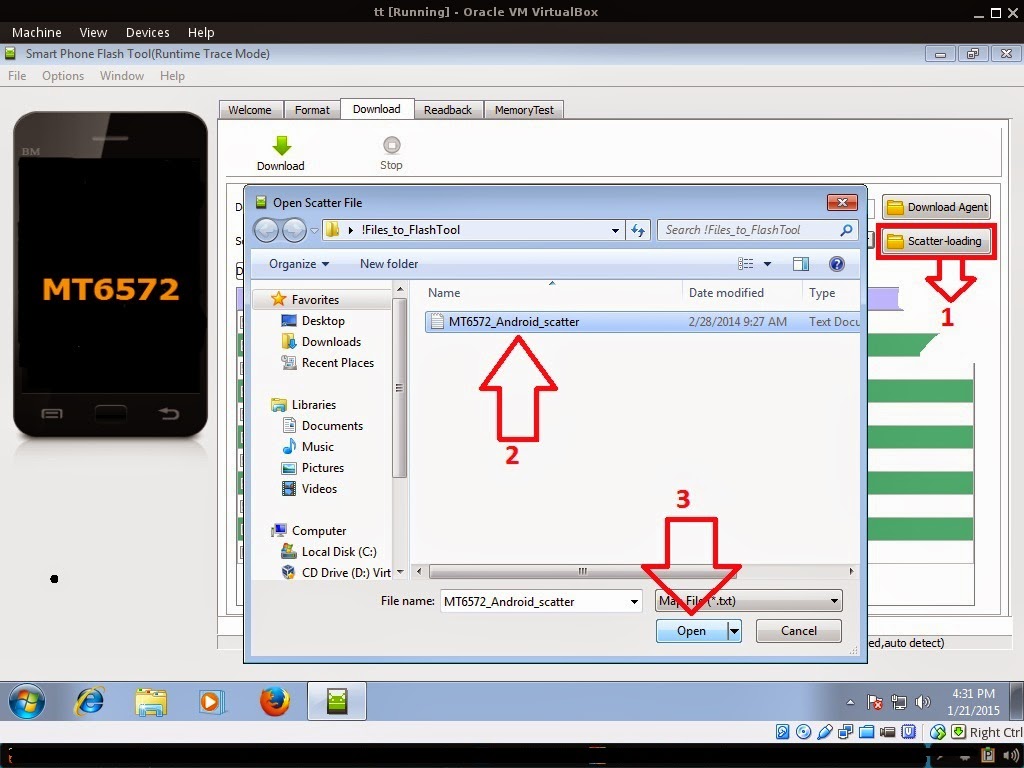
Reference Video Using FlashTool version 5.xxx (watch in HD)
3. After you load the file, UNCHECK PRELOADER only, press Press Download to Flash your Phone.
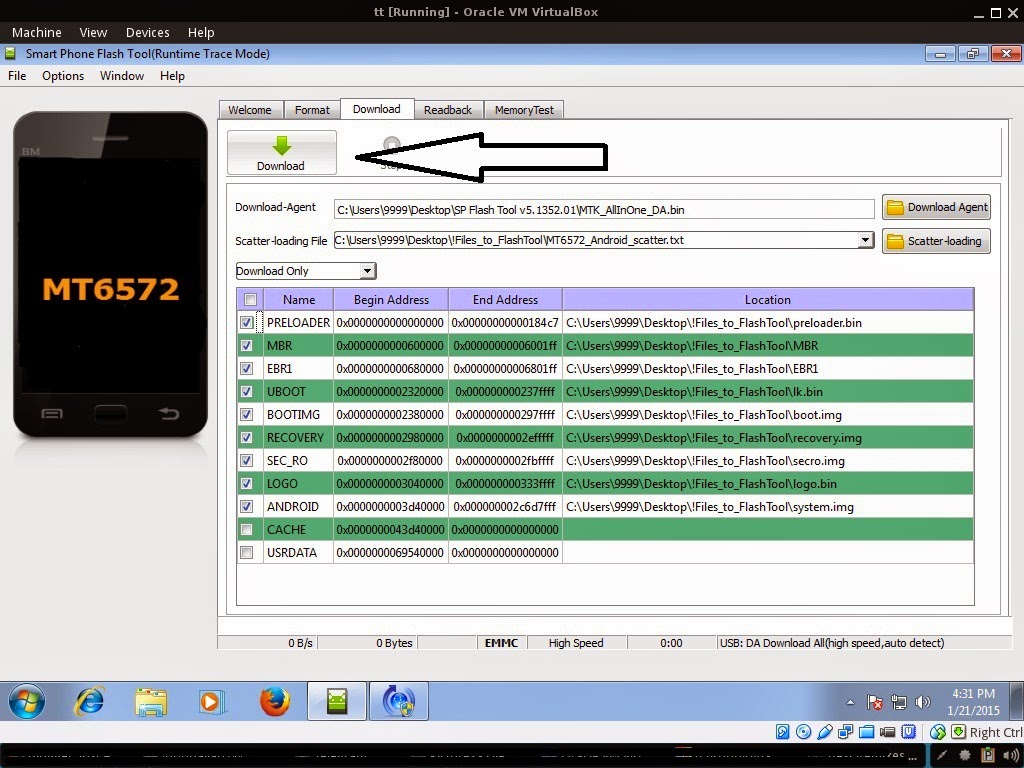
4. After you press Download Follow these steps
Some workarounds:
- Turn off your phone (always powered off is a must)
- Press and HOLD volume UP or Down or you can simply press it simultaneously
- Insert your USB cable without releasing the VOLUME button(s).
- Keep on repeating until Flashtool detected your phone.
"Hard reset your phone after flashing"
Some workarounds:
If you encounter PMT_Changed error here is what you do:
In Latest version of Flashtool
- PMT_CHANGED error occur when firmware is not compatible with your phone. Sometimes your phone has a different board version. You should check it too, if your firmware is compatible with your phone.
- Try Firmware upgrade
- Try different version of flashtool
- Try to set Format All + Download
- Or try Manual Format first then Download.
If you encounter Privacy Protection Password:
For Invalid IMEI (Does not work in MT6571 SoC):
FOR DAMAGED BASEBAND or UNKNOWN BASEBAND (Your phone must be rooted first)
1. Make sure you have MTKDROIDSTOOL version 2.4.8 or version 2.5.3 (you can search it in google)
2. In MTKDroidstool (I assume you launch the tool) -- Click in Root.
3. In your device -- After you press Root, you need to authorize it. A pop up message will appear. Click Allow/Authorize depends on your root application.
4. In MTKDroidsTool -- Click in IMEI/NVRAM, then click in RESTORE.
5. Then look for the folder where you extracted the NVRAM files.
6. Check if the Baseband is fixed. And if the IMEI is fully restored.
7. If Baseband is still Unknown and IMEI is invalid. Then you need to hard reset first your phone.
8. After hard reset your baseband should be fixed already. (base on my experience)
9. If your baseband is fixed sometimes the IMEI is still invalid. So you need to restore the IMEI.
10. To restore IMEI follow Step 1-4, but you should not restore. You should fill the IMEI then click REPLACE. Then reboot your phone. VOILA! I hope the phone is fully working :)
- Open flash_tool.exe
- Load the scatter file
- Goto Format Tab
- Click on Format except bootloader
- Press Play/Start Icon
- Then remove battery
- Insert the battery again
- Insert the USB cable (you should hear a beep on your computer, and it should proceed in formatting.)
- After done formatting proceed in Flashing.
- Goto Download tab (I assume that you loaded the scatter file already)
- Uncheck PRELOADER (this is very important)
- Press Download
- Then remove battery
- Insert Battery again
- Insert the USB cable (you should hear a beep on your computer, and it should proceed in flashing or downloading the firmware in your phone.)
- Power ON the phone after flashing.
- Restore your IMEI.
For Invalid IMEI (Does not work in MT6571 SoC):
- Root your phone via vRoot/iRoot/Kingoroot or your preferred method in rooting you device. Your phone must be rooted first.
- Download MTKDroidsTool version 2.4.8 and version 2.5.3
- Enable your USB debugging in Developer Option (you also need this in rooting your phone via PC)
- Okay in your PC -- Open MTKDroidstool version 2.4.8 (Mtkdroidstool.exe) first. Make sure that you connected your phone already.
- Still in Mtkdroidstool -- Click ROOT
- In your phone -- A pop up dialogue will appear, just grant or allow it.
- In your PC -- If root shell is granted/allowed, Click in IMEI/NVRAM tab. If it is grayed out this is the time when you open the MTKDroidsTool version 2.5.3.
- Enter your original IMEI
- Click Replace
- Reboot your phone
1. Make sure you have MTKDROIDSTOOL version 2.4.8 or version 2.5.3 (you can search it in google)
I hope this tutorial help you. Please drop a comment if something is not clear to you.
Go to link download
Arc Mobile Nitro 401D firmware stock rom to unbrick your phone
Arc Mobile Nitro 401D firmware stock rom to unbrick your phone
Hi,
I hope this firmware can help those who are in need of this file. Ive tried and tested this in a bootloop Arc Mobile 401D. Just follow the procedure below.

You can fix the following issue in your phone:
1. Bootloop
2. Damaged System UI
3. TP Upgrade only
4. Dead phone but it is detected in computer
5. Remove Gmail Account / Password / Pattern Lock (Alternative Way)
6. And other issues with your phones firmware
"DOWNLOAD THESE FILES"
Firmware Here -->Arc Mobile Nitro 401D Part 1
Firmware Here -->Arc Mobile Nitro 401D Part 2
Firmware Here -->Arc Mobile Nitro 401D Part 3
VCOM Driver -->VCOM Manual
Alternative Driver --> AutoInstaller
Firmware Here -->Arc Mobile Nitro 401D Part 3
VCOM Driver -->VCOM Manual
Alternative Driver --> AutoInstaller
SPFlashTool --> LatestVersion
"Use WinRar or 7zip to extract the firmware"
"Extract the files to your desired folder"
"If you encounter error in flashtool, use different version of it."
"I suggest to use 32bit Windows OS for compatibility of the driver"
Installing Driver with AutoInstaller
First try the Alternative Driver, which is the AutoInstaller. Just open the install.exe then it will automatically install the driver. To fully check if the driver is correctly installed in your computer.
Follow these steps:
- Turn off your phone (always powered off is a must)
- Press and hold volume up or down, or you can simple press the two button
- Insert your USB cable without releasing the VOLUME button(s).
- In your computer, it must detect your phone and it will install the MTK Preloader or Mediatek USB VCOM driver.
- Repeat 1 to 4 if it does not detect your phone.
- If MTK Preloader/Mediatek USB VCOM Driver is installed you are good to go in flashing your phone ^_^
Reference Video using Driver Auto Installer (watch in HD)
Installing Manually using VCOM Driver
When installing it manually your phone must be turned off, then connect it to your computer/laptop while pressing VOLUME UP or VOLUME DOWN. This will detect and look for the driver.
1. This is the first time that you will connect your phone and it will search for the correct driver.
2. Check include this location ... ... and click on browse. Look for USB VCOM Driver and Click on 2K_XP_COM folder if you are using Windows XP or Win7 for Windows 7 and then press OK when you are done picking the right folder for the driver.
3. If the driver is successfully installed MediaTek DA USB VCOM will appear in the New Hardware Wizard.
Video Installing VCOM Driver (please watch in HD)
"Your Phone must be turned off when you are ready to connect and flash your phone"
Flashing
1. Launch FlashTool (flash_tool.exe)
2. In Flashtool, Click on Scatter-Loading, and load your scatter file. (see example below)
Reference Video Using FlashTool version 5.xxx (watch in HD)
3. After you load the file, press Press Download to Flash your Phone.
4. After you press Download Follow these steps
Some workarounds:
- Turn off your phone (always powered off is a must)
- Press and HOLD volume UP or Down or you can simply press it simultaneously
- Insert your USB cable without releasing the VOLUME button(s).
- Keep on repeating until Flashtool detected your phone.
"Hard reset your phone after flashing"
Some workarounds:
If you encounter PMT_Changed error here is what you do:
In Latest version of Flashtool
- Load the scatter file
- Choose Format all + Download (Underneath Scatter-loading file)
- Then Click Download and wait until it is done flashing
For Invalid IMEI:Your Phone/Tablet must be rooted first
Restore yong IMEI in MTKDroidTools version 2.5.3. You will have this error when you format your phone in Flashtool as I had experienced. To restore download MTKDroidTools version 2.5.3 After you extract the file. Open the green robot, you must enable the usb debugging in your phone. It is usually located in Settings>Devoloper Mode then look for usb debugging. After enabling it. Connect your phone in your computer then in MTKDroidTool click on ROOT. Wait for it to finish, then Click in IMEI/NVRAM, input 15 number in each box. Then click REPLACE. Then click Reboot or you can manually turn off your phone. Then turn your phone on again. You can see that you have fully restored your IMEI.
Restore yong IMEI in MTKDroidTools version 2.5.3. You will have this error when you format your phone in Flashtool as I had experienced. To restore download MTKDroidTools version 2.5.3 After you extract the file. Open the green robot, you must enable the usb debugging in your phone. It is usually located in Settings>Devoloper Mode then look for usb debugging. After enabling it. Connect your phone in your computer then in MTKDroidTool click on ROOT. Wait for it to finish, then Click in IMEI/NVRAM, input 15 number in each box. Then click REPLACE. Then click Reboot or you can manually turn off your phone. Then turn your phone on again. You can see that you have fully restored your IMEI.
I hope this tutorial help you. Please drop a comment if something is not clear to you.
Go to link download
Friday, October 7, 2016
Cherry Mobile Ace F100 firmware stock rom to unbrick your phone
Cherry Mobile Ace F100 firmware stock rom to unbrick your phone
Hi all,
This firmware is for Cherry Mobile Ace F100 with firefox OS. I have already tested this firmware and it is fully working...
TOOLS
ResearchDownload --> DOWNLOAD HERE
Firmware --> Download HERE
Driver -- > DOWNLOAD HERE
"Extract to your desired folders"
DOWNLOAD THE FILES, AND EXTRACT. INSTALL DRIVER.
There are two ways you can use this firmware.
1. To fully flash your phone
2. To remove password, pattern lock, and gmail account.
TO remove password, pattern lock and gmail account.
1. Open Researchdownload
2. Load packet and look for file(first button)
3. Check only the following
?FDL1?FDL2?UserData
4. Click in calibration page, and UNCHECK ALL and press OK
5. And lastly press the Play button to continue flashing.
TO fully flash your phone.
1. Open Researchdownload
2. Load packet and look for file(first button)
3. Remove check in the following selection
?EraseRuntimeNV
?PHASE_CHECK
?EraseCache
?EraseData
?EraseMisc
4. Click in Calibration/BACK UP page, and UNCHECK ALL and press OK
5. And lastly press the Play button to continue flashing.
When connecting your phone in the PC after you press the Play button in Research Download, press and hold either VOLUME UP or VOLUME DOWN, or you can press VOLUME UP and VOLUME DOWN simultaneously.
I hope this tutorial help you recover your phone :)
Go to link download
Wednesday, October 5, 2016
Cherry Mobile Pebble Stock Rom firmware to unbrick your phone
Cherry Mobile Pebble Stock Rom firmware to unbrick your phone
Hi,
This firmware is for Cherry Mobile Pebble. This phone has an MTK chip.

The firmware is not rooted. If you want to root this phone you can use Kingroot or vRoot for PC
1. Bootloop
2. Damaged System UI
3. TP Upgrade only
4. Dead phone but it is detected in computer
5. Remove Gmail Account / Password / Pattern Lock (Alternative Way)
6. Privacy Protection Password Lock up
"DOWNLOAD THESE FILES"
Firmware Here -->Cherry Mobile Pebble Part 1
Firmware Here -->Cherry Mobile Pebble Part 2
Firmware Here -->Cherry Mobile Pebble Part 3
VCOM Driver -->VCOM Manual
Alternative Driver --> AutoInstaller
Alternative Driver --> AutoInstaller
SPFlashTool --> LatestVersion
"Use WinRar or 7zip to extract the firmware"
"Extract the files to your desired folder"
"If you encounter error in flashtool, use different version of it."
"Extract the files to your desired folder"
"If you encounter error in flashtool, use different version of it."
"I suggest to use 32bit Windows OS for compatibility of the driver"
Installing Driver with AutoInstaller
First try the Alternative Driver, which is the AutoInstaller. Just open the install.exe then it will automatically install the driver. To fully check if the driver is correctly installed in your computer.
Follow these steps:
- Turn off your phone (always powered off is a must)
- Press and hold volume up or down, or you can simple press the two button.
- Insert your USB cable without releasing the VOLUME button(s).
- In your computer, it must detect your phone and it will install the MTK Preloader or Mediatek USB VCOM driver.
- Repeat 1 to 4 if it does not detect your phone.
- If MTK Preloader/Mediatek USB VCOM Driver is installed you are good to go in flashing your phone ^_^
Reference Video using Driver Auto Installer (watch in HD)
Installing Manually using VCOM Driver
When installing it manually your phone must be turned off, then connect it to your computer/laptop while pressing VOLUME UP or VOLUME DOWN. This will detect and look for the driver.
1. This is the first time that you will connect your phone and it will search for the correct driver.
2. Check include this location ... ... and click on browse. Look for USB VCOM Driver and Click on 2K_XP_COM folder if you are using Windows XP or Win7 for Windows 7 and then press OK when you are done picking the right folder for the driver.
3. If the driver is successfully installed MediaTek DA USB VCOM will appear in the New Hardware Wizard.
Video Installing VCOM Driver (please watch in HD)
"Your Phone must be turned off when you are ready to connect and flash your phone"
Flashing1. Launch FlashTool (flash_tool.exe)
2. In Flashtool, Click on Scatter-Loading, and load your scatter file. (see example below)
Reference Video Using FlashTool version 5.xxx (watch in HD)
3. After you load the file, UNCHECK PRELOADER only, press Press Download to Flash your Phone.
4. After you press Download Follow these steps
Some workarounds:
- Turn off your phone (always powered off is a must)
- Press and HOLD volume UP or Down or you can simply press it simultaneously
- Insert your USB cable without releasing the VOLUME button(s).
- Keep on repeating until Flashtool detected your phone.
"Hard reset your phone after flashing"
Some workarounds:
If you encounter PMT_Changed error here is what you do:
In Latest version of Flashtool
PMT_CHANGED error occur when firmware is not compatible with your phone. Sometimes your phone has a different board version. You should check it too, if your firmware is compatible with your phone.
PMT_CHANGED error occur when firmware is not compatible with your phone. Sometimes your phone has a different board version. You should check it too, if your firmware is compatible with your phone.
If you encounter Privacy Protection Password:
- Open flash_tool.exe
- Load the scatter file
- Goto Format Tab
- Click on Format except bootloader
- Press Play/Start Icon
- Then remove battery
- Insert the battery again
- Insert the USB cable (you should hear a beep on your computer, and it should proceed in formatting.)
- After done formatting proceed in Flashing.
- Goto Download tab (I assume that you loaded the scatter file already)
- Uncheck PRELOADER (this is very important)
- Press Download
- Then remove battery
- Insert Battery again
- Insert the USB cable (you should hear a beep on your computer, and it should proceed in flashing or downloading the firmware in your phone.)
- Power ON the phone after flashing.
- Restore your IMEI.
For Invalid IMEI:Your Phone/Tablet must be rooted first
Restore yong IMEI in MTKDroidTools version 2.5.3. You will have this error when you format your phone in Flashtool as I had experienced. To restore download MTKDroidTools version 2.5.3 After you extract the file. Open the green robot, you must enable the usb debugging in your phone. It is usually located in Settings>Devoloper Mode then look for usb debugging. After enabling it. Connect your phone in your computer then in MTKDroidTool click on ROOT. Wait for it to finish, then Click in IMEI/NVRAM, input 15 number in each box. Then click REPLACE. Then click Reboot or you can manually turn off your phone. Then turn your phone on again. You can see that you have fully restored your IMEI.
1. Make sure you have MTKDROIDSTOOL version 2.4.8 or version 2.5.3 (you can search it in google)
I hope this tutorial help you. Please drop a comment if something is not clear to you.
Tested by:
Me - Files / Flashing
Go to link download
Subscribe to:
Posts (Atom)