Sunday, October 16, 2016
Phone Repair RIM Blackberry PSD
Phone Repair RIM Blackberry PSD

1 File PSD in 135 Layers | 6.20 MB | RS
Rapidshare
UploadBox
Source : http://mobilephonerepair.f1v.net/?p=1883
Go to link download
Saturday, October 15, 2016
Phone Repair iPhone 3G Unlocker
Phone Repair iPhone 3G Unlocker

iPhone 3G Unlocker
RapidShare
UploadBox
Source : http://mobilephonerepair.f1v.net/?p=1882
Go to link download
Wednesday, October 12, 2016
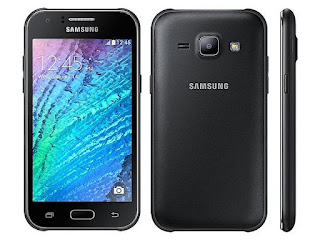
Samsung Galaxy J1 2016 J120F firmware stock rom to unbrick your phone
Samsung Galaxy J1 2016 J120F firmware stock rom to unbrick your phone
This firmware is for Samsung Galaxy J1 2016 J120F.
I have already tried and tested this firmware.
This tutorial is same with the new Galaxy J1 2016, just follow it and replace the firmware that you downloaded below.
For other variant of Galaxy J1, I will post it in another article. The file in this post consist of PIT, BOOTLOADER, PDA, MODEM and CSC file.
Download These Files First before proceeding
"If you are having hard time downloading the file in datafilehost make sure to UNCHECK "DOWNLOAD WITH SECURED DOWNLOAD MANAGER" below DOWNLOAD button"
Odin --> Odin 3.07
Firmware -- > J120F XXU1AOL2 OXE1AOL3.part01
Firmware -- > J120F XXU1AOL2 OXE1AOL3.part02
Firmware -- > J120F XXU1AOL2 OXE1AOL3.part06
"Extract these files in your desired folder"
Installing the driver
1. Install driver first just keep on hitting next. (Open/Execute/Run SamsungDrivePack)
2. After installing the driver Press and Hold Volume Down + Home Key + Power Button, a selection will appear if you would like to go in Download Mode, Press Volume Up to proceed in Download Mode.
3. Connect your phone in the PC via USB Cable
4. Wait for it to finish installing the driver.
"Note: Sometimes it is better to reboot your PC. After installing the driver."
BEFORE PROCEEDING IN FLASHING MAKE SURE THAT THE BATTERY IS FULLY CHARGED OR 50% CHARGED.
Flashing your Phone
*** For Rebootloop you can only check PDA, PHONE and CSC. (This is only base on my experience, because flashing PIT is dangerous too. You might brick your phone.)
PIT --> J13G.pit
BOOLOADER --> BOOTLOADER_BL_J100HXXU0AOA1_CL333157_QB3542504_REV01_user_low_ship.tar
PDA --> PDA_AP_J100HXXU0AOA1_CL333157_QB3542504_REV01_user_low_ship.tar.md5
PHONE --> MODEM_CP_J100HXXU0AOA1_CL333157_QB3542504_REV01_user_low_ship.tar.md5
CSC --> CSC_OXE_J100HOXE0AOA1_CL333157_QB3542504_REV01_user_low_ship.tar.md5
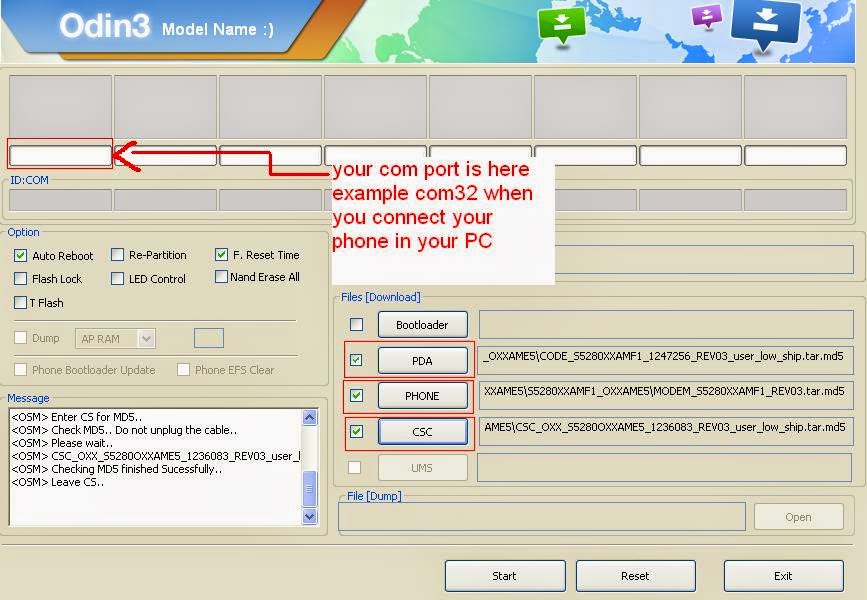 |
| Picture is example only. |
3. Do not check repartition.
I hope this tutorial help you. Drop a comment if there is something is not clear to you. Cheers! ^_^
Make sure to leave a feedback ;)
Go to link download
Use AC3 Player on your Android Phone
Use AC3 Player on your Android Phone


- Name: AC3 Player
- Category: Media & Video
- Version: 5.00
- File Size: 15 MB
- 100% Free!!
- Developer: New Preet Pvt. Ltd.
- AC3 Audio Format Supported
- No 3rd Party Plugin Required
- Simple & Easy User Interface
- Get Subtitle Online
- Fit Screen Button
- Resume Capability
- Music Player
- File Explorer

- Download AC3 Player APK file from this link.
- Locate and tap on the APK file in your phone storage.
- Allow installing unknown source apps if necessary.
- Complete the installation process.
- You will get the player icon on your apps list.

- Tap twice to stop and resume the video
- Play the video as audio by tapping on settings icon
- Get subtitle by tapping on subtitle icon
- Use the lock icon to lock the screen
- On the right side, tap and drag upward/ downward to adjust the volume
- On the left side, tab and drag upward/ downward to adjust the brightness
Stay with Marks PC Solution to get more interesting IT topics!
Go to link download
Monday, October 10, 2016
Phone Repair 5c130c SL3 Security code Done
Phone Repair 5c130c SL3 Security code Done


5130c SL3 Security Code done..
Action Taken…
*Using jaf box.
*Using Old UFC Cable
*Cable no:6 concordant for pinout..
Logs..Read info..
Code:
JAF chronicle 1.98.62
Detected PKEY: 9000BC84
Card hold up counter: 99.99%
P-key nokia procedure chronicle 01.02
Detected JAF INTERFACE version: 01.B1, Driver version: 40000, Library version: 30107
JAF DCT4/BB5 LOADERS DIR: C:Program FilesODEONJAFFlash
JAF DCT4/BB5 PRODUCT DIR: C:Program FilesNokiaPhoenixProducts
JAF USB LOADERS DIR: C:Program FilesODEONJAFFlashUSB
JAF DCT3/DCTL LOADERS DIR: C:Program FilesODEONJAFFlash3
USB Cable Driver version: 7.0.2.0
Changing mode…Done!
FILES SET FOR FLASHING:
MCU Flash file: NONE
PPM Flash file: NONE
CNT Flash file: NONE
APE Variant file: NONE
Switching to serial…
Powering a phone…
Failed! Aborting!
FILES SET FOR FLASHING:
MCU Flash file: NONE
PPM Flash file: NONE
CNT Flash file: NONE
APE Variant file: NONE
Source : http://mobilephonerepair.f1v.net/?p=1872
Go to link download
I9195 Root Unlock Full ProcedureStep 4 Turn off the phone Press and hold home volume down and power
I9195 Root Unlock Full ProcedureStep 4 Turn off the phone Press and hold home volume down and power
9195 Root & Unlock Full Procedure
STEP 1.Extract recovery-clockwork-6.0.3.7-serranoltexx.tar.zip file to your computer.(Download hereOdin_v3.09) &
recovery-clockwork-6.0.3.7-serranoltexx.tar(1)
Step 2.Copy the " S4Mini_RootKit_v1.zip" to your device SD card.File hereS4Mini_RootKit_v1
Step 4.Turn off the phone.
Press and hold home, volume down and power
Connect Micro USB cable, and press
Start Odin, and then click AP button.
Select "recovery-clockwork-6.0.3.7-serranoltexx.tar.md5" file that you extracted,
and press Start button. The phone will reboot when finished.
Step 3.After the phone restart on vibrate press hold volume up and home buttons to boot into recovery mode.
Select the option to install the ZIP file (S4Mini_RootKit_v1.zip) you have previously copied to your SD card.
and after installed just reboot, now your phone is succesfully rooted
Step 4.Phone Must be powered on
Step 5.Type *#0808# and choice DM Modem Adb
Step 6.Reboot phone
Step 7.Conect USB cable install drivers.
Step 8.Select Mobile Usb Port
Step 9.Press Unlock
Step 10.Enjoy Unlock Successfully done
Go to link download
Sunday, October 9, 2016
Measure Vehicle Speed with your Phone!!
Measure Vehicle Speed with your Phone!!

- Name: DigiHUD Speedometer
- Category: Transportation
- Size: 1.5 MB
- Version: 1.4.2 (December 04, 2015)
- Developer: James Moss
- Rating: 4.3
- 100 % Free - No Ads!!
- Download DigiHUD Speedometer from Link 1 or Link 2.
- If youre downloading this through phone, then this APK file is directly usable.
- If youre downloading through PC, simply copy the APK file to your phone.
- Locate DigiHUD Speedometer APK file from your phone storage.
- Short press on that file and it will ask to install.
- Hit on the Install option and wait few seconds.
- Finally you will see App Installed message.
- Hit on the Done button to exit from this window. Or you can directly press the Open button to run the application.


- Current Speed (in MPH/ KPH)
- Average Speed
- Maximum Speed
- Distance Travelled
- Compass
- Current Time
- Battery Level etc.
Stay with Marks PC Solution to get more interesting IT topics!
Go to link download
Saturday, October 8, 2016
Cherry Mobile Sonic Stock ROM firmware to unbrick your phone
Cherry Mobile Sonic Stock ROM firmware to unbrick your phone
Hi,
This firmware is for Cherry Mobile Sonic only. This is not compatible with Cherry Mobile Sonic 2.0. So be sure to check your model.

1. Bootloop
2. Damaged System UI
3. TP Upgrade only
4. Dead phone but it is detected in computer
5. Remove Gmail Account / Password / Pattern Lock (Alternative Way)
6. Privacy Protection Password Lock up
"DOWNLOAD THESE FILES"
Firmware Here -->Cherry Mobile Sonic
Alternative Driver --> AutoInstaller
"Extract the files to your desired folder"
"If you encounter error in flashtool, use different version of it."
"I suggest to use 32bit Windows OS for compatibility of the driver"
"You can also use 64bit version, just disable driver signing or driver signature before installing the driver."
Installing Driver with AutoInstaller
First try the Alternative Driver, which is the AutoInstaller. Just open the install.exe then it will automatically install the driver. To fully check if the driver is correctly installed in your computer.
Follow these steps:
- Turn off your phone (always powered off is a must)
- Press and hold volume up or down, or you can simple press the two button.
- Insert your USB cable without releasing the VOLUME button(s).
- In your computer, it must detect your phone and it will install the MTK Preloader or Mediatek USB VCOM driver.
- Repeat 1 to 4 if it does not detect your phone.
- If MTK Preloader/Mediatek USB VCOM Driver is installed you are good to go in flashing your phone ^_^
Reference Video using Driver Auto Installer (watch in HD)
Installing Manually using VCOM Driver

1. This is the first time that you will connect your phone and it will search for the correct driver.


3. If the driver is successfully installed MediaTek DA USB VCOM will appear in the New Hardware Wizard.
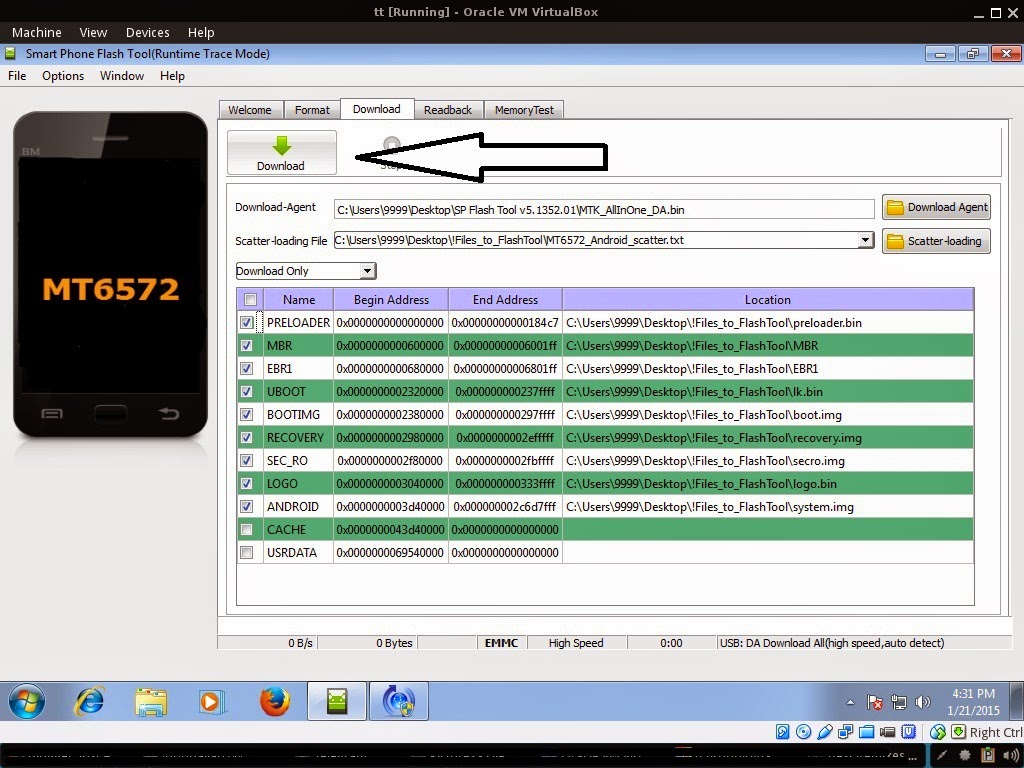
Reference Video Using FlashTool version 5.xxx (watch in HD)
3. After you load the file, UNCHECK PRELOADER only, press Press Download to Flash your Phone.
- Turn off your phone (always powered off is a must)
- Press and HOLD volume UP or Down or you can simply press it simultaneously
- Insert your USB cable without releasing the VOLUME button(s).
- Keep on repeating until Flashtool detected your phone.
Some workarounds:
- PMT_CHANGED error occur when firmware is not compatible with your phone. Sometimes your phone has a different board version. You should check it too, if your firmware is compatible with your phone.
- Try Firmware upgrade
- Try different version of flashtool
- Try to set Format All + Download
- Or try Manual Format first then Download.
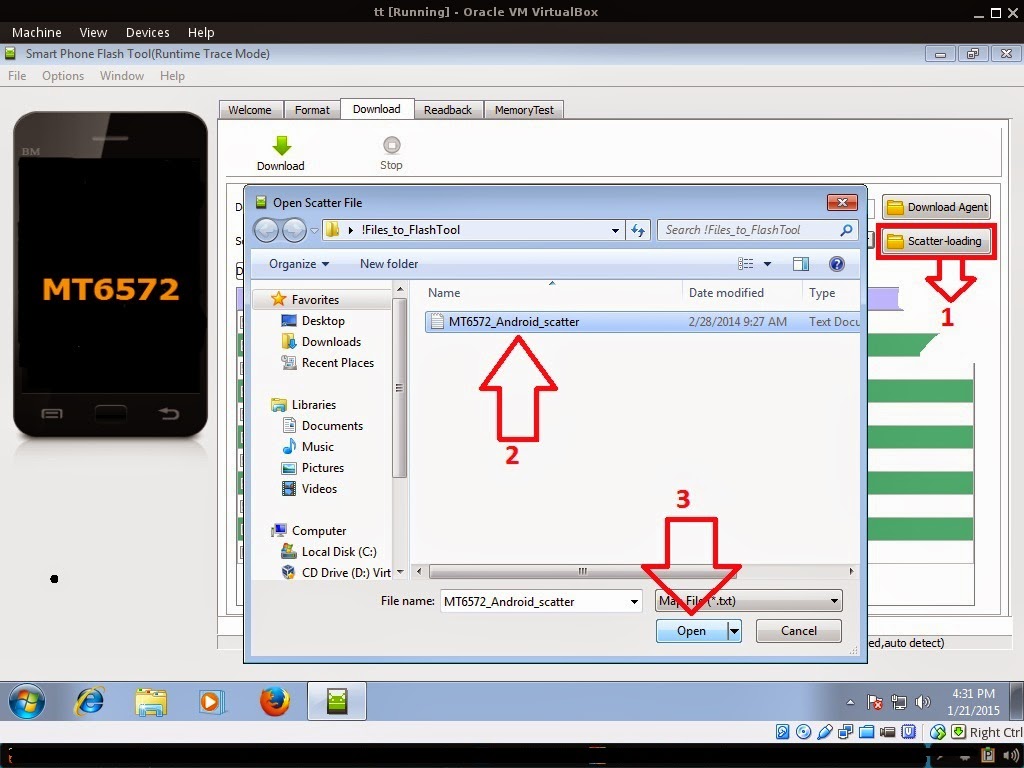
- Open flash_tool.exe
- Load the scatter file
- Goto Format Tab
- Click on Format except bootloader
- Press Play/Start Icon
- Then remove battery
- Insert the battery again
- Insert the USB cable (you should hear a beep on your computer, and it should proceed in formatting.)
- After done formatting proceed in Flashing.
- Goto Download tab (I assume that you loaded the scatter file already)
- Uncheck PRELOADER (this is very important)
- Press Download
- Then remove battery
- Insert Battery again
- Insert the USB cable (you should hear a beep on your computer, and it should proceed in flashing or downloading the firmware in your phone.)
- Power ON the phone after flashing.
- Restore your IMEI.
For Invalid IMEI (Does not work in MT6571 SoC):
- Root your phone via vRoot/iRoot/Kingoroot or your preferred method in rooting you device. Your phone must be rooted first.
- Download MTKDroidsTool version 2.4.8 and version 2.5.3
- Enable your USB debugging in Developer Option (you also need this in rooting your phone via PC)
- Okay in your PC -- Open MTKDroidstool version 2.4.8 (Mtkdroidstool.exe) first. Make sure that you connected your phone already.
- Still in Mtkdroidstool -- Click ROOT
- In your phone -- A pop up dialogue will appear, just grant or allow it.
- In your PC -- If root shell is granted/allowed, Click in IMEI/NVRAM tab. If it is grayed out this is the time when you open the MTKDroidsTool version 2.5.3.
- Enter your original IMEI
- Click Replace
- Reboot your phone
1. Make sure you have MTKDROIDSTOOL version 2.4.8 or version 2.5.3 (you can search it in google)
I hope this tutorial help you. Please drop a comment if something is not clear to you.
Go to link download
How To Restore Recover Deleted Files From Android Phone 2015
How To Restore Recover Deleted Files From Android Phone 2015

Best Methods To Take Backup Of Android Device Data.
1st Method:- Using Recovery Android - Data Recovery Machine for Android


2nd Method:- Using Yodot Recovery Software


3rd Method:- Using Dumpster- Recycle Bin Android App.


Go to link download
Arc Mobile Nitro 401D firmware stock rom to unbrick your phone
Arc Mobile Nitro 401D firmware stock rom to unbrick your phone
Hi,
I hope this firmware can help those who are in need of this file. Ive tried and tested this in a bootloop Arc Mobile 401D. Just follow the procedure below.

You can fix the following issue in your phone:
1. Bootloop
2. Damaged System UI
3. TP Upgrade only
4. Dead phone but it is detected in computer
5. Remove Gmail Account / Password / Pattern Lock (Alternative Way)
6. And other issues with your phones firmware
"DOWNLOAD THESE FILES"
Firmware Here -->Arc Mobile Nitro 401D Part 1
Firmware Here -->Arc Mobile Nitro 401D Part 3
VCOM Driver -->VCOM Manual
Alternative Driver --> AutoInstaller
"Use WinRar or 7zip to extract the firmware"
"Extract the files to your desired folder"
"If you encounter error in flashtool, use different version of it."
Installing Driver with AutoInstaller
First try the Alternative Driver, which is the AutoInstaller. Just open the install.exe then it will automatically install the driver. To fully check if the driver is correctly installed in your computer.
Follow these steps:
- Turn off your phone (always powered off is a must)
- Press and hold volume up or down, or you can simple press the two button
- Insert your USB cable without releasing the VOLUME button(s).
- In your computer, it must detect your phone and it will install the MTK Preloader or Mediatek USB VCOM driver.
- Repeat 1 to 4 if it does not detect your phone.
- If MTK Preloader/Mediatek USB VCOM Driver is installed you are good to go in flashing your phone ^_^
Reference Video using Driver Auto Installer (watch in HD)
Installing Manually using VCOM Driver
1. This is the first time that you will connect your phone and it will search for the correct driver.
3. If the driver is successfully installed MediaTek DA USB VCOM will appear in the New Hardware Wizard.
Flashing
Reference Video Using FlashTool version 5.xxx (watch in HD)
3. After you load the file, press Press Download to Flash your Phone.
- Turn off your phone (always powered off is a must)
- Press and HOLD volume UP or Down or you can simply press it simultaneously
- Insert your USB cable without releasing the VOLUME button(s).
- Keep on repeating until Flashtool detected your phone.
Some workarounds:
- Load the scatter file
- Choose Format all + Download (Underneath Scatter-loading file)
- Then Click Download and wait until it is done flashing
Restore yong IMEI in MTKDroidTools version 2.5.3. You will have this error when you format your phone in Flashtool as I had experienced. To restore download MTKDroidTools version 2.5.3 After you extract the file. Open the green robot, you must enable the usb debugging in your phone. It is usually located in Settings>Devoloper Mode then look for usb debugging. After enabling it. Connect your phone in your computer then in MTKDroidTool click on ROOT. Wait for it to finish, then Click in IMEI/NVRAM, input 15 number in each box. Then click REPLACE. Then click Reboot or you can manually turn off your phone. Then turn your phone on again. You can see that you have fully restored your IMEI.
I hope this tutorial help you. Please drop a comment if something is not clear to you.
Go to link download