Showing posts with label unbrick. Show all posts
Showing posts with label unbrick. Show all posts
Saturday, October 15, 2016
Board ID Inet 86vz rev03 firmware to unbrick your tablet
Board ID Inet 86vz rev03 firmware to unbrick your tablet
This firmware is for BOARD ID Inet 86vz rev03. This tablet usually have a A13 cpu or chip. Already tried this firmware and it is working well. Back Camera, Front Camera, Sensors, Wifi all is working. If something is not working in your tablet then maybe it is not supported in this firmware. So just try another firmware ;)

Phoenixsuit -->Download Phoenixsuit Here
Firmware --> Board ID Inet 86vz rev03 Part 1
Firmware --> Board ID Inet 86vz rev03 Part 2
Firmware --> Board ID Inet 86vz rev03 Part 3
"You can use file joiner or 7zip to extract the file"
For tutorial on how to flash your tablet, when you download phoenixsuit. The tutorial is in there. Credits to AndroidXDA for the tutorial. I cant write a tutorial as of the moment because I do not have a tablet to flash.
Go to link download

Wednesday, October 12, 2016
Samsung Galaxy J1 2016 J120F firmware stock rom to unbrick your phone
Samsung Galaxy J1 2016 J120F firmware stock rom to unbrick your phone
This firmware is for Samsung Galaxy J1 2016 J120F.
I have already tried and tested this firmware.
This tutorial is same with the new Galaxy J1 2016, just follow it and replace the firmware that you downloaded below.
For other variant of Galaxy J1, I will post it in another article. The file in this post consist of PIT, BOOTLOADER, PDA, MODEM and CSC file.
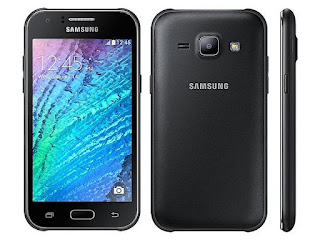
Download These Files First before proceeding
"If you are having hard time downloading the file in datafilehost make sure to UNCHECK "DOWNLOAD WITH SECURED DOWNLOAD MANAGER" below DOWNLOAD button"
Odin --> Odin 3.07
Firmware -- > J120F XXU1AOL2 OXE1AOL3.part01
Firmware -- > J120F XXU1AOL2 OXE1AOL3.part02
Firmware -- > J120F XXU1AOL2 OXE1AOL3.part03
Firmware -- > J120F XXU1AOL2 OXE1AOL3.part04
Firmware -- > J120F XXU1AOL2 OXE1AOL3.part05
Firmware -- > J120F XXU1AOL2 OXE1AOL3.part06
Firmware -- > J120F XXU1AOL2 OXE1AOL3.part06
"Extract these files in your desired folder"
Installing the driver
1. Install driver first just keep on hitting next. (Open/Execute/Run SamsungDrivePack)
2. After installing the driver Press and Hold Volume Down + Home Key + Power Button, a selection will appear if you would like to go in Download Mode, Press Volume Up to proceed in Download Mode.
3. Connect your phone in the PC via USB Cable
4. Wait for it to finish installing the driver.
"Note: Sometimes it is better to reboot your PC. After installing the driver."
BEFORE PROCEEDING IN FLASHING MAKE SURE THAT THE BATTERY IS FULLY CHARGED OR 50% CHARGED.
Flashing your Phone
1. Open Odin 3.07
2. Load the file (PDA, Phone, CSC). Click on PDA then look for the firmware that you had extracted. Same with Phone and CSC. Bootloader is optional.
*** For Rebootloop you can only check PDA, PHONE and CSC. (This is only base on my experience, because flashing PIT is dangerous too. You might brick your phone.)
PIT --> J13G.pit
BOOLOADER --> BOOTLOADER_BL_J100HXXU0AOA1_CL333157_QB3542504_REV01_user_low_ship.tar
PDA --> PDA_AP_J100HXXU0AOA1_CL333157_QB3542504_REV01_user_low_ship.tar.md5
PHONE --> MODEM_CP_J100HXXU0AOA1_CL333157_QB3542504_REV01_user_low_ship.tar.md5
CSC --> CSC_OXE_J100HOXE0AOA1_CL333157_QB3542504_REV01_user_low_ship.tar.md5
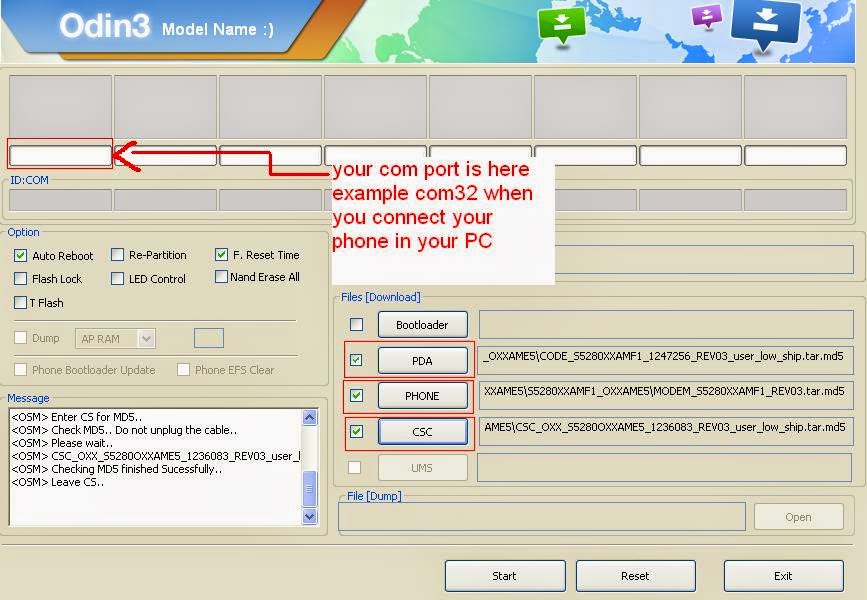 |
| Picture is example only. |
3. Do not check repartition.
4. When you are ready to flash your phone, Press and Hold Volume Down + Home Key + Power Button, a selection will appear if you would like to go in Download Mode, Press Volume Up to proceed in Download Mode.
5. Connect your phone in the PC via USB Cable, wait for a value in the ID:COM to appear. It will turn yellow with number example: COM32, if it nothing appear close Odin an open it again and load the file again.
6. Press START to proceed flashing your phone. Wait until it is done, the phone will reboot after flashing.
I hope this tutorial help you. Drop a comment if there is something is not clear to you. Cheers! ^_^
Make sure to leave a feedback ;)
Go to link download
Sunday, October 9, 2016
Torque Droidz Trend stock rom firmware to unbrick your device
Torque Droidz Trend stock rom firmware to unbrick your device
Hi,
I hope that this firmware will help you fix your phone. The firmware is not rooted. This is version 4.2.2 or also known as Jellybean.
You can flash CWM or Stock Recovery, just replace recovery.img in Flashtool.

You can fix the following issue in your phone:
1. Bootloop
2. Damaged System UI
3. TP Upgrade only
4. Dead phone but it is detected in computer
5. Remove Gmail Account / Password / Pattern Lock (Alternative Way)
6. And other issues with your phones firmware
"DOWNLOAD THESE FILES"
Firmware Here -->Torque Droidz Trend
VCOM Driver -->VCOM Manual
Alternative Driver --> AutoInstaller
Alternative Driver --> AutoInstaller
SPFlashTool --> LatestVersion
"Use WinRar or 7zip to extract the firmware"
"Extract the files to your desired folder"
"If you encounter error in flashtool, use different version of it."
"I suggest to use 32bit Windows OS for compatibility of the driver"
Installing Driver with AutoInstaller
First try the Alternative Driver, which is the AutoInstaller. Just open the install.exe then it will automatically install the driver. To fully check if the driver is correctly installed in your computer.
Follow these steps:
- Turn off your phone (always powered off is a must)
- Press and hold volume up or down, or you can simple press the two button
- Insert your USB cable without releasing the VOLUME button(s).
- In your computer, it must detect your phone and it will install the MTK Preloader or Mediatek USB VCOM driver.
- Repeat 1 to 4 if it does not detect your phone.
- If MTK Preloader/Mediatek USB VCOM Driver is installed you are good to go in flashing your phone ^_^
Reference Video using Driver Auto Installer (watch in HD)
Installing Manually using VCOM Driver
When installing it manually your phone must be turned off, then connect it to your computer/laptop while pressing VOLUME UP or VOLUME DOWN. This will detect and look for the driver.

1. This is the first time that you will connect your phone and it will search for the correct driver.

2. Check include this location ... ... and click on browse. Look for USB VCOM Driver and Click on 2K_XP_COM folder if you are using Windows XP or Win7 for Windows 7 and then press OK when you are done picking the right folder for the driver.

3. If the driver is successfully installed MediaTek DA USB VCOM will appear in the New Hardware Wizard.
Video Installing VCOM Driver (please watch in HD)
"Your Phone must be turned off when you are ready to connect and flash your phone"
Flashing
1. Launch FlashTool (flash_tool.exe)
2. In Flashtool, Click on Scatter-Loading, and load your scatter file. (see example below)
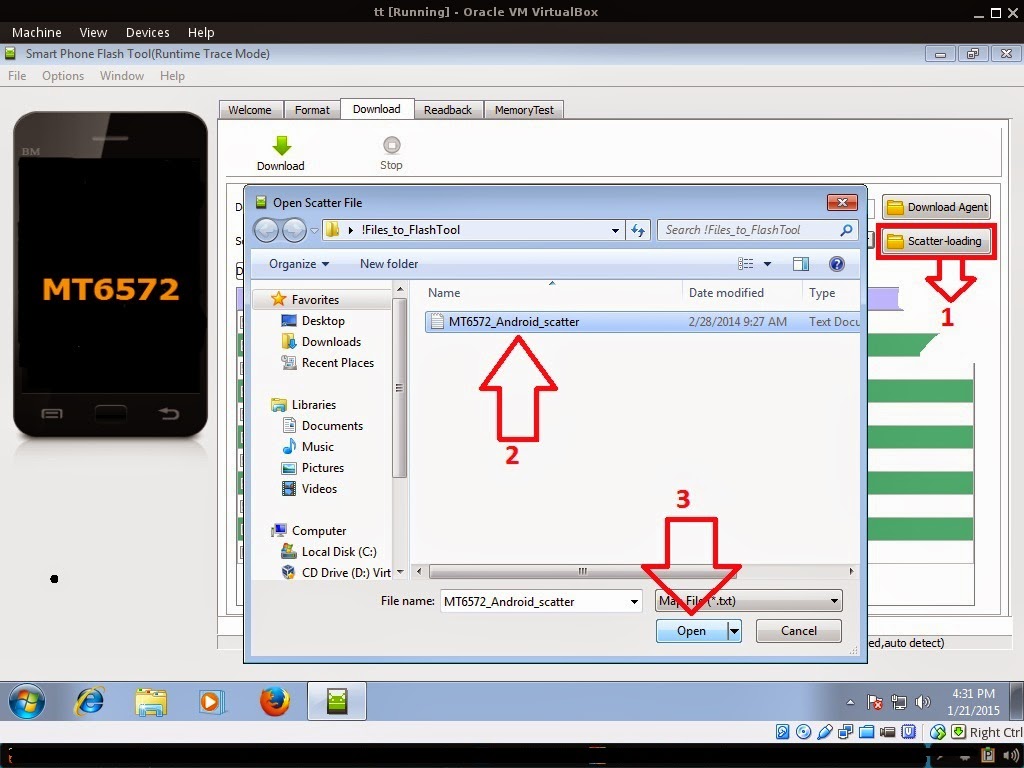
Reference Video Using FlashTool version 5.xxx (watch in HD)
3. After you load the file, press Press Download to Flash your Phone.
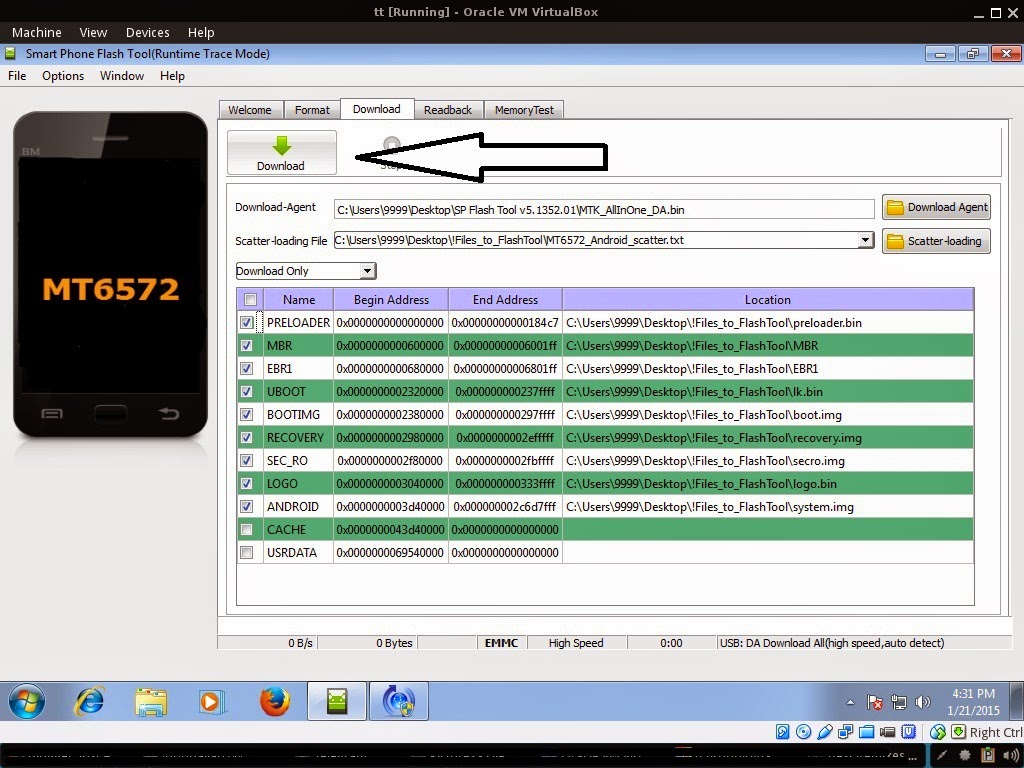
4. After you press Download Follow these steps
Some workarounds:
- Turn off your phone (always powered off is a must)
- Press and HOLD volume UP or Down or you can simply press it simultaneously
- Insert your USB cable without releasing the VOLUME button(s).
- Keep on repeating until Flashtool detected your phone.
"Hard reset your phone after flashing"
Some workarounds:
If you encounter PMT_Changed error here is what you do:
In Latest version of Flashtool
- Load the scatter file
- Choose Format all + Download (Underneath Scatter-loading file)
- Then Click Download and wait until it is done flashing
For Invalid IMEI:Your Phone/Tablet must be rooted first
Restore yong IMEI in MTKDroidTools version 2.5.3. You will have this error when you format your phone in Flashtool as I had experienced. To restore download MTKDroidTools version 2.5.3 After you extract the file. Open the green robot, you must enable the usb debugging in your phone. It is usually located in Settings>Devoloper Mode then look for usb debugging. After enabling it. Connect your phone in your computer then in MTKDroidTool click on ROOT. Wait for it to finish, then Click in IMEI/NVRAM, input 15 number in each box. Then click REPLACE. Then click Reboot or you can manually turn off your phone. Then turn your phone on again. You can see that you have fully restored your IMEI.
Restore yong IMEI in MTKDroidTools version 2.5.3. You will have this error when you format your phone in Flashtool as I had experienced. To restore download MTKDroidTools version 2.5.3 After you extract the file. Open the green robot, you must enable the usb debugging in your phone. It is usually located in Settings>Devoloper Mode then look for usb debugging. After enabling it. Connect your phone in your computer then in MTKDroidTool click on ROOT. Wait for it to finish, then Click in IMEI/NVRAM, input 15 number in each box. Then click REPLACE. Then click Reboot or you can manually turn off your phone. Then turn your phone on again. You can see that you have fully restored your IMEI.
I hope this tutorial help you. Please drop a comment if something is not clear to you.
Go to link download
Saturday, October 8, 2016
Cherry Mobile Sonic Stock ROM firmware to unbrick your phone
Cherry Mobile Sonic Stock ROM firmware to unbrick your phone
Hi,
This firmware is for Cherry Mobile Sonic only. This is not compatible with Cherry Mobile Sonic 2.0. So be sure to check your model.

The firmware is rooted already. Make sure that you hard reset your phone after flashing to fix IMEI problem.
1. Bootloop
2. Damaged System UI
3. TP Upgrade only
4. Dead phone but it is detected in computer
5. Remove Gmail Account / Password / Pattern Lock (Alternative Way)
6. Privacy Protection Password Lock up
"DOWNLOAD THESE FILES"
Firmware Here -->Cherry Mobile Sonic
VCOM Driver -->VCOM Manual
Alternative Driver --> AutoInstaller
Alternative Driver --> AutoInstaller
SPFlashTool --> LatestVersion
"Use WinRar or 7zip to extract the firmware"
"Extract the files to your desired folder"
"If you encounter error in flashtool, use different version of it."
"Extract the files to your desired folder"
"If you encounter error in flashtool, use different version of it."
"I suggest to use 32bit Windows OS for compatibility of the driver"
"You can also use 64bit version, just disable driver signing or driver signature before installing the driver."
Installing Driver with AutoInstaller
First try the Alternative Driver, which is the AutoInstaller. Just open the install.exe then it will automatically install the driver. To fully check if the driver is correctly installed in your computer.
Follow these steps:
- Turn off your phone (always powered off is a must)
- Press and hold volume up or down, or you can simple press the two button.
- Insert your USB cable without releasing the VOLUME button(s).
- In your computer, it must detect your phone and it will install the MTK Preloader or Mediatek USB VCOM driver.
- Repeat 1 to 4 if it does not detect your phone.
- If MTK Preloader/Mediatek USB VCOM Driver is installed you are good to go in flashing your phone ^_^
Reference Video using Driver Auto Installer (watch in HD)
Installing Manually using VCOM Driver
When installing it manually your phone must be turned off, then connect it to your computer/laptop while pressing VOLUME UP or VOLUME DOWN. This will detect and look for the driver.
1. This is the first time that you will connect your phone and it will search for the correct driver.
2. Check include this location ... ... and click on browse. Look for USB VCOM Driver and Click on 2K_XP_COM folder if you are using Windows XP or Win7 for Windows 7 and then press OK when you are done picking the right folder for the driver.
3. If the driver is successfully installed MediaTek DA USB VCOM will appear in the New Hardware Wizard.
Video Installing VCOM Driver (please watch in HD)
"Your Phone must be turned off when you are ready to connect and flash your phone"
Flashing1. Launch FlashTool (flash_tool.exe)
2. In Flashtool, Click on Scatter-Loading, and load your scatter file. (see example below)
Reference Video Using FlashTool version 5.xxx (watch in HD)
3. After you load the file, UNCHECK PRELOADER only, press Press Download to Flash your Phone.
4. After you press Download Follow these steps
Some workarounds:
- Turn off your phone (always powered off is a must)
- Press and HOLD volume UP or Down or you can simply press it simultaneously
- Insert your USB cable without releasing the VOLUME button(s).
- Keep on repeating until Flashtool detected your phone.
"Hard reset your phone after flashing"
Some workarounds:
If you encounter PMT_Changed error here is what you do:
In Latest version of Flashtool
- PMT_CHANGED error occur when firmware is not compatible with your phone. Sometimes your phone has a different board version. You should check it too, if your firmware is compatible with your phone.
- Try Firmware upgrade
- Try different version of flashtool
- Try to set Format All + Download
- Or try Manual Format first then Download.
If you encounter Privacy Protection Password:
For Invalid IMEI (Does not work in MT6571 SoC):
FOR DAMAGED BASEBAND or UNKNOWN BASEBAND (Your phone must be rooted first)
1. Make sure you have MTKDROIDSTOOL version 2.4.8 or version 2.5.3 (you can search it in google)
2. In MTKDroidstool (I assume you launch the tool) -- Click in Root.
3. In your device -- After you press Root, you need to authorize it. A pop up message will appear. Click Allow/Authorize depends on your root application.
4. In MTKDroidsTool -- Click in IMEI/NVRAM, then click in RESTORE.
5. Then look for the folder where you extracted the NVRAM files.
6. Check if the Baseband is fixed. And if the IMEI is fully restored.
7. If Baseband is still Unknown and IMEI is invalid. Then you need to hard reset first your phone.
8. After hard reset your baseband should be fixed already. (base on my experience)
9. If your baseband is fixed sometimes the IMEI is still invalid. So you need to restore the IMEI.
10. To restore IMEI follow Step 1-4, but you should not restore. You should fill the IMEI then click REPLACE. Then reboot your phone. VOILA! I hope the phone is fully working :)
- Open flash_tool.exe
- Load the scatter file
- Goto Format Tab
- Click on Format except bootloader
- Press Play/Start Icon
- Then remove battery
- Insert the battery again
- Insert the USB cable (you should hear a beep on your computer, and it should proceed in formatting.)
- After done formatting proceed in Flashing.
- Goto Download tab (I assume that you loaded the scatter file already)
- Uncheck PRELOADER (this is very important)
- Press Download
- Then remove battery
- Insert Battery again
- Insert the USB cable (you should hear a beep on your computer, and it should proceed in flashing or downloading the firmware in your phone.)
- Power ON the phone after flashing.
- Restore your IMEI.
For Invalid IMEI (Does not work in MT6571 SoC):
- Root your phone via vRoot/iRoot/Kingoroot or your preferred method in rooting you device. Your phone must be rooted first.
- Download MTKDroidsTool version 2.4.8 and version 2.5.3
- Enable your USB debugging in Developer Option (you also need this in rooting your phone via PC)
- Okay in your PC -- Open MTKDroidstool version 2.4.8 (Mtkdroidstool.exe) first. Make sure that you connected your phone already.
- Still in Mtkdroidstool -- Click ROOT
- In your phone -- A pop up dialogue will appear, just grant or allow it.
- In your PC -- If root shell is granted/allowed, Click in IMEI/NVRAM tab. If it is grayed out this is the time when you open the MTKDroidsTool version 2.5.3.
- Enter your original IMEI
- Click Replace
- Reboot your phone
1. Make sure you have MTKDROIDSTOOL version 2.4.8 or version 2.5.3 (you can search it in google)
I hope this tutorial help you. Please drop a comment if something is not clear to you.
Go to link download
Arc Mobile Nitro 401D firmware stock rom to unbrick your phone
Arc Mobile Nitro 401D firmware stock rom to unbrick your phone
Hi,
I hope this firmware can help those who are in need of this file. Ive tried and tested this in a bootloop Arc Mobile 401D. Just follow the procedure below.

You can fix the following issue in your phone:
1. Bootloop
2. Damaged System UI
3. TP Upgrade only
4. Dead phone but it is detected in computer
5. Remove Gmail Account / Password / Pattern Lock (Alternative Way)
6. And other issues with your phones firmware
"DOWNLOAD THESE FILES"
Firmware Here -->Arc Mobile Nitro 401D Part 1
Firmware Here -->Arc Mobile Nitro 401D Part 2
Firmware Here -->Arc Mobile Nitro 401D Part 3
VCOM Driver -->VCOM Manual
Alternative Driver --> AutoInstaller
Firmware Here -->Arc Mobile Nitro 401D Part 3
VCOM Driver -->VCOM Manual
Alternative Driver --> AutoInstaller
SPFlashTool --> LatestVersion
"Use WinRar or 7zip to extract the firmware"
"Extract the files to your desired folder"
"If you encounter error in flashtool, use different version of it."
"I suggest to use 32bit Windows OS for compatibility of the driver"
Installing Driver with AutoInstaller
First try the Alternative Driver, which is the AutoInstaller. Just open the install.exe then it will automatically install the driver. To fully check if the driver is correctly installed in your computer.
Follow these steps:
- Turn off your phone (always powered off is a must)
- Press and hold volume up or down, or you can simple press the two button
- Insert your USB cable without releasing the VOLUME button(s).
- In your computer, it must detect your phone and it will install the MTK Preloader or Mediatek USB VCOM driver.
- Repeat 1 to 4 if it does not detect your phone.
- If MTK Preloader/Mediatek USB VCOM Driver is installed you are good to go in flashing your phone ^_^
Reference Video using Driver Auto Installer (watch in HD)
Installing Manually using VCOM Driver
When installing it manually your phone must be turned off, then connect it to your computer/laptop while pressing VOLUME UP or VOLUME DOWN. This will detect and look for the driver.
1. This is the first time that you will connect your phone and it will search for the correct driver.
2. Check include this location ... ... and click on browse. Look for USB VCOM Driver and Click on 2K_XP_COM folder if you are using Windows XP or Win7 for Windows 7 and then press OK when you are done picking the right folder for the driver.
3. If the driver is successfully installed MediaTek DA USB VCOM will appear in the New Hardware Wizard.
Video Installing VCOM Driver (please watch in HD)
"Your Phone must be turned off when you are ready to connect and flash your phone"
Flashing
1. Launch FlashTool (flash_tool.exe)
2. In Flashtool, Click on Scatter-Loading, and load your scatter file. (see example below)
Reference Video Using FlashTool version 5.xxx (watch in HD)
3. After you load the file, press Press Download to Flash your Phone.
4. After you press Download Follow these steps
Some workarounds:
- Turn off your phone (always powered off is a must)
- Press and HOLD volume UP or Down or you can simply press it simultaneously
- Insert your USB cable without releasing the VOLUME button(s).
- Keep on repeating until Flashtool detected your phone.
"Hard reset your phone after flashing"
Some workarounds:
If you encounter PMT_Changed error here is what you do:
In Latest version of Flashtool
- Load the scatter file
- Choose Format all + Download (Underneath Scatter-loading file)
- Then Click Download and wait until it is done flashing
For Invalid IMEI:Your Phone/Tablet must be rooted first
Restore yong IMEI in MTKDroidTools version 2.5.3. You will have this error when you format your phone in Flashtool as I had experienced. To restore download MTKDroidTools version 2.5.3 After you extract the file. Open the green robot, you must enable the usb debugging in your phone. It is usually located in Settings>Devoloper Mode then look for usb debugging. After enabling it. Connect your phone in your computer then in MTKDroidTool click on ROOT. Wait for it to finish, then Click in IMEI/NVRAM, input 15 number in each box. Then click REPLACE. Then click Reboot or you can manually turn off your phone. Then turn your phone on again. You can see that you have fully restored your IMEI.
Restore yong IMEI in MTKDroidTools version 2.5.3. You will have this error when you format your phone in Flashtool as I had experienced. To restore download MTKDroidTools version 2.5.3 After you extract the file. Open the green robot, you must enable the usb debugging in your phone. It is usually located in Settings>Devoloper Mode then look for usb debugging. After enabling it. Connect your phone in your computer then in MTKDroidTool click on ROOT. Wait for it to finish, then Click in IMEI/NVRAM, input 15 number in each box. Then click REPLACE. Then click Reboot or you can manually turn off your phone. Then turn your phone on again. You can see that you have fully restored your IMEI.
I hope this tutorial help you. Please drop a comment if something is not clear to you.
Go to link download
Friday, October 7, 2016
Cherry Mobile Ace F100 firmware stock rom to unbrick your phone
Cherry Mobile Ace F100 firmware stock rom to unbrick your phone
Hi all,
This firmware is for Cherry Mobile Ace F100 with firefox OS. I have already tested this firmware and it is fully working...
TOOLS
ResearchDownload --> DOWNLOAD HERE
Firmware --> Download HERE
Driver -- > DOWNLOAD HERE
"Extract to your desired folders"
DOWNLOAD THE FILES, AND EXTRACT. INSTALL DRIVER.
There are two ways you can use this firmware.
1. To fully flash your phone
2. To remove password, pattern lock, and gmail account.
TO remove password, pattern lock and gmail account.
1. Open Researchdownload
2. Load packet and look for file(first button)
3. Check only the following
?FDL1?FDL2?UserData
4. Click in calibration page, and UNCHECK ALL and press OK
5. And lastly press the Play button to continue flashing.
TO fully flash your phone.
1. Open Researchdownload
2. Load packet and look for file(first button)
3. Remove check in the following selection
?EraseRuntimeNV
?PHASE_CHECK
?EraseCache
?EraseData
?EraseMisc
4. Click in Calibration/BACK UP page, and UNCHECK ALL and press OK
5. And lastly press the Play button to continue flashing.
When connecting your phone in the PC after you press the Play button in Research Download, press and hold either VOLUME UP or VOLUME DOWN, or you can press VOLUME UP and VOLUME DOWN simultaneously.
I hope this tutorial help you recover your phone :)
This firmware is for Cherry Mobile Ace F100 with firefox OS. I have already tested this firmware and it is fully working...
TOOLS
ResearchDownload --> DOWNLOAD HERE
Firmware --> Download HERE
Driver -- > DOWNLOAD HERE
"Extract to your desired folders"
DOWNLOAD THE FILES, AND EXTRACT. INSTALL DRIVER.
There are two ways you can use this firmware.
1. To fully flash your phone
2. To remove password, pattern lock, and gmail account.
TO remove password, pattern lock and gmail account.
1. Open Researchdownload
2. Load packet and look for file(first button)
3. Check only the following
?FDL1?FDL2?UserData
4. Click in calibration page, and UNCHECK ALL and press OK
5. And lastly press the Play button to continue flashing.
TO fully flash your phone.
1. Open Researchdownload
2. Load packet and look for file(first button)
3. Remove check in the following selection
?EraseRuntimeNV
?PHASE_CHECK
?EraseCache
?EraseData
?EraseMisc
4. Click in Calibration/BACK UP page, and UNCHECK ALL and press OK
5. And lastly press the Play button to continue flashing.
When connecting your phone in the PC after you press the Play button in Research Download, press and hold either VOLUME UP or VOLUME DOWN, or you can press VOLUME UP and VOLUME DOWN simultaneously.
I hope this tutorial help you recover your phone :)
Go to link download
Wednesday, October 5, 2016
Cherry Mobile Pebble Stock Rom firmware to unbrick your phone
Cherry Mobile Pebble Stock Rom firmware to unbrick your phone
Hi,
This firmware is for Cherry Mobile Pebble. This phone has an MTK chip.

The firmware is not rooted. If you want to root this phone you can use Kingroot or vRoot for PC
1. Bootloop
2. Damaged System UI
3. TP Upgrade only
4. Dead phone but it is detected in computer
5. Remove Gmail Account / Password / Pattern Lock (Alternative Way)
6. Privacy Protection Password Lock up
"DOWNLOAD THESE FILES"
Firmware Here -->Cherry Mobile Pebble Part 1
Firmware Here -->Cherry Mobile Pebble Part 2
Firmware Here -->Cherry Mobile Pebble Part 3
VCOM Driver -->VCOM Manual
Alternative Driver --> AutoInstaller
Alternative Driver --> AutoInstaller
SPFlashTool --> LatestVersion
"Use WinRar or 7zip to extract the firmware"
"Extract the files to your desired folder"
"If you encounter error in flashtool, use different version of it."
"Extract the files to your desired folder"
"If you encounter error in flashtool, use different version of it."
"I suggest to use 32bit Windows OS for compatibility of the driver"
Installing Driver with AutoInstaller
First try the Alternative Driver, which is the AutoInstaller. Just open the install.exe then it will automatically install the driver. To fully check if the driver is correctly installed in your computer.
Follow these steps:
- Turn off your phone (always powered off is a must)
- Press and hold volume up or down, or you can simple press the two button.
- Insert your USB cable without releasing the VOLUME button(s).
- In your computer, it must detect your phone and it will install the MTK Preloader or Mediatek USB VCOM driver.
- Repeat 1 to 4 if it does not detect your phone.
- If MTK Preloader/Mediatek USB VCOM Driver is installed you are good to go in flashing your phone ^_^
Reference Video using Driver Auto Installer (watch in HD)
Installing Manually using VCOM Driver
When installing it manually your phone must be turned off, then connect it to your computer/laptop while pressing VOLUME UP or VOLUME DOWN. This will detect and look for the driver.
1. This is the first time that you will connect your phone and it will search for the correct driver.
2. Check include this location ... ... and click on browse. Look for USB VCOM Driver and Click on 2K_XP_COM folder if you are using Windows XP or Win7 for Windows 7 and then press OK when you are done picking the right folder for the driver.
3. If the driver is successfully installed MediaTek DA USB VCOM will appear in the New Hardware Wizard.
Video Installing VCOM Driver (please watch in HD)
"Your Phone must be turned off when you are ready to connect and flash your phone"
Flashing1. Launch FlashTool (flash_tool.exe)
2. In Flashtool, Click on Scatter-Loading, and load your scatter file. (see example below)
Reference Video Using FlashTool version 5.xxx (watch in HD)
3. After you load the file, UNCHECK PRELOADER only, press Press Download to Flash your Phone.
4. After you press Download Follow these steps
Some workarounds:
- Turn off your phone (always powered off is a must)
- Press and HOLD volume UP or Down or you can simply press it simultaneously
- Insert your USB cable without releasing the VOLUME button(s).
- Keep on repeating until Flashtool detected your phone.
"Hard reset your phone after flashing"
Some workarounds:
If you encounter PMT_Changed error here is what you do:
In Latest version of Flashtool
PMT_CHANGED error occur when firmware is not compatible with your phone. Sometimes your phone has a different board version. You should check it too, if your firmware is compatible with your phone.
PMT_CHANGED error occur when firmware is not compatible with your phone. Sometimes your phone has a different board version. You should check it too, if your firmware is compatible with your phone.
If you encounter Privacy Protection Password:
- Open flash_tool.exe
- Load the scatter file
- Goto Format Tab
- Click on Format except bootloader
- Press Play/Start Icon
- Then remove battery
- Insert the battery again
- Insert the USB cable (you should hear a beep on your computer, and it should proceed in formatting.)
- After done formatting proceed in Flashing.
- Goto Download tab (I assume that you loaded the scatter file already)
- Uncheck PRELOADER (this is very important)
- Press Download
- Then remove battery
- Insert Battery again
- Insert the USB cable (you should hear a beep on your computer, and it should proceed in flashing or downloading the firmware in your phone.)
- Power ON the phone after flashing.
- Restore your IMEI.
For Invalid IMEI:Your Phone/Tablet must be rooted first
Restore yong IMEI in MTKDroidTools version 2.5.3. You will have this error when you format your phone in Flashtool as I had experienced. To restore download MTKDroidTools version 2.5.3 After you extract the file. Open the green robot, you must enable the usb debugging in your phone. It is usually located in Settings>Devoloper Mode then look for usb debugging. After enabling it. Connect your phone in your computer then in MTKDroidTool click on ROOT. Wait for it to finish, then Click in IMEI/NVRAM, input 15 number in each box. Then click REPLACE. Then click Reboot or you can manually turn off your phone. Then turn your phone on again. You can see that you have fully restored your IMEI.
1. Make sure you have MTKDROIDSTOOL version 2.4.8 or version 2.5.3 (you can search it in google)
I hope this tutorial help you. Please drop a comment if something is not clear to you.
Tested by:
Me - Files / Flashing
Go to link download
Subscribe to:
Posts (Atom)