Showing posts with label word. Show all posts
Showing posts with label word. Show all posts
Saturday, October 15, 2016
Adding Border to Word Document
Adding Border to Word Document
To decorate your word document, you can put border around the page. You can put the border either in the first page, section or whole document. Not everywhere page border is applicable. Only use it where necessary.
Page Border in Earlier Versions of MS Word
Same feature is also available on Office XP or 2003. As people are not using them anymore, Ill just focus on running versions. If youre using Office XP or 2003, just follow the steps below -
Format Menu > Borders & Shading > Page Border
After getting the Borders & Shading dialogue box, things are almost similar!
This Tutorial Applies to -
- Microsoft Word 2007
- Microsoft Word 2010
- Microsoft Word 2013
Note: Images, screenshots and instructions used in this document are based on Office 2013.
About Borders & Shading > Page Borders
With page borders, you can create stylish borders around your pages. MS Word allows you to create normal borders as well as many stylish borders. And you have the option to adjust the thickness, size, distance from the text, and color of the border.
Adding a Simple Page Border/ Art Border
- Open an existing word document or create a new one.
- Go to the Design tab and find Page Borders option from the right.

- Hit on the Page Borders to get Borders and Shading window.
- Make sure Page Border tab is selected.
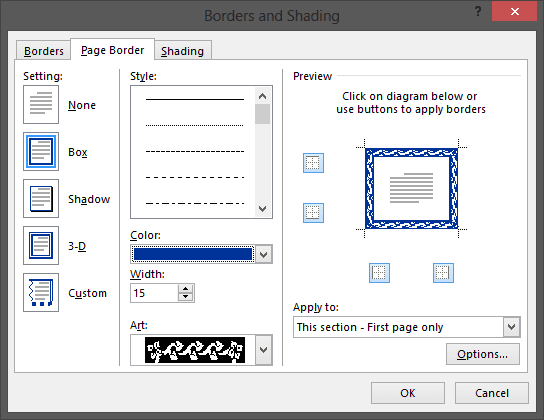
- Choose either Box or Shadow from located under Settings > Choose a border style > Change Color if necessary > You can also choose stylish border from the drop down list of Art option > Adjust the width > Choose Apply to - Whole Document/ Section/ First page only > Then hit OK.
If everything is okay, you will get your selected border/ art border around your page.
Customizing the Art Border - Tips n Tricks
- Color - You can only change the color of black borders.
- Width - Art borders have different widths - 20 to 31 pt. I dont prefer more than 10 pt.
- Preview - You can remove the border from any of the side. If you click on left, the left border will be removed. If you hit on bottom, the bottom border will be removed. Clicking again will take the border back.
- Apply to - Choose whether the border will be applied to Whole Document/ First page/ current section.
- Option > Measure from - Edge of page will put the border at the edge of page. Text will bring the border closer to your text. You can also manually adjust the values from margin. I think you should choose 5 pt for every sides.
After you complete these tasks hit OK > OK.
Creating Section
Section helps you to differentiate some settings from other part of your document. Suppose you need page border for first 5 pages of your document. To do this, you need a section break. Otherwise the border will be added to the whole document.
If your document has no section, then you have to create one. Suppose your first section will include the first 5 pages. From the 6th page, you want the next section.
Put your cursor at the end of page 5. Then create section break as -
Now you can use different settings for different sections. And you can create as many sections as you need.
Creating Section
Section helps you to differentiate some settings from other part of your document. Suppose you need page border for first 5 pages of your document. To do this, you need a section break. Otherwise the border will be added to the whole document.
If your document has no section, then you have to create one. Suppose your first section will include the first 5 pages. From the 6th page, you want the next section.
Put your cursor at the end of page 5. Then create section break as -
Page Layout Tab > Page Setup Section > Breaks > Section Breaks > Next Page > To check the section, double click on header or footer.
Now you can use different settings for different sections. And you can create as many sections as you need.
Removing the Border
Its really embarrassing when you need to remove the border but you dont know how! Its just how did you put the border. Follow the steps below -
- Design > Page Borders > Borders and Shading
- Make sure Page Border tab is selected
- Under the Settings, choose None > hit Enter/ OK > Everything will be clear!
Hopefully its a complete tutorial on MS Word Page Border. If youre having any sort of problem regarding this issue, please knock me . . .
Stay with Marks PC Solution to get more interesting IT topics!
Go to link download
Monday, October 10, 2016
Hide Spelling Grammar Errors in MS Word
Hide Spelling Grammar Errors in MS Word

When we type something wrong (typo) in MS Word, either in terms of grammar or spelling, the Spelling & Grammar Checker automatically detects the errors. And then we see a red underline for spelling error and blue underline for grammar error. And thats pretty useful and essential for preparing a correct document.
But sometimes, this automatic error detection marks may cause your headache. Maybe youre preparing something which is correct but not supported by traditional spelling and grammar rules. In that time, those error marks (red and blue underlines) look odd. Lets hide them!
Applies to:
- Office 2007
- Office 2010
- Office 2013
- Office 2016
Hide Spelling & Grammar Errors . . .
- Open up an MS Word document from your PC.
- Hit on the File button from upper left corner & select Options.
- Now choose Proofing option from the left pane.
- Scroll down to the bottom and find the Exceptions for section.
- If you wanna hide the errors for all new documents in the future then choose, All New documents. Or simply choose Document 1 or your current document.
- And finally, select the checkboxes - Hide Spelling Errors & Hide Grammar Errors > OK.

Note for Word 2007 Users:
File button is only available for the users of Office 2010, 2013 and 2016. Office 2007 users will see a different button instead of File button. Its called Office button as shown below -

And instead of options, you will see Word Options.
Rolling Back this Settings . . .
If you wanna back to the previous settings, I mean, if you wanna see the spelling & grammar errors again, then follow the steps below:
Rolling Back this Settings . . .
If you wanna back to the previous settings, I mean, if you wanna see the spelling & grammar errors again, then follow the steps below:
- Go to File > Options.
- Choose Proofing.
- Deselect the checkboxes > Hide Spelling Errors > Hide Grammar Errors.
- Exceptions for > Choose All New Documents or current document as applies.
- OK
Special Thanks to - Shamsul Arefin
Who phoned me to know why dont spelling mistakes is underlining in his word document. Actually in his word settings, spelling and grammar error options were turned off. And in this tutorial I just wrote about the opposite settings! :)
Stay with Marks PC Solution to get more interesting IT topics!
Go to link download
Thursday, October 6, 2016
Using Curve Tool in MS Word
Using Curve Tool in MS Word

Most of you may think that MS Word has no free drawing tool like Photoshop or Illustrator. But youre wrong! Word has also a free drawing tool named curve which you can use just like Photoshop Pencil Tool. With curve tool, you can draw shapes freely.
Applies to:
- Word 2007
- Word 2010
- Word 2013

Where do I find Curve Tool?
In fact, Word doesnt consider curve as a tool. Though its a drawing tool, Word names it as a shape. You will find the curve in the Shapes.


Insert Tab > Illustration Section > Shapes > Curve  .
.
How to Use it?
Its very handy to use the curve tool. To use the tool, run MS Word. Then choose curve from the shapes.
- After choosing the curve tool, click anywhere of your document to start drawing.
- Move your mouse to the left, right or top from the starting point.
- Click left mouse button where you wanna turn around.
- If you would like to stop drawing and keep the shape open, simply click twice.
- If you wanna keep the shape close, simply click on the starting point.
How to Edit the Shape?
You can also edit the shape made by curve tool. After drawing the shape, if you think that you need to change the shape a little, you can edit the points of that shape.
While drawing the shape, you clicked mouse several times. Those clicks are shape points. If you would like to edit the shape points, right click on that shape and choose Edit Points  option.

Now you will see the points. Click on the points and adjust them by dragging.
Designing the Shape
After creating the shape, you can design it like other shapes. You can choose different fill color, outline or give it special effect from the Format tab.
Curve is also Available for -

Now you will see the points. Click on the points and adjust them by dragging.
Designing the Shape
After creating the shape, you can design it like other shapes. You can choose different fill color, outline or give it special effect from the Format tab.
Curve is also Available for -
- Excel: Insert > Illustration > Shapes > Curve
- PowerPoint: Insert > Shapes > Curve
- Outlook: Insert > Shapes > Curve
Hope you have understand todays topic properly. If you have any query, please leave a comment . . .
Stay with Marks PC Solution to get more interesting IT topics!
Go to link download
Friday, September 23, 2016
How to Repeat Table Heading in MS Word
How to Repeat Table Heading in MS Word

When youre working with a large table that is supposed to be divided into several pages, you may need to use the same heading on every page. And whenever you make any adjustment, you may face problem with the header rows. In MS Word, you can easily get rid of this problem through Repeat Header Rows option.
Applies to:
- Word 2007
- Word 2010
- Word 2013
Note: Ive prepared this tutorial using Word 2013. You may find bit difference if youre using Word 2010 or 2007.
Often you may need to add/ remove some rows from a page, consequently the header rows of next page will move upward or downward. And every time you make any change, you may need to edit those header rows again. Thats quite intolerable!
In Microsoft Excel, you can use the Freeze Panes option to do this.
Repeat Header Rows in Word - Follow the image below . . .
- Run MS Word from your PC > Create a new document.
- Create a table from the Insert tab.
- As soon as you create a table, you will get two new tabs under Table Tools - Design & Layout. Weve to use the Layout tab.
- Select your header rows (Either 1, 2, 3 or more rows, but it must include the first row of the table).
- Go to the Layout tab and choose Repeat Header Rows option from located in the Data group as shown in the image below. Thats it.

Now increase the number of rows by pressing Tab button. Or keep working normally to increase the number rows. As soon as your table goes to the new page, your selected rows will be repeated there automatically!
Come on! Its a magic - share with your friends.
Remember
- Header rows will be repeated in every pages automatically.
- Automatic Header Rows will be visible in Print Layout View, Reading View and when you print the document. But it will not be shown when youre working in Web Layout view.
- When you create a page break manually, repeating header rows will be stopped there.
- You can choose multiple rows as header rows, but the first row of the table must be selected.
Stay with Marks PC Solution to get more interesting IT topics!
Go to link download
Saturday, September 10, 2016
Using Online Templates in MS Word
Using Online Templates in MS Word

With the improvement of technology, things are getting easier. You know, as a word processor, MS Word provides all the necessary elements & facilities for preparing any sort of document. Additionally, it has thousands of online templates to enhance the user experience. Lets explore . . .
Applies To -
- Microsoft Office 2007
- Microsoft Office 2010
- Microsoft Office 2013
- Microsoft Office 2016
Template Categories
Actually there are varieties types of online templates in Archive. The prime categories are divided as -
- Business
- Personal
- Industry
- Design Sets
- Education
- Event etc.
But specifically, we may get the following types of templates -
- Letters & Applications
- Wedding/ Birthday Party Invitations
- Party Menu
- Certificates
- Sales Invoice/ Sales Order/ Thanks Letter
- Meeting Minutes
- Survey Formats
- Report Cover
- Business Cards
- Resume
- Business Newsletter
And there are a lot of such stuffs . . . .
Get your Desired Template(s)
- Start MS Word in your PC.
- Go to the File button and choose New.
- Now you can type and search your desired template using the search box.
- For example, type - Certificate. And there will be many samples.
- Choose one that you need. And hit on the create button.
- Now your template will be downloaded.
- Make necessary changes and save it on your hard disk. Its simple!

Look at the above image. Here you can search for your desired types of documents. After entering a search query, you will get the categories on the right side.
And look at the image below. After choosing a template, you will get its details. Then youve to hit on the Create button to download that template.

Hope this trick will help you all. Stay with Marks PC . . .
Stay with Marks PC Solution to get more interesting IT topics!
Go to link download
Saturday, September 3, 2016
Create Keyboard Shortcuts for Fonts in Word 2010
Create Keyboard Shortcuts for Fonts in Word 2010
Professionals love to type quickly. And most of them like to use keyboard shortcuts to get their job done. And so am I. When you need to use multiple fonts frequently it might be boring and time consuming. If you wanna avoid using mouse to choose a font, then you can create keyboard shortcuts for your preferred fonts . . .
Applies to -
- Office 2007
- Office 2010
- Office 2013
- Office 2016
This tutorial has been prepared using Word 2016. If youre using previous versions of Word, you may experience a bit change in the options.
Creating Fonts Shortcuts . . .
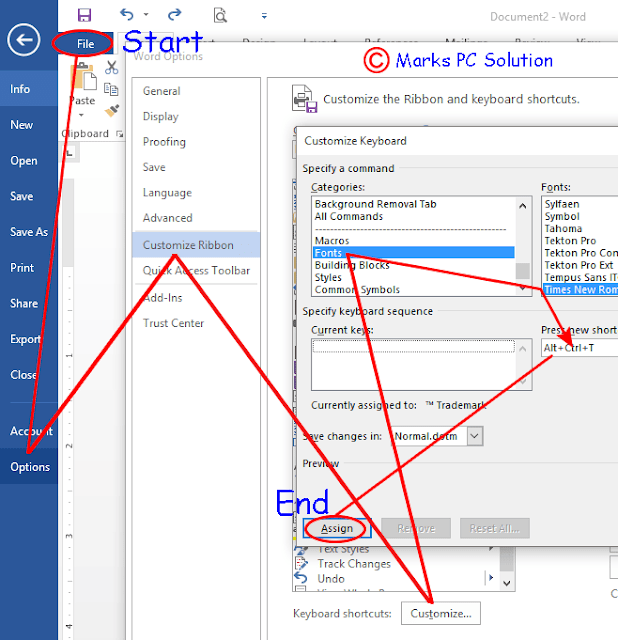
- Run MS Word from your PC.
- Hit on the File button and choose Options from the bottom.
- Select Customize Ribbon from the left pane.
- Click on the Customize button located at the bottom of the window.
- Choose Fonts from the Categories.
- Select your preferred font from the list at the right.
- Press keyboard shortcut (i.e. Ctrl+Alt+T for Times New Roman font) in the press new shortcut key box.
- Hit on the Assign button and close the window. Thats it.
Follow the illustration below for further clarification -
Removing/ Changing Shortcuts . . .
Sometimes your customized shortcuts may create conflict with the default keyboard shortcuts of MS Word. In that case, you can remove or change that shortcut. Follow the steps below:
- Go to the Fonts from Categories.
- Choose the font for which you created keyboard shortcuts.
- You will get the existing shortcuts in the Current Keys.
- Select the shortcut.
- Hit on the Remove button to remove the shortcut.
- Press new shortcut to create shortcut again.
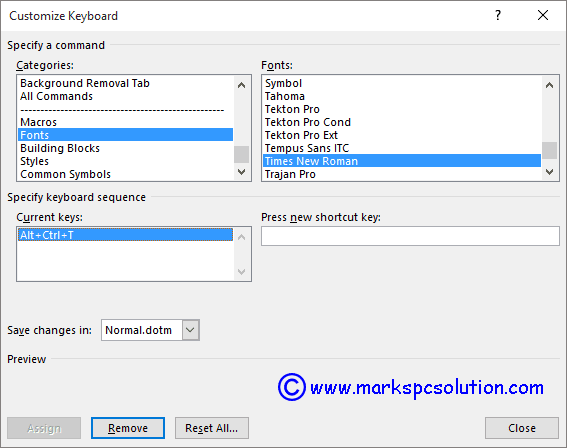
Remember, this method is not only for creating shortcuts of fonts. In this way, you can create shortcuts for many other commands that appear in the categories.
Stay with Marks PC Solution to get more interesting IT topics!
Go to link download
Monday, August 29, 2016
Using Default Cover Pages in MS Word
Using Default Cover Pages in MS Word

Are you preparing a formal report? Or do you need any cover page sample for any other task? By default, MS Word contains some outstanding cover pages. Each of them will give you different flavor. Today Im gonna talk about using the default cover pages of MS Word . . .
This Tutorial Applies to -
Stuffs you Should Know
Hopefully this post will be of great help if you need to prepare documents frequently. Of if you are engaged with professional writing, these cover pages will reduce your time required to design your report cover.
If you need to know more about adding cover page, then follow this link . . .
This Tutorial Applies to -
- Word 2007
- Word 2010
- Word 2013
- Word 2016
In every new version, Microsoft Office changes their default templates. Same thing happens to Word cover pages. I mean, the default cover pages are not same in every version of MS Word.
Cover pages included in Word 2016 may not be found in the previous versions of Office. Word 2016 has 16 cover pages. But you can discover more from Office.com . . .
Add a Cover Page
- Run MS Word.
- Create a new document or open an existing one.
- Go to the Insert tab.
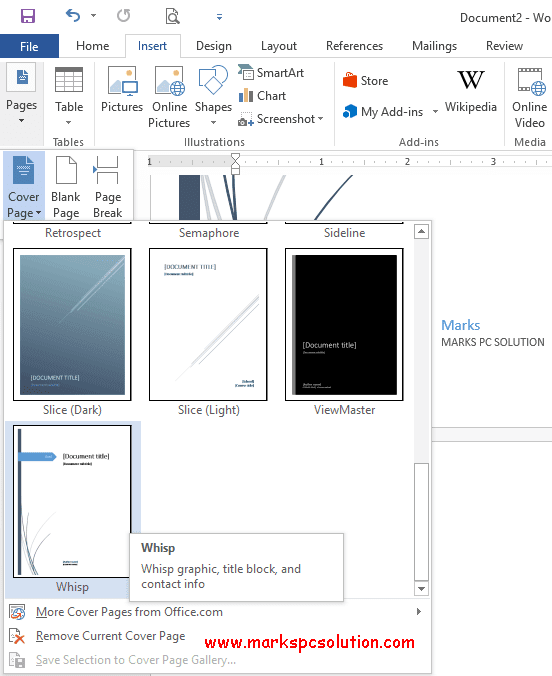
- Hit on the Pages > Cover Page > Click on the cover which you like. Thats it.

Stuffs you Should Know
- When you add a page number in your document, your cover page will be counted as page number 0. So, youve to insert page number at the next page to your cover page.
- If you add a new cover page, it will replace the first one.
- If you need to delete the cover page, Insert Tab > Pages > Cover Page > Remove Current Cover Page (Follow the above image).
- To delete a cover page which was created by the earlier version of word, you must remove it manually.
Hopefully this post will be of great help if you need to prepare documents frequently. Of if you are engaged with professional writing, these cover pages will reduce your time required to design your report cover.
If you need to know more about adding cover page, then follow this link . . .
Stay with Marks PC Solution to get more interesting IT topics!
Go to link download
Saturday, August 27, 2016
How to Print Word Document as Booklet
How to Print Word Document as Booklet

You can print your Word Document as book. In MS Word, the term is known as Book Fold which can be found in the Page Setup dialogue box. If you want a document to be printed as a booklet, you must set up the document at first. Otherwise your document settings may change too much. And this will take a huge time to fix the settings.
For last few days, Ive published several posts on Excel. Now its time to write something on MS Word. What do you think? :)
Applies to All Versions of MS Word
- Word XP, 2003
- Word 2007, 2010, 2013
What does Book Fold Do?
Its a good question to begin the discussion. Suppose you have a document with 4 pages. If you want the printed document to be looked like a book, you can use the booklet option. The Word will print your document as show in the image below:

And if you print the two pages in both sides of a single paper, it will be like a book! What if you have 8 pages? Then it will be printed as below:
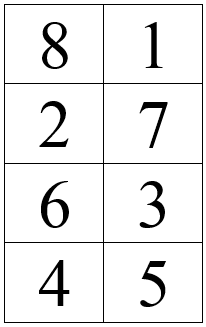
That means the last page of the document will be printed with the first one. Then the second page and the second last page will be printed together. Thus the series will continue. Even page will be printed on the left side and the odd page will be printed on the right.
In a 8-page document, you have to use 2 papers only. Page 8, 1 and 2, 7 should be printed on the both sides of a single paper. Then page 6, 3 and 4, 5 will be printed on another paper. The second paper should be folded in the first paper if you want the document as book.
The concept of booklet is little bit tough if you have no practical experience. So, I suggest you to try it directly if you have a printer. :)
How to Use Book Fold?
If you use Book Fold after completing your document, you may suffer a lot. Because it will change your text or graphics position. So, if you have any intention to print the document as book, your should set your document as Book Fold when you set up the page.
Follow the steps below:
If you have any confusion, please leave a comment . . . :)
How to Use Book Fold?
If you use Book Fold after completing your document, you may suffer a lot. Because it will change your text or graphics position. So, if you have any intention to print the document as book, your should set your document as Book Fold when you set up the page.
Follow the steps below:
- Open a document or create a new one
- Go to the Page Setup option from Page Layout Tab (In Office XP, 2003: File > Page Layout)
- Margins > Pages > Multiple Pages > Choose Book Fold
- Sheets per Booklet > Choose All
- Hit OK to exit. Done!
How to Print Booklet?
You must know the right way to print a booklet properly. If your printer supports automatic both side printing, the task will be much easier for you. But if it doesnt, then you have to print both sides manually.
Go to the Print options > Print on Both Sides (Flip on Short Edge)/ Manually Print Both Sides > Landscape Orientation > Hit OK.
If you have any confusion, please leave a comment . . . :)
Stay with Marks PC Solution to get more interesting IT topics!
Go to link download
Sunday, August 21, 2016
Perform Basic Calculations in MS Word Table
Perform Basic Calculations in MS Word Table
The general idea about MS Word is that, its all about typing. Most of the users think that its nothing but a word processor. Of course they are not wrong. But you can perform some basic calculations in MS Word while youre working with a table. It allows you to perform logical comparisons too!
Intermediate level users should already know this trick. But the basic users may not have any knowledge about MS Word Table Function. Thats why Im sharing this little trick.
Applies to:
Intermediate level users should already know this trick. But the basic users may not have any knowledge about MS Word Table Function. Thats why Im sharing this little trick.
Applies to:
- Word XP/ 2003
- Word 2007
- Word 2010/ 2013
Note: This tutorial is prepared based on MS Word 2010. So you may notice slight changes in other versions.
How to Perform Calculations?
To perform basic calculations in MS Word, you have to create a table. After creating the table, input numbers there. Have a look at the illustration below:
Product | January | February | March | Total |
A | 12 | 12 | 15 | |
B | 8 | 9 | 10 | |
C | 23 | 22 | 25 | |
Total |
Suppose youve to sum up the values of rows and columns of this table. And for this work, you dont need to use Excel. Simply use the Formula option.
In Word XP/ 2003, you will find the Formula option under Table menu.
And in the ribbon interface of Word 2007/ 2010/ 2013, the Formula option will be in on the Layout tab, in the Data group as shown in the image below -
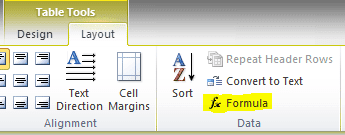
Note: The Layout tab will be available when you put your mouse in a table. When youre out of the table, this tab will be hidden.
Now place the cursor on Product A Total cell. Open the Formula option. And you will get the following window -
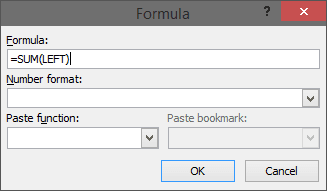
Since there is no value in the top, Formula automatically assumed the values on the left side. If you put the cursor in the January total cell, it will show =SUM(ABOVE). Simply hit OK to sum up the values.
But if there are values both on left and top, then it will consider the values of the top. In that case, if you need to sum up the left side values, you have to manually write the formula as =SUM(LEFT).
How to Update the Formula Result?
Suppose youve already performed a calculation. Now if you change some values, the result will not be automatically updated as MS Excel. Now you can follow two ways -
Hope this will help you a lot. If you need any help, just knock me . . .
In Word XP/ 2003, you will find the Formula option under Table menu.
And in the ribbon interface of Word 2007/ 2010/ 2013, the Formula option will be in on the Layout tab, in the Data group as shown in the image below -

Note: The Layout tab will be available when you put your mouse in a table. When youre out of the table, this tab will be hidden.
Now place the cursor on Product A Total cell. Open the Formula option. And you will get the following window -

Since there is no value in the top, Formula automatically assumed the values on the left side. If you put the cursor in the January total cell, it will show =SUM(ABOVE). Simply hit OK to sum up the values.
But if there are values both on left and top, then it will consider the values of the top. In that case, if you need to sum up the left side values, you have to manually write the formula as =SUM(LEFT).
How to Update the Formula Result?
Suppose youve already performed a calculation. Now if you change some values, the result will not be automatically updated as MS Excel. Now you can follow two ways -
- Method 1: Simply delete the result and use the formula again.
- Method 2: Select the result by mouse, and press F9.
If there are multiple formulae on the table and you need to update all the results, Press Ctrl+A > the F9.
In earlier version of MS Word, there were some limitations. But Word 2010 or 2013 is more flexible. You can use the formulae in different ways. While using the formula, you can use all the 4 directions of a cell - Left, Right, Above and Below!
And you can use the following functions:
- Average =Average(ABOVE)
- Count =Count(ABOVE)
- Max =MAX(LEFT)
- Min =MIN(BELOW)
- Product =PRODUCT(ABOVE)
- Sum =SUM(ABOVE)
Caution: The function will not work without Equal (=) sign. And it must be typed on the Formula window.
Hope this will help you a lot. If you need any help, just knock me . . .
Stay with Marks PC Solution to get more interesting IT topics!
Go to link download
Subscribe to:
Posts (Atom)