Showing posts with label document. Show all posts
Showing posts with label document. Show all posts
Saturday, October 15, 2016
Adding Border to Word Document
Adding Border to Word Document
To decorate your word document, you can put border around the page. You can put the border either in the first page, section or whole document. Not everywhere page border is applicable. Only use it where necessary.
Page Border in Earlier Versions of MS Word
Same feature is also available on Office XP or 2003. As people are not using them anymore, Ill just focus on running versions. If youre using Office XP or 2003, just follow the steps below -
Format Menu > Borders & Shading > Page Border
After getting the Borders & Shading dialogue box, things are almost similar!
This Tutorial Applies to -
- Microsoft Word 2007
- Microsoft Word 2010
- Microsoft Word 2013
Note: Images, screenshots and instructions used in this document are based on Office 2013.
About Borders & Shading > Page Borders
With page borders, you can create stylish borders around your pages. MS Word allows you to create normal borders as well as many stylish borders. And you have the option to adjust the thickness, size, distance from the text, and color of the border.
Adding a Simple Page Border/ Art Border
- Open an existing word document or create a new one.
- Go to the Design tab and find Page Borders option from the right.

- Hit on the Page Borders to get Borders and Shading window.
- Make sure Page Border tab is selected.
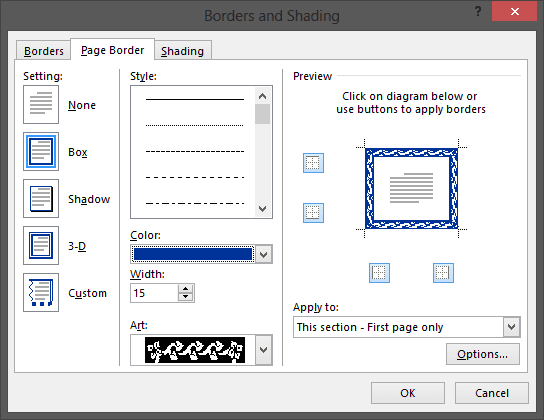
- Choose either Box or Shadow from located under Settings > Choose a border style > Change Color if necessary > You can also choose stylish border from the drop down list of Art option > Adjust the width > Choose Apply to - Whole Document/ Section/ First page only > Then hit OK.
If everything is okay, you will get your selected border/ art border around your page.
Customizing the Art Border - Tips n Tricks
- Color - You can only change the color of black borders.
- Width - Art borders have different widths - 20 to 31 pt. I dont prefer more than 10 pt.
- Preview - You can remove the border from any of the side. If you click on left, the left border will be removed. If you hit on bottom, the bottom border will be removed. Clicking again will take the border back.
- Apply to - Choose whether the border will be applied to Whole Document/ First page/ current section.
- Option > Measure from - Edge of page will put the border at the edge of page. Text will bring the border closer to your text. You can also manually adjust the values from margin. I think you should choose 5 pt for every sides.
After you complete these tasks hit OK > OK.
Creating Section
Section helps you to differentiate some settings from other part of your document. Suppose you need page border for first 5 pages of your document. To do this, you need a section break. Otherwise the border will be added to the whole document.
If your document has no section, then you have to create one. Suppose your first section will include the first 5 pages. From the 6th page, you want the next section.
Put your cursor at the end of page 5. Then create section break as -
Now you can use different settings for different sections. And you can create as many sections as you need.
Creating Section
Section helps you to differentiate some settings from other part of your document. Suppose you need page border for first 5 pages of your document. To do this, you need a section break. Otherwise the border will be added to the whole document.
If your document has no section, then you have to create one. Suppose your first section will include the first 5 pages. From the 6th page, you want the next section.
Put your cursor at the end of page 5. Then create section break as -
Page Layout Tab > Page Setup Section > Breaks > Section Breaks > Next Page > To check the section, double click on header or footer.
Now you can use different settings for different sections. And you can create as many sections as you need.
Removing the Border
Its really embarrassing when you need to remove the border but you dont know how! Its just how did you put the border. Follow the steps below -
- Design > Page Borders > Borders and Shading
- Make sure Page Border tab is selected
- Under the Settings, choose None > hit Enter/ OK > Everything will be clear!
Hopefully its a complete tutorial on MS Word Page Border. If youre having any sort of problem regarding this issue, please knock me . . .
Stay with Marks PC Solution to get more interesting IT topics!
Go to link download

Saturday, August 27, 2016
How to Print Word Document as Booklet
How to Print Word Document as Booklet
You can print your Word Document as book. In MS Word, the term is known as Book Fold which can be found in the Page Setup dialogue box. If you want a document to be printed as a booklet, you must set up the document at first. Otherwise your document settings may change too much. And this will take a huge time to fix the settings.
For last few days, Ive published several posts on Excel. Now its time to write something on MS Word. What do you think? :)
Applies to All Versions of MS Word
- Word XP, 2003
- Word 2007, 2010, 2013
What does Book Fold Do?
Its a good question to begin the discussion. Suppose you have a document with 4 pages. If you want the printed document to be looked like a book, you can use the booklet option. The Word will print your document as show in the image below:
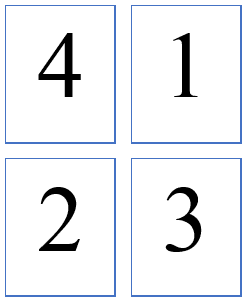
And if you print the two pages in both sides of a single paper, it will be like a book! What if you have 8 pages? Then it will be printed as below:
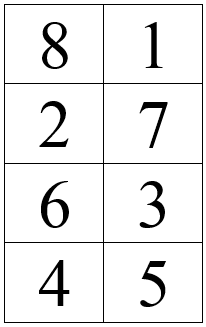
That means the last page of the document will be printed with the first one. Then the second page and the second last page will be printed together. Thus the series will continue. Even page will be printed on the left side and the odd page will be printed on the right.
In a 8-page document, you have to use 2 papers only. Page 8, 1 and 2, 7 should be printed on the both sides of a single paper. Then page 6, 3 and 4, 5 will be printed on another paper. The second paper should be folded in the first paper if you want the document as book.
The concept of booklet is little bit tough if you have no practical experience. So, I suggest you to try it directly if you have a printer. :)
How to Use Book Fold?
If you use Book Fold after completing your document, you may suffer a lot. Because it will change your text or graphics position. So, if you have any intention to print the document as book, your should set your document as Book Fold when you set up the page.
Follow the steps below:
If you have any confusion, please leave a comment . . . :)
How to Use Book Fold?
If you use Book Fold after completing your document, you may suffer a lot. Because it will change your text or graphics position. So, if you have any intention to print the document as book, your should set your document as Book Fold when you set up the page.
Follow the steps below:
- Open a document or create a new one
- Go to the Page Setup option from Page Layout Tab (In Office XP, 2003: File > Page Layout)
- Margins > Pages > Multiple Pages > Choose Book Fold
- Sheets per Booklet > Choose All
- Hit OK to exit. Done!
How to Print Booklet?
You must know the right way to print a booklet properly. If your printer supports automatic both side printing, the task will be much easier for you. But if it doesnt, then you have to print both sides manually.
Go to the Print options > Print on Both Sides (Flip on Short Edge)/ Manually Print Both Sides > Landscape Orientation > Hit OK.
If you have any confusion, please leave a comment . . . :)
Stay with Marks PC Solution to get more interesting IT topics!
Go to link download
Subscribe to:
Posts (Atom)