Showing posts with label hide. Show all posts
Showing posts with label hide. Show all posts
Monday, October 10, 2016
Hide Spelling Grammar Errors in MS Word
Hide Spelling Grammar Errors in MS Word

When we type something wrong (typo) in MS Word, either in terms of grammar or spelling, the Spelling & Grammar Checker automatically detects the errors. And then we see a red underline for spelling error and blue underline for grammar error. And thats pretty useful and essential for preparing a correct document.
But sometimes, this automatic error detection marks may cause your headache. Maybe youre preparing something which is correct but not supported by traditional spelling and grammar rules. In that time, those error marks (red and blue underlines) look odd. Lets hide them!
Applies to:
- Office 2007
- Office 2010
- Office 2013
- Office 2016
Hide Spelling & Grammar Errors . . .
- Open up an MS Word document from your PC.
- Hit on the File button from upper left corner & select Options.
- Now choose Proofing option from the left pane.
- Scroll down to the bottom and find the Exceptions for section.
- If you wanna hide the errors for all new documents in the future then choose, All New documents. Or simply choose Document 1 or your current document.
- And finally, select the checkboxes - Hide Spelling Errors & Hide Grammar Errors > OK.

Note for Word 2007 Users:
File button is only available for the users of Office 2010, 2013 and 2016. Office 2007 users will see a different button instead of File button. Its called Office button as shown below -

And instead of options, you will see Word Options.
Rolling Back this Settings . . .
If you wanna back to the previous settings, I mean, if you wanna see the spelling & grammar errors again, then follow the steps below:
Rolling Back this Settings . . .
If you wanna back to the previous settings, I mean, if you wanna see the spelling & grammar errors again, then follow the steps below:
- Go to File > Options.
- Choose Proofing.
- Deselect the checkboxes > Hide Spelling Errors > Hide Grammar Errors.
- Exceptions for > Choose All New Documents or current document as applies.
- OK
Special Thanks to - Shamsul Arefin
Who phoned me to know why dont spelling mistakes is underlining in his word document. Actually in his word settings, spelling and grammar error options were turned off. And in this tutorial I just wrote about the opposite settings! :)
Stay with Marks PC Solution to get more interesting IT topics!
Go to link download

Friday, September 2, 2016
How To Hide Files Apps On Android Phone
How To Hide Files Apps On Android Phone
Method 1. Using GO Launcher Ex (For Non Rooted Phone)
 GO launcher Ex is one of the popular Android launcher Application that allow you to hide your Apps and maintain your Privacy. It is available on Google PlayStore for free. It can also lock Apps with Pattern and pin lock. It support 4M apk to increase our phone performance. It also provide XX transition effect to each slide. It is a light weight application with attractive and easy to use interface. It also provide different types of wallpapers to make our screen more attractive. Approximately 1B install this App.
Steps To Hide Apps Using GO Launcher EX
Step 1. Open your Playstore Account from your Android Phone and Search GO Launcher.
Step 2. You need to scan for the QR code to install this App.

Step 3. Your Android Phone will Automatically search for GO Launcher App even if you do not have QR code scanner in your phone.
Step 4. Now install the GO launcher App in your phone.
Step 5. After the installation you have to apply GO Launcher to your Android device.
Step 6. Click and launch the App and by opening the main menu you can see different installed App in your App.

Step 8. A list of App will be shown on your screen.
Step 9. Now tick the Apps you want to hide and click the OK button.

Method 2:- Using Link2SD Android App (for Rooted Phones)
 Link2SD is an Android App which is available on Google Playstore for free. It is provide an easy way to hide the Apps in Rooted Android phones. This App hide the Apps by freezing the background running App. It provide dual benefits one by freezing the App and other by saving the Amount of RAM which is necessary for multitasking. It can auto clear cache service, notify when movable App is installed. It can freeze both system and installed App. It can convert system App to user App and vice versa. Approximately 12,000,000 install this App.
Steps To Hide Apps With Link2SD
Step 1. Download and Install the Link2SD Android App by clicking the button below.
Step 2. Click and Launch the App into your phone.

Step 3. You can go through different Apps option at least once to understand its different options.
Step 4. In the App you will see all installed Apps.
Step 5. Click on the menu button and look for frozen option.

Step 6. You will see the Apps now select the Apps and press OK button.
Step 7. Now your Apps are completely hidden and to unhidden the App long press the desired App and select unfreeze option.
Go to link download
Thursday, August 18, 2016
Disable Auto Hide Ribbon in Microsoft Office
Disable Auto Hide Ribbon in Microsoft Office
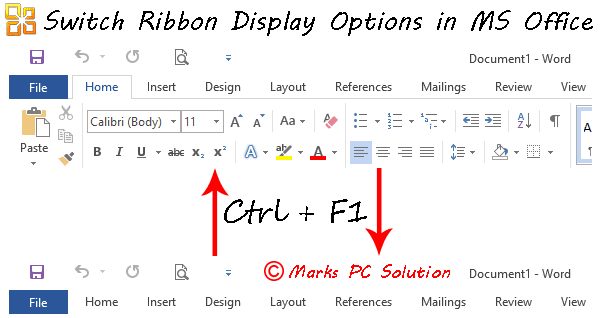
Were familiar with ribbon interface from Microsoft Office 2007. And now the latest version is Office 2016. In ribbon interface, everything you need is just a click away. Here, you dont need to search for an option through drop down menu.
The main problem of the ribbon is, it reduces your typing/ working space. Thats why your system may hide the ribbon automatically. But if youre not tensed with the working space, then you should keep the ribbon turned on. Definitely it will make your tasks more convenient.
Show/ Hide the Ribbon in Office 2013/ 2016
Hitting on this button will prevent the system from hiding the commands automatically. Or you can use Ctrl+F1 to switch between modes.
Show/ Hide the Ribbon in Word 2007/ 2010
As Im using Word 2016, providing screenshots for earlier versions is bit tough. And ribbon option is little bit different in Word 2010 and 2007.
But I hope, Ctrl+F1 works in these versions too! And you can also follow the image below:
Clicking on the down arrow (Cutomize Quick Access Toolbar) will allow you access these options.
As the ribbon is now displayed, you can see Minimize the Ribbon option. When the ribbon commands are hidden, you will see the opposite option.
And in Office 2010, a small up arrow will be shown just above the ribbon commands. Clicking on that button will hide your ribbon commands.
And always remember the keyboard shortcut for this option -
Hope this trick will help a lot if youre in trouble with the ribbon display options. If you still need to be clarified, please knock me . . .
Show/ Hide the Ribbon in Office 2013/ 2016
- Simply press Ctrl + F1 to switch between ribbon views. When the ribbon is turned on, press Ctrl+F1 to hide this. Using the same keyboard shortcut will turn it on again!
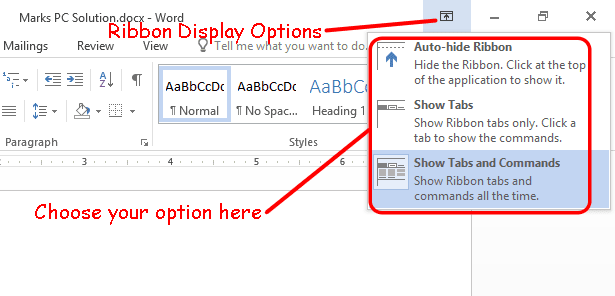
- Or if youre not good at memorizing the keyboard shortcuts, please follow the image below -
Look at the options -
- Auto-hide Ribbon: It will keep the ribbon and tabs hidden automatically. To view the commands, you need to click at the top of the screen.
- Show Tabs: It will only display the tabs. When you click on any of them, you will able to see the commands.
- Show Tabs & Commands: This is what I prefer most of the cases. Choosing this option will show the ribbon tabs and commands.
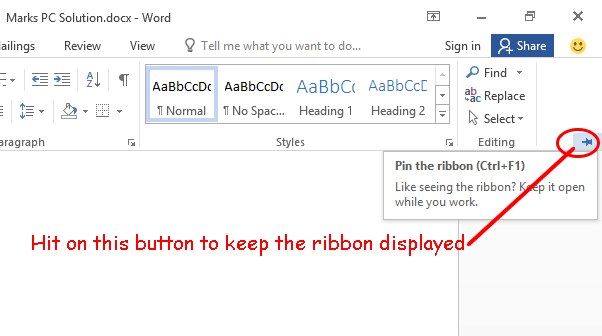
When your system is automatically set to Show Tabs option, you will be able to view the commands when you choose a tab. In that case, if you would like to pin the ribbon, simply look at the image below:
Hitting on this button will prevent the system from hiding the commands automatically. Or you can use Ctrl+F1 to switch between modes.
Show/ Hide the Ribbon in Word 2007/ 2010
As Im using Word 2016, providing screenshots for earlier versions is bit tough. And ribbon option is little bit different in Word 2010 and 2007.
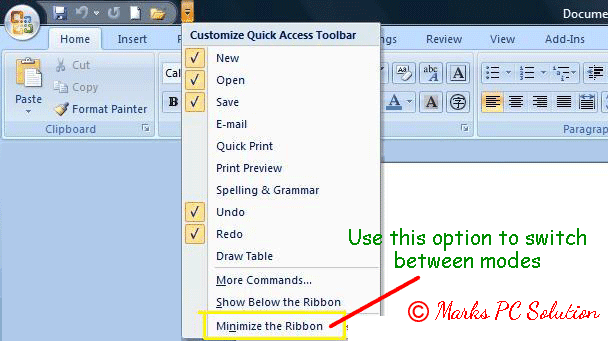
But I hope, Ctrl+F1 works in these versions too! And you can also follow the image below:
Clicking on the down arrow (Cutomize Quick Access Toolbar) will allow you access these options.
As the ribbon is now displayed, you can see Minimize the Ribbon option. When the ribbon commands are hidden, you will see the opposite option.
And in Office 2010, a small up arrow will be shown just above the ribbon commands. Clicking on that button will hide your ribbon commands.
And always remember the keyboard shortcut for this option -
Ctrl + F1
Hope this trick will help a lot if youre in trouble with the ribbon display options. If you still need to be clarified, please knock me . . .
Stay with Marks PC Solution to get more interesting IT topics!
Go to link download
Subscribe to:
Posts (Atom)