Showing posts with label disable. Show all posts
Showing posts with label disable. Show all posts
Monday, September 19, 2016
Disable Automatic Update in Windows 10
Disable Automatic Update in Windows 10

As I mentioned earlier, Windows 10 has come with some boring changes. One of the stupid changes is related to Automatic Update. In Windows 10, youre set to automatically install new updates. And youve no choice to change this settings. Because the change settings option is disable.
Applies to: Windows 10
Disable Automatic Update (Final Edition)
When you Disable Automatic Update?
- If your net bandwidth is limited
- If you dont need windows updates at all
- If the updates cause activators not work in your PC
In earlier versions of Windows (Windows 7, 8 or 8.1), you can manually configure the update settings. There were four settings:
- Install updates automatically
- Download updates but let me choose whether to install them
- Check for updates but let me choose . . .
- Never check for updates
In Windows 10, you dont have any option to choose any of these settings. Its simply disabled. You cant use the drop down menu. Look at the image below:

But still you have a chance to configure Windows Update. And youve to enable this settings from Group Policy Editor. In this post, Im gonna discuss about enabling/ disabling Automatic Update of Windows 10.
Instruction


If Group Policy Editor (gpedit.msc) is not Available?
Then follow this system -
Control Panel > Administrative Tools > Services > Scroll to the bottom > Windows Update > Startup Type > Choose Manual > Apply > OK.
Hope this will help. Take a reboot if necessary.
Fix these problems too!
Instruction
- Press Start+R > Type gpedit.msc > Press Enter.
- Computer Configuration > Administrative Templates > All Settings.
- Find Configure Automatic Updates (Press C to go there quickly).
- Choose Enable > There are 5 choices in the Options > Choose # 5 - Allow local admin to choose setting.
- Apply > OK.
Now your automatic update settings will be like this -
Have you noticed that the Never Check for Updates option is not available here? This option is vanished from this settings. Anyway, you can stop checking for updates completely.
Never Check for Updates
If you even dont need to check for updates, then follow the steps below -
- Run > gpedit.msc > Enter
- Computer Configuration > Administrative Templates > All Settings
- Double Click on Configure Automatic Updates
- Choose Disabled > Apply > OK.
Now your update settings will be disabled again. But this time, you Windows will never check for any updates!
If Group Policy Editor (gpedit.msc) is not Available?
Then follow this system -
Control Panel > Administrative Tools > Services > Scroll to the bottom > Windows Update > Startup Type > Choose Manual > Apply > OK.
Hope this will help. Take a reboot if necessary.
Fix these problems too!
- Get Windows 8 Start Screen Back on Windows 10
- Install .Net Framework 3.5 on Windows 10
- Cant type @ on Windows 10? Fix it now . . .
Stay with Marks PC Solution to get more interesting IT topics!
Go to link download

Friday, August 26, 2016
How to Disable or Enable Autoplay
How to Disable or Enable Autoplay

By default, when you insert any removable media (ie. Flash Drive, CD etc.) on your PC, windows will automatically open the drive. Or it may play media or start program contained by that drive. If youre good to go with this Autoplay Policy, then its okay. But if your PC is vulnerable to virus, then you must turn off Autoplay.
There are different methods for different versions of Windows which you can use to turn off Autoplay. But Im gonna show you a universal method which applies to all running versions of Windows.
Enable/ Disable Autoplay - Universal Method
Applies to:
- Windows 2000/ XP
- Windows Vista/ 7
- Windows 8/ 8.1
I would like to use Group Policy Editor to perform this task. Simply follow the steps below:
- Press Start + R to open Run.
- Type gpedit.msc > Press Enter.
- Now you will get the Group Policy Editor window.
- Hit on Administrative Template under Computer Configuration > Windows Components > AutoPlay Policies > Double Click on Turn of Autoplay.
- There are three options - Not Configured/ Enabled/ Disabled. To turn off Autoplay, choose - Enabled > Apply > OK.
- If you choose Not Configured or Disabled, Autoplay will be Enabled.
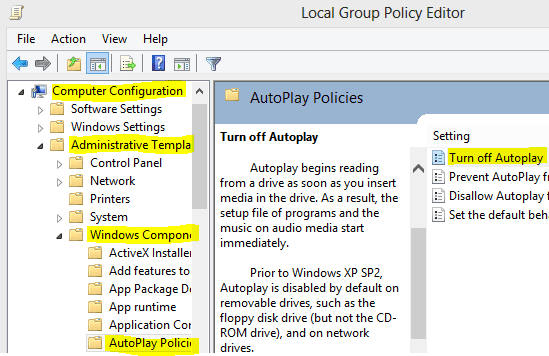
Note: Autoplay Policy is available both on Computer and User Configuration. You should always use Computer Configuration. Because if there is any conflict between the two, Computer Configuration settings will be preferred.
Another handy way to turn off Autoplay is choosing - Take No Action. When you insert any media on your PC, Windows may ask you what to do?
In that time, you can simply choose Take No Action to turn off Autoplay.
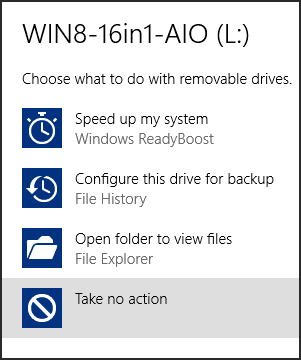
Note: If you choose any action, next time this notification will not appear.
Turn off/ on Autoplay from Control Panel
You can also turn autoplay on/ off from control panel. Follow the steps below:
- Go to Control Panel.
- Then open AutoPlay from there.
- Removable Drives > Choose Take No Action to disable autoplay or Choose Ask me Everytime.
- To enable autoplay, choose Open folders to view files. Thats it.
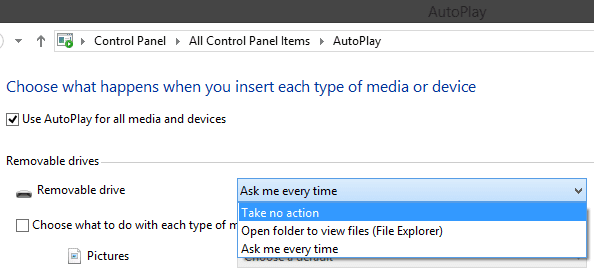
If you have any confusion, please leave a comment . . .
Stay with Marks PC Solution to get more interesting IT topics!
Go to link download
Thursday, August 25, 2016
How to Disable Windows 8 Lock Screen
How to Disable Windows 8 Lock Screen
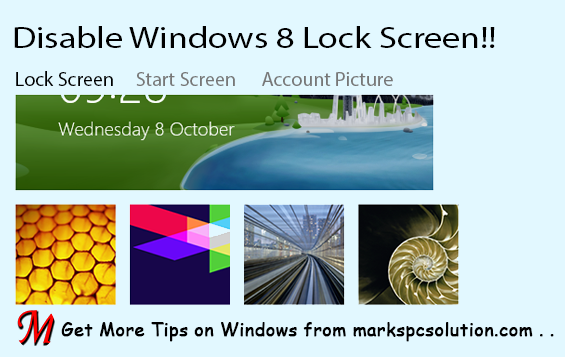
Lock screen looks cool when youre in a tablet PC. But if youre a busy person with laptop or desktop computer, probably it will make you bore. Same thing happens to me. Thats why Im gonna write about how to disable lock screen in Windows 8.
Applies to:
- Windows 8/ 8.1
- Windows RT
- Windows Server 2012
You can easily disable the lock screen from Group Policy Editor (gpedit.msc). Once disabled, the lock screen will not be shown when you start up your Windows! And certainly this will save you few seconds.
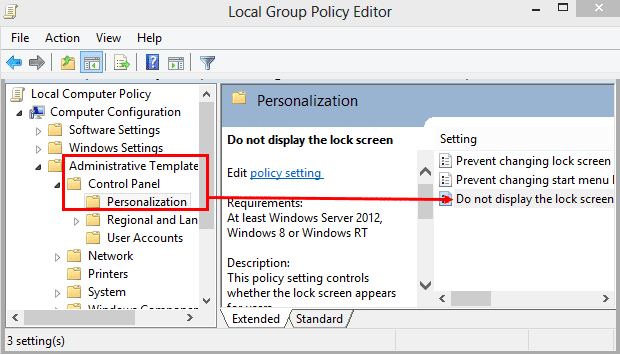
Instruction
- Press Start + R to open Run.
- Type gpedit.msc and hit Enter.
- Collapse Administrative Templates under Computer Configuration.
- Collapse Control Panel and choose Personalization.
- Click twice on Do not display the lock screen.
- Select Enabled > Apply > OK. Done!

If youd like to get your lock screen back, simply follow the above steps again. And at the last step choose Not Configured or Disabled option to get it back.
If you face any problem regarding lock screen, dont hesitate to leave a comment . . .
If you face any problem regarding lock screen, dont hesitate to leave a comment . . .
Stay with Marks PC Solution to get more interesting IT topics!
Go to link download
Friday, August 19, 2016
Disable Windows 10 Automatic Update All Editions
Disable Windows 10 Automatic Update All Editions
Though Windows 10 Pro users can easily disable Automatic Update, Home users cant! Because they dont have Group Policy Editor. And Registry Settings for turning off auto update doesnt work too. In this situation, if youre a home user then you can stop automatic update through Services.
At the end of last year, Ive published another post on disabling Windows 10 Auto Update. But it doesnt work with Windows Home edition. If youre using Windows 10 Pro or Enterprise edition, then follow the link below -
Disable Automatic Update through Group Policy Editor . . .
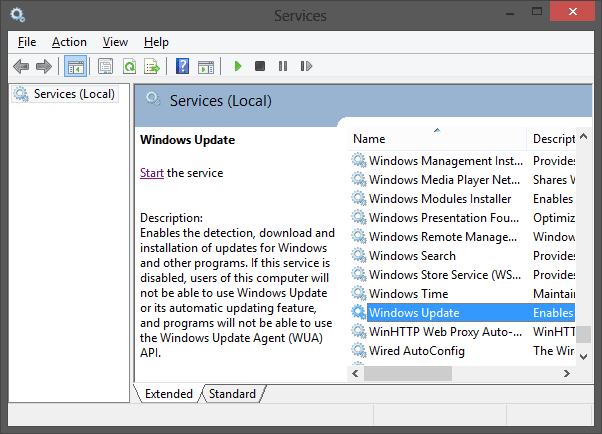
Turn off Automatic Update (Specially For Home Users)
- Go to Control Panel.
- Open Administrative Tools.
- Click twice on Services.
- Lots of services will be there. Press W > Scroll down and find Windows Update. (Or Press Start + R > Type services.msc > Press Enter > Find Windows Update)
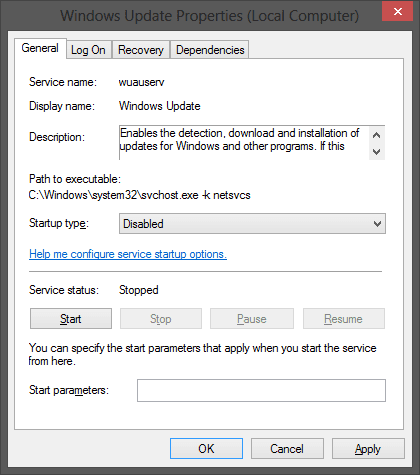
- Double click on it to open Windows Update Properties.
- Make sure youre on the General tab.
- Choose Startup type Disabled. If youd like to update manually, then choose Manual.
- Now look at the Service status. If its running, stop it.
- Finally, hit on the Apply > OK.
Hope this will work. Let me know whether it works or not. If you face any sort of problem, inform me. Waiting for your feedback . . .
Stay with Marks PC Solution to get more interesting IT topics!
Go to link download
Thursday, August 18, 2016
Disable Auto Hide Ribbon in Microsoft Office
Disable Auto Hide Ribbon in Microsoft Office
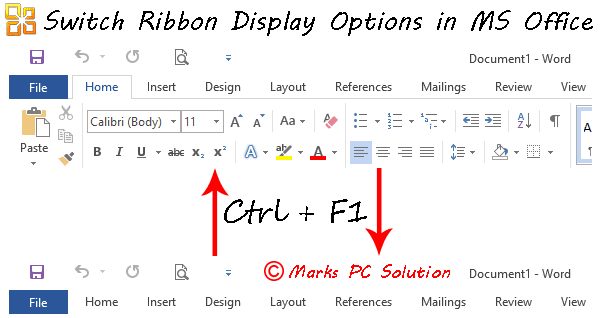
Were familiar with ribbon interface from Microsoft Office 2007. And now the latest version is Office 2016. In ribbon interface, everything you need is just a click away. Here, you dont need to search for an option through drop down menu.
The main problem of the ribbon is, it reduces your typing/ working space. Thats why your system may hide the ribbon automatically. But if youre not tensed with the working space, then you should keep the ribbon turned on. Definitely it will make your tasks more convenient.
Show/ Hide the Ribbon in Office 2013/ 2016
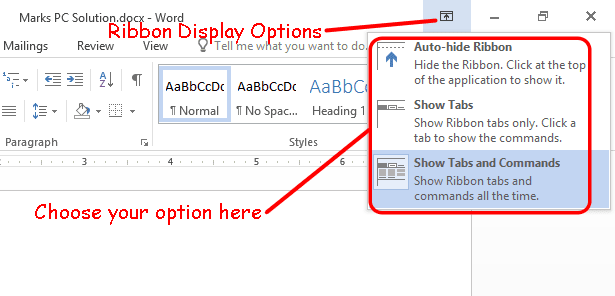
Hitting on this button will prevent the system from hiding the commands automatically. Or you can use Ctrl+F1 to switch between modes.
Show/ Hide the Ribbon in Word 2007/ 2010
As Im using Word 2016, providing screenshots for earlier versions is bit tough. And ribbon option is little bit different in Word 2010 and 2007.
But I hope, Ctrl+F1 works in these versions too! And you can also follow the image below:
Clicking on the down arrow (Cutomize Quick Access Toolbar) will allow you access these options.
As the ribbon is now displayed, you can see Minimize the Ribbon option. When the ribbon commands are hidden, you will see the opposite option.
And in Office 2010, a small up arrow will be shown just above the ribbon commands. Clicking on that button will hide your ribbon commands.
And always remember the keyboard shortcut for this option -
Hope this trick will help a lot if youre in trouble with the ribbon display options. If you still need to be clarified, please knock me . . .
Show/ Hide the Ribbon in Office 2013/ 2016
- Simply press Ctrl + F1 to switch between ribbon views. When the ribbon is turned on, press Ctrl+F1 to hide this. Using the same keyboard shortcut will turn it on again!
- Or if youre not good at memorizing the keyboard shortcuts, please follow the image below -
Look at the options -
- Auto-hide Ribbon: It will keep the ribbon and tabs hidden automatically. To view the commands, you need to click at the top of the screen.
- Show Tabs: It will only display the tabs. When you click on any of them, you will able to see the commands.
- Show Tabs & Commands: This is what I prefer most of the cases. Choosing this option will show the ribbon tabs and commands.
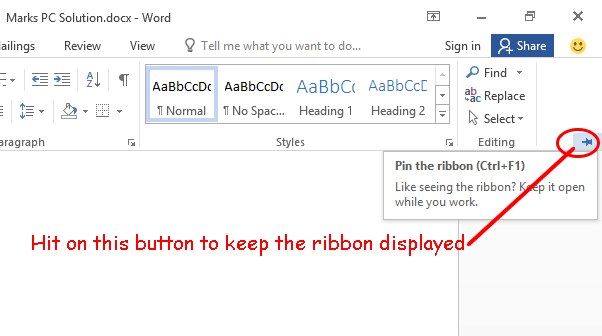
When your system is automatically set to Show Tabs option, you will be able to view the commands when you choose a tab. In that case, if you would like to pin the ribbon, simply look at the image below:
Hitting on this button will prevent the system from hiding the commands automatically. Or you can use Ctrl+F1 to switch between modes.
Show/ Hide the Ribbon in Word 2007/ 2010
As Im using Word 2016, providing screenshots for earlier versions is bit tough. And ribbon option is little bit different in Word 2010 and 2007.
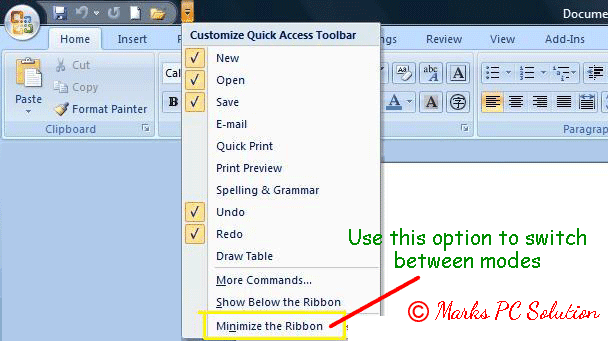
But I hope, Ctrl+F1 works in these versions too! And you can also follow the image below:
Clicking on the down arrow (Cutomize Quick Access Toolbar) will allow you access these options.
As the ribbon is now displayed, you can see Minimize the Ribbon option. When the ribbon commands are hidden, you will see the opposite option.
And in Office 2010, a small up arrow will be shown just above the ribbon commands. Clicking on that button will hide your ribbon commands.
And always remember the keyboard shortcut for this option -
Ctrl + F1
Hope this trick will help a lot if youre in trouble with the ribbon display options. If you still need to be clarified, please knock me . . .
Stay with Marks PC Solution to get more interesting IT topics!
Go to link download
Subscribe to:
Posts (Atom)