Showing posts with label change. Show all posts
Showing posts with label change. Show all posts
Saturday, October 15, 2016
MODEL china Galaxy S IV I950X imei not change
MODEL china Galaxy S IV I950X imei not change
Connecting to Phone,Wait..ok
Hardware:mt6572
Board:lcsh72_we_jb3
CPU ABI:armbi-v7a
Manufacturer:
Model: Galaxy S IV(I950X)
Android Ver:4.2.2
bootloader ver:unknown
USB config:mass_storage,adb
User:rs
FS:EXT4
Baseband ver:MOLY.WR8.W1315.MD.WG.MP.V1.P2, 2013/10/19 15:03
Build :ALPS.JB3.MP.V1
IMEI1: 35**************
IMEI2: 3***************
Root: Rooted(su)
Done
Connecting to Phone,Wait..
Repair IMEI...
Connection Done
CPU: mt6572
MODEL: Galaxy S IV(I950X)
VSN: 4.2.2
Wait ...
permission denied
Connecting to Phone,Wait..
Repair IMEI...
Connection Done
CPU: mt6572
MODEL: Galaxy S IV(I950X)
VSN: 4.2.2
Wait ...
permission denied
Go to link download
Wednesday, October 5, 2016
How to Change the Folder Icon
How to Change the Folder Icon
By default, Windows folders look like a yellow folder. And if you use any custom theme, it may change. Many of you might know how to customize the Windows Folder Icon. Its very easy to change. Previously I discussed about how to change the pen drive/ hard drives icon. Today Im gonna discuss about changing the folder icon.
Its been few months when I published any Windows trick. Sorry for the long break!
To change the folder icon is much easier than changing the drive icon. If you wanna change the drive icon, you have to use an autorun file. But you dont need any notepad file to change the folder icon. All you need is just an icon format (must be .ico) image.
First collect an icon format image. You can convert an image into icon in any of the following ways:
- Create Icon using IcoFx (Only 1.62 MB)
- Convert Image into Icon Online
I prefer using IcoFx. Download it and convert your image into icon within seconds. After getting the icon, you can go for the next step.
Change Folder Icon
- Copy the icon that you wanna show in the folder.
- Go to My Computer (Start + E) or any location where your desired folder is located.
- Paste the icon within that folder.
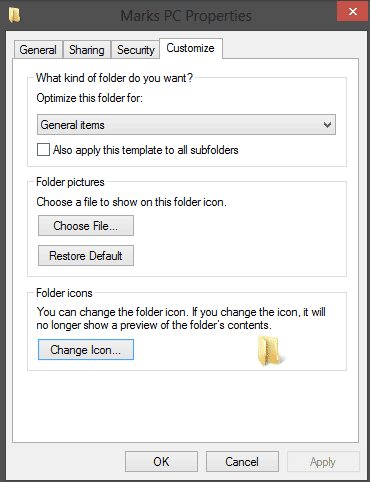
- Press Backspace to get out of this folder. Now click right mouse button over the folder and go to the Customize tab > Change Icon as shown in the image below.

After hitting the Change icon button, you will get a list of Windows Icons. You can use any of them. But here Im gonna use the custom icon. So you have to click on the browse button.
After hitting the browse button, you have to locate the folder again. Go to the folder and choose your custom icon that youve copied in the first step. Now hit on Open > Apply > OK. And youre done!
Restart your PC if you dont see any change.
Note: Its not necessary that the icon needs to be copied in your desired folder. Windows can show the folder icon from any other folder. But when you take that folder through a CD or Pen Drive, you may not get that icon with the folder. Thats why Im recommending to keep the custom icon within this folder.
For more tips on Windows, visit this page . . .
Stay with Marks PC Solution to get more interesting IT topics!
Go to link download
Friday, September 23, 2016
Change Dress Color Using Photoshop!!
Change Dress Color Using Photoshop!!

Some little tricks of Adobe Photoshop may enable you to perform extraordinary works. Even you can prove yourself as magician to common people. Today Ive come with such tricks which will help you to change the color of dress without hurting the background and subject of the image . . .
Before you start, please have a look at this post also -
Use Hue/ Saturation to Modify Color in Photoshop
Requirements:
- Adobe Photoshop (Im using version CS6)
- A good quality photo of a person
- Basic knowledge of Photoshop
Step 1 | Choose an Image

Step 2 | Change the Color
Open your image using Photoshop. And do the following tasks -
- Go to the Image Menu > Adjustment > Hue/ Saturation [Ctrl + U]
- Move the Hue slider to left or right.
- Also move the Saturation and Lightness slider (Optional)
When you get the desired dress color, hit OK.

Ive used 100 in Hue option and left the other fields as they are. It brings me the following result:

Now compare it with the first image. This lady got a completely new dress. But Oh My God! What happened to her face and skin? And what about the background?
Okay weve nothing to worry about until we have Photoshop. Now Ive to take some parts of this image back to its original look.
Step 3 | History Brush Tool
At this step, weve to do some works manually. Except the dress, other parts of the image (Face, Hair, Skin & Image background) should be taken to their previous stage.

Look at the above Tool of Photoshop. This is our Trump Card. With this History Brush Tool, you can simply paint the area that needs to be backed to its previous stage.
The keyboard shortcut of this tool is Y.
As soon as you choose History Brush Tool, you will get a circle. Start painting over your image. Press this key [ to decrease the brush size and press this ] to increase.

Here Ive just touched the upper left corner of the image. After painting the whole area except the dress, the final result is as below -

Ive edited this image within a very short time. But if you practice properly and spend little more time, hopefully you will get much better result.
Hope it will help you all. In my next post, I will write more on History Brush Tool. Till then, stay with Marks PC . . .
Caution!
No photo of this tutorial can be used anywhere in the web, print or any other media.
Model: Rizwana, Computer Engineer.
Stay with Marks PC Solution to get more interesting IT topics!
Go to link download
Wednesday, September 7, 2016
How To Change Font On Android Phone Without Root
How To Change Font On Android Phone Without Root
Method 1st:- Using GO Launcher Ex (For Non rooted Phone)
Steps To Change Fonts Using GO Launcher EX
Step 1. First of all install GO Launcher from Google Play Store or by clicking the button below.


Step 4. Select the preferences from the menu then look for the font option.


Step 7. After doing the changes, changes take place immediately without restarting the Phone.
Method 2nd:- Using Font Installer (For Rooted Android Phones)
Steps To Change Font Using Font Installer App
Step 1. Download and install Font installer App into your Android device by clicking the following button.


Step 4. You can view and install any of the font from the list. Tap the desired font and click on install.


Steps To Use TTF Files
Step 1. If you have downloaded TTF file then you can copy your font file to /sdcard directory.
Step 2. Run the Font installer App and Backup your previous fonts. You have to grant Superuser or SuperSU permission when prompted.
Step 3. Now click on the local tap and find the TTF file that you copy on the sdcard.
Step 4. Click on the desired TTF file that you want to use and tap the install option to make it system font.
Step 5. Reboot your device to reflect the changes.
Go to link download
ORT JTAG ORT Plus V2 01 HTC Desire 300 Unlock IMEI Change SN Full Supported
ORT JTAG ORT Plus V2 01 HTC Desire 300 Unlock IMEI Change SN Full Supported
ORT - JTAG UPDATE
[17 JUNE 2014]
Description :
- ORT Plus V2.01 Released
- HTC_301E DLL ( HTC desire 300 ) Released
- Platform Updates :
- Qualcomm MSM8225 Routines are improved
- Qualcomm MSM8225 NEW ID : 0x1077C0E1
- Download ORT Plus V2.01 here
- HTC Desire 300 / HTC Zara Mini / HTC 301E Full Support for following options
- Repair Dead Boot
- Unlocking
- IMEI Change
- SN Change
- CID Change
- Advanced EFS Repair
- ORT Repair files had already included EFS repair for many Samsung Phones for years !!
- You do not need to download anything for that it is just inside the repair files .
- Universal JTAG Programmer
- ORT JTAG has always been Universal JTAG Programmer for the supported CPUs
- We do not limit you with the model list you can work with any model as long as you have the correct connection
- JTAG Finder Started
- Service Database for your center
- www.ORT-JTAG.com
Go to link download
Tuesday, August 30, 2016
How to Change Office 2013 Theme
How to Change Office 2013 Theme

Just 2 days ago, I shared Office 2013 Activator. And from now, you will get tips on Microsoft Office 2013. Im gonna start with a little trick - customizing the office theme. Microsoft Office has 3 themes - Dark Gray, Light Gray and White. And you can choose one which you prefer.
By default, you will get the light gray or white theme. But I dont like them at all. Because both of them looks somewhat like blue. My choice is dark gray. And I really like it. Because this will protect your eyes from light. But in light gray, you may feel too much light.
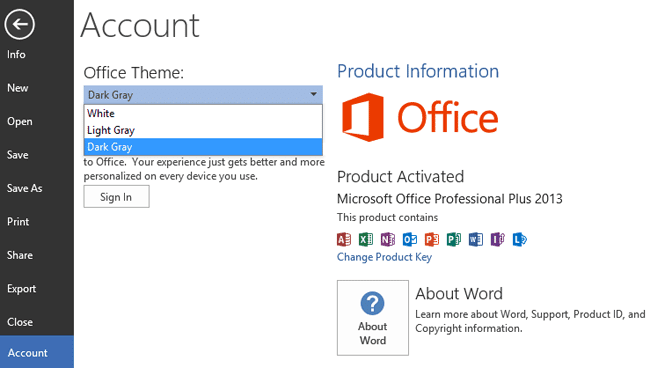
You can also change the theme if you want. It takes less than a minute. Simply look at the image below:

Hope youve understood the procedure from the above image. Again Im gonna clarify it. Remember that, you can change the theme from Word, Excel or PowerPoint. But Im using Word Now. Follow the steps below:
- Run Word 2013
- Click on the File button from the upper left corner
- Now choose Account as shown in the above image
- Click on the drop down menu under Office Theme
- Choose your desired theme
Youre done!
You can also change Office 2007, 2010 theme. But in these versions, you will not find the term Theme. You will get Color Scheme there. Find out more . . .
Stay with Marks PC Solution to get more interesting IT topics!
Go to link download
Monday, August 29, 2016
Download Book of Change 1 3 APK for Android
Download Book of Change 1 3 APK for Android
ID: saywhat.com.bookofchange
Version: 1.3
File Size: 2.3Mb
Book of Change Screenshots
Book of Change Description
Book of changesThis application will help you to perform fast fortunetelling. Although the future is unknown to us, we always will be in search for the right guides that will help us to understand the next day better.I Ching (Book of changes is one of the tools you can use.
This application has been made the way it will work on any android device. Any special features are not added here to provide reliable work and fault free fortunetelling experience.
Please, provide us with some feedback as to the features your heart desire to see, after detailed review we will be introducing new features.
Whats new in Book of Change 1.3
Ukrainian translation addedUpdate 1.3: Hexagram fix
Download Book of Change 1.3 APK
- Google Play
- DOWNLOAD
Go to link download
Subscribe to:
Posts (Atom)