Showing posts with label upgrade. Show all posts
Showing posts with label upgrade. Show all posts
Monday, October 17, 2016
How to Flash or Install S5830XXKPT Firmware Upgrade Samsung Galaxy Ace to Android 2 3 6 Gingerbread
How to Flash or Install S5830XXKPT Firmware Upgrade Samsung Galaxy Ace to Android 2 3 6 Gingerbread
Heres the procedure on how to manually upgrade the Samsung Galaxy Ace GT-S5830 to Android 2.3.6 Gingerbread using the stock ROM S5830XXKPT. This is a Russian official firmware update for Galaxy Ace that has been recently released this March 2012. Some changes is the lock screen features, much more faster than the previous buildS5830XXKPP and S5830XWKT7. Some European languages are included on this packaged, so anyone who prepares an English (UK and US) and European languages can use this ROM. The default language is set in Russian, but you can change it to your desired local language after installation.
Note: This ROM may only flashable for Galaxy Ace GT-S5830 only.
Download the stock ROM S5830XXKPT
firmware info:
PDA: S5830XXKPT
CSC: S5830SERKPT
Phone: S5830XXKPT
Version: Android 2.3.6 Gingerbread
Country: Russia
Build date: March 03, 2012
stock ROM GT-S830_SER_S5830XXKPT_S5830SERKPT_S5830XXKPT
Grab the ODIN Multi Downloader and OPS File: Cooper_v1.0.ops
Samsung Galaxy Ace Odin flashing S5830XXKPT Android 2.3.6 stock firmware
- Make sure you are running Windows on your PC with USB driver installed or have Kies installed.
A USB cable wire of your device, a good working USB serial port, sometimes the connection issues occurs because of a bad USB port of your PC and the USB cable.
- Make a back up copy of all important files stored on your phone, the file is a none wipe but it is better to have an extra precautions if something went wrong.
- Disable any antivirus and Kies installed, this program might also interrupt Odin while in flashing process.
1. After youve done downloaded theS5830XXKPT stock ROM, just simply extract it using winrar, winzip, 7zip or any rar file extractor program you have. Then you in the folder you can see the file
S5830XXKPT_S5830XXKPT_S5830SERKPT_HOME.tar.md5
SS_DL.dll
we dont need this SS_DL.dll on this flashing, but dont delete it.
2. Extract and run also the Odin v4.38 on your desktop.
3. On ODIN clickt the OPS button and load the Cooper_v1.0.ops file on it.
4. Hit the One packaged in the checkboxes options (the Auto reboot and protect OPS remain checked,
then at the lower part of Odin click on the One Packaged button then select and load the
S5830XXKPT_S5830XXKPT_S5830SERKPT_HOME.tar.md5

5. Set the Samsung Galaxy Ace inDownload Mode:
Turn the OFF the phone or remove the battery for a couple of seconds then put it back again. By pressing Volume Down+Power+ Middle buttonssimultaneously the phone will then reboot into download mode.

7. Once the connection set up is okay, begin the flashing by hitting the Startbutton.
It only takes around 4 to 5 minutes to complete, a progress bar on the left side of ODIN will show you the downloading progress. A word "PASS" will display once it finishes.
Its time to unplug the phone from PC, then do a factory data reset to clean all data caches and have a fresh firmware installed, you can do this by Recovery Mode button - Home + Power Button, then toggle on using the volume button and select Wipe Data/ Factory Reset or by typing this code *2767*3855#.
To check the newly installed firmware update - by typing *#1234#.
Change the default Russian language to your Region, go to settings and then locate the locale and text icon, then find your native language. You may then also often check out the Samsung Galaxy Ace stock ROM list for future firmware updates.
Go to link download

Thursday, August 25, 2016
Grub missing after Windows upgrade
Grub missing after Windows upgrade
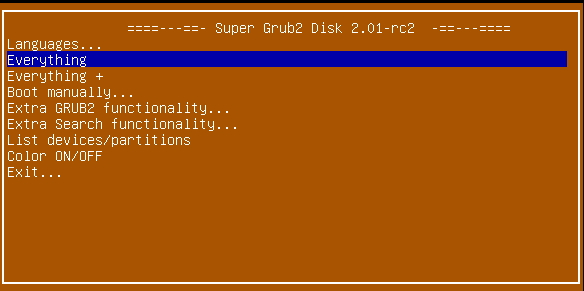
If you have a dual-boot machine with Linux and Windows and you update your Windows operating system, your machine will likely boot directly into Windows without giving you your familiar grub boot loader screen. You may panic and wonder if the Windows update wiped out your Linux installation but dont worry your Linux install is safe and sound -- its just that Windows overwrote the MBR with its own boot loader and you need to re-install grub. Your initial reaction will be to use a Linux LiveCD and some terminal commands to restore grub but that often requires mounting the hard disk using a bunch of cryptic commands and even then it might not work if you have a RAID setup. Instead, I recommend you download and burn the Super Grub2 rescue CD (look for the Recommended download link) and then restart your machine to boot into it. The screens are a bit confusing but the overall process is really simple so Ill just walk you through it:
1. Use the up/down arrows on your keyboard to select the Everything option and hit the Enter key
2. The resulting screen will show all the versions of the Linux kernel that it found on your computer (dont worry if you see a bunch of entries in the list even if you only have one install of Linux)
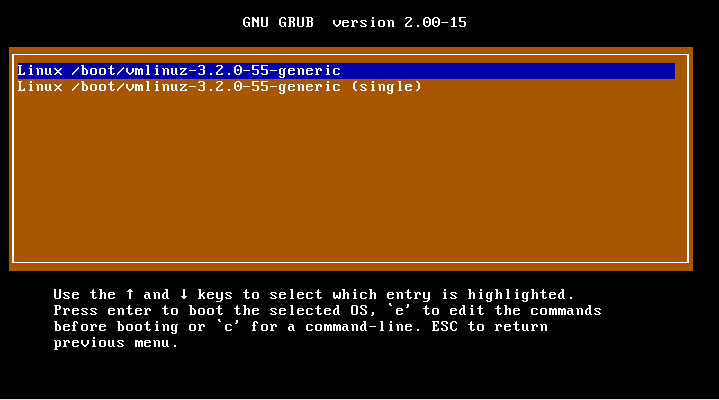
3. Use the up/down arrows on your keyboard to select the highest Linux version in the list and then hit the Enter key
4. Your Linux instance should boot up - yay! Now, you need to restore your grub boot loader. To get the right command, open a terminal and run the following (note: this is a safe, read-only command that simply checks for the presence of RAID):
if [[ `sudo dmraid -r 2>/dev/null` =~ [^/dev/sda:] ]]; then echo sudo grub-install /dev/mapper/`sudo dmraid -r 2>/dev/null | egrep ^/dev/sda | cut -d" -f 2` ; else echo "sudo grub-install /dev/sda" ; fi
5. The result should be something like "sudo grub-install /path/to/your/bootable/partition" Run that command in your terminal to set up the grub boot loader.
if [[ `sudo dmraid -r 2>/dev/null` =~ [^/dev/sda:] ]]; then echo sudo grub-install /dev/mapper/`sudo dmraid -r 2>/dev/null | egrep ^/dev/sda | cut -d" -f 2` ; else echo "sudo grub-install /dev/sda" ; fi
5. The result should be something like "sudo grub-install /path/to/your/bootable/partition" Run that command in your terminal to set up the grub boot loader.
6. Remove the CD and then restart your machine to verify it worked.
Go to link download
Subscribe to:
Posts (Atom)