Showing posts with label after. Show all posts
Showing posts with label after. Show all posts
Monday, October 3, 2016
IDM After finish Downloading it say File has been Moved Fix it Now!
IDM After finish Downloading it say File has been Moved Fix it Now!
This thing has been happening to me more than one time a week, to be honest i couldnt know what to do next. I finish downloading a file with 889MB by using IDM but After i finish download and want to open it it prompt " ......file has been moved".
 The massage was killing me because I could find where the file has been moved. So I think and decide to go and check on IDM temporary files downloads. Final image to see the file but still can not be open.....that was another problem, check the file extension and notice has no file extension so I change file extension to .mp4 as my file was in Mp4 format while i was downloading it. And it work like waooooooh!!!!
I made it.
NB:
Remember to change extension File format after see your file, then move it to any place you want
 The massage was killing me because I could find where the file has been moved. So I think and decide to go and check on IDM temporary files downloads. Final image to see the file but still can not be open.....that was another problem, check the file extension and notice has no file extension so I change file extension to .mp4 as my file was in Mp4 format while i was downloading it. And it work like waooooooh!!!!
I made it.
 |
| Allocate IDM temporary file folder |
 |
| Follow the Step to Find your hidden ////File |
Remember to change extension File format after see your file, then move it to any place you want
For any Comment, advice or Question do not be uncomfortable...
Just leave a Comment Below
And I will Help. Or send a Mail through my Contact:
Raymkindo02@gmail.com
+255718574710
Go to link download

Wednesday, September 21, 2016
ew post for Samsuns S7262 After Imei Repair Emercy Done Done with Tool v 17 2
ew post for Samsuns S7262 After Imei Repair Emercy Done Done with Tool v 17 2
Hi Everyone
new post for Samsuns S7262 After Imei Repair Emercy Done Done with Tool v.17.2
S7262 Pro Emrecy Call After Imei repair Done
Prduce ... 1st Root Your Phone
2.Conect Phone And rd efs
3.repair imei and fill imei Just Tick Imei.
4. After imei Repir Write Efs Backup
And Chek Network
elected model: S7262
Selected port:
Selected port speed: 115200
Srching ADB device... OK
Rding phone info...
Model: GT-S7262
Android version: 4.1.2
Product : GT-S7262MKAINS
Phone version: S7262XXUAMK2
PDA version: S7262XXUAML1
CSC version: S7262ODDAMK2
IMEI: 353684**********
Phone S/N: RZ1DC2P5ZVY
Checking Super user right... true
Writing EFS to phone... OK
Rebooting phone... OK
Done with Tool v.17.2
Done with Tool v.17.2
Here Is Tested Efs File
EFS_S7262_11-4-2014_19-49-43
unlock galaxy S4 L720T ndroid version ; 4.4.2 how to unlock this phone
Go to link download
Saturday, September 10, 2016
Galaxy Mega I9200 After update touch not working Solution Here Tested
Galaxy Mega I9200 After update touch not working Solution Here Tested
Galaxy Mega I9200 After update touch not working Solution Here Tested
Guide: MySelf
This Solution Tested & Done By : allumts
Note: This file Only fix Bootloop issues Always Booting in
recovery mode, after update to 4.4.2 hang Logo
Only recovery mode & Touch not working after update to kitkat.
Tested Downgrade from 4.4.2 to 4.2.2 Tested vit out any issues
Firmware Flashing Method:
* Put Mobile in Download Mode By Holding Vol dwn + Home + Pwr
* Cnnt vit pc using Usb
* Run Odin
* Select File in PDA
* Uncheck Auto Boot in Odin (Important This Step )
* Click Start
* After Flash complete remain with Blu line, but not import after PASS only Important.
* Just take out battery, wait 30 sec.s and
put back the battery power on phone,
itself goes in Recovery mode, or manually put recovery mode just
select Wipe/Factory reset and reboot, all working fine.
Note:Tested nd Worked Fine nd IMEI also fine
Firmware Download Here Android 4.2.2
Mirror Link Here Login vit sammobile Acc
Odin Flasher
Note:if all language not available aftr flash simply root yur device install language enabler frm here nd enable all languages reboot device
Also yu can install all language manually via wifi Goto settings /Language input
CSC flashable Language Pack vil be added Soon
Result Credits to : allumts
Odin flash Log
: Added!!
Enter CS for MD5..
Check MD5.. Do not unplug the cable..
Plse wait..
I9200ZTUCNG1_I9200ZZTCNG1_I9200ZTUCNG1_HOME.tar.md 5 is valid.
Checking MD5 finished Sucessfully..
Lve CS..
Odin v.3 engine (ID:18)..
File analysis..
SetupConnection..
Initialzation..
Get PIT for mapping..
Firmware update start..
SingleDownload.
sbl1.mbn
NAND Write Start!!
sbl2.mbn
sbl3.mbn
rpm.mbn
aboot.mbn
tz.mbn
boot.img
recovery.img
system.img.ext4
NON-HLOS.bin
cache.img.ext4
hidden.img.ext4
RQT_CLOSE !!
RES OK !!
Remain Port .... 0
All thrds completed. (succeed 1 / failed 0)
DONT SAY THANKSJUST PRESS BUTTON
BUTTON
Go to link download
Saturday, September 3, 2016
Download Shrek Forever After free android app
Download Shrek Forever After free android app

Shrek Forever After
Books & Reference
[Download Link >>]
version:1.2
rating: 3
rating count: 682
updated: 2015-01-20
size: 9.5 MB
installs: 1000
cost: UAH30.35
Go to link download
Thursday, August 25, 2016
Grub missing after Windows upgrade
Grub missing after Windows upgrade
If you have a dual-boot machine with Linux and Windows and you update your Windows operating system, your machine will likely boot directly into Windows without giving you your familiar grub boot loader screen. You may panic and wonder if the Windows update wiped out your Linux installation but dont worry your Linux install is safe and sound -- its just that Windows overwrote the MBR with its own boot loader and you need to re-install grub. Your initial reaction will be to use a Linux LiveCD and some terminal commands to restore grub but that often requires mounting the hard disk using a bunch of cryptic commands and even then it might not work if you have a RAID setup. Instead, I recommend you download and burn the Super Grub2 rescue CD (look for the Recommended download link) and then restart your machine to boot into it. The screens are a bit confusing but the overall process is really simple so Ill just walk you through it:
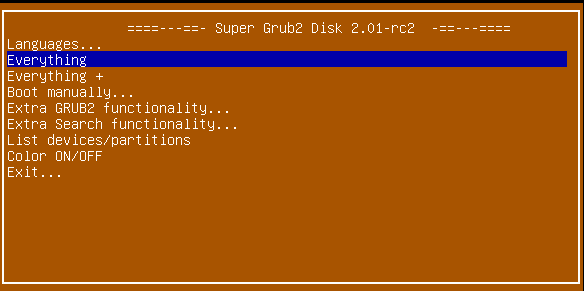
1. Use the up/down arrows on your keyboard to select the Everything option and hit the Enter key
2. The resulting screen will show all the versions of the Linux kernel that it found on your computer (dont worry if you see a bunch of entries in the list even if you only have one install of Linux)
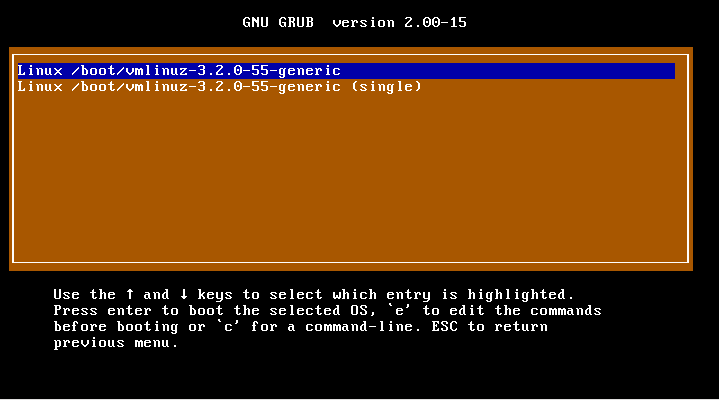
3. Use the up/down arrows on your keyboard to select the highest Linux version in the list and then hit the Enter key
4. Your Linux instance should boot up - yay! Now, you need to restore your grub boot loader. To get the right command, open a terminal and run the following (note: this is a safe, read-only command that simply checks for the presence of RAID):
if [[ `sudo dmraid -r 2>/dev/null` =~ [^/dev/sda:] ]]; then echo sudo grub-install /dev/mapper/`sudo dmraid -r 2>/dev/null | egrep ^/dev/sda | cut -d" -f 2` ; else echo "sudo grub-install /dev/sda" ; fi
5. The result should be something like "sudo grub-install /path/to/your/bootable/partition" Run that command in your terminal to set up the grub boot loader.
if [[ `sudo dmraid -r 2>/dev/null` =~ [^/dev/sda:] ]]; then echo sudo grub-install /dev/mapper/`sudo dmraid -r 2>/dev/null | egrep ^/dev/sda | cut -d" -f 2` ; else echo "sudo grub-install /dev/sda" ; fi
5. The result should be something like "sudo grub-install /path/to/your/bootable/partition" Run that command in your terminal to set up the grub boot loader.
6. Remove the CD and then restart your machine to verify it worked.
Go to link download
Subscribe to:
Posts (Atom)