Showing posts with label install. Show all posts
Showing posts with label install. Show all posts
Monday, October 17, 2016
How to Flash or Install S5830XXKPT Firmware Upgrade Samsung Galaxy Ace to Android 2 3 6 Gingerbread
How to Flash or Install S5830XXKPT Firmware Upgrade Samsung Galaxy Ace to Android 2 3 6 Gingerbread
Heres the procedure on how to manually upgrade the Samsung Galaxy Ace GT-S5830 to Android 2.3.6 Gingerbread using the stock ROM S5830XXKPT. This is a Russian official firmware update for Galaxy Ace that has been recently released this March 2012. Some changes is the lock screen features, much more faster than the previous buildS5830XXKPP and S5830XWKT7. Some European languages are included on this packaged, so anyone who prepares an English (UK and US) and European languages can use this ROM. The default language is set in Russian, but you can change it to your desired local language after installation.
Note: This ROM may only flashable for Galaxy Ace GT-S5830 only.
Download the stock ROM S5830XXKPT
firmware info:
PDA: S5830XXKPT
CSC: S5830SERKPT
Phone: S5830XXKPT
Version: Android 2.3.6 Gingerbread
Country: Russia
Build date: March 03, 2012
stock ROM GT-S830_SER_S5830XXKPT_S5830SERKPT_S5830XXKPT
Grab the ODIN Multi Downloader and OPS File: Cooper_v1.0.ops
Samsung Galaxy Ace Odin flashing S5830XXKPT Android 2.3.6 stock firmware
- Make sure you are running Windows on your PC with USB driver installed or have Kies installed.
A USB cable wire of your device, a good working USB serial port, sometimes the connection issues occurs because of a bad USB port of your PC and the USB cable.
- Make a back up copy of all important files stored on your phone, the file is a none wipe but it is better to have an extra precautions if something went wrong.
- Disable any antivirus and Kies installed, this program might also interrupt Odin while in flashing process.
1. After youve done downloaded theS5830XXKPT stock ROM, just simply extract it using winrar, winzip, 7zip or any rar file extractor program you have. Then you in the folder you can see the file
S5830XXKPT_S5830XXKPT_S5830SERKPT_HOME.tar.md5
SS_DL.dll
we dont need this SS_DL.dll on this flashing, but dont delete it.
2. Extract and run also the Odin v4.38 on your desktop.
3. On ODIN clickt the OPS button and load the Cooper_v1.0.ops file on it.
4. Hit the One packaged in the checkboxes options (the Auto reboot and protect OPS remain checked,
then at the lower part of Odin click on the One Packaged button then select and load the
S5830XXKPT_S5830XXKPT_S5830SERKPT_HOME.tar.md5

5. Set the Samsung Galaxy Ace inDownload Mode:
Turn the OFF the phone or remove the battery for a couple of seconds then put it back again. By pressing Volume Down+Power+ Middle buttonssimultaneously the phone will then reboot into download mode.

7. Once the connection set up is okay, begin the flashing by hitting the Startbutton.
It only takes around 4 to 5 minutes to complete, a progress bar on the left side of ODIN will show you the downloading progress. A word "PASS" will display once it finishes.
Its time to unplug the phone from PC, then do a factory data reset to clean all data caches and have a fresh firmware installed, you can do this by Recovery Mode button - Home + Power Button, then toggle on using the volume button and select Wipe Data/ Factory Reset or by typing this code *2767*3855#.
To check the newly installed firmware update - by typing *#1234#.
Change the default Russian language to your Region, go to settings and then locate the locale and text icon, then find your native language. You may then also often check out the Samsung Galaxy Ace stock ROM list for future firmware updates.
Go to link download

Sunday, October 9, 2016
chkrootkit install and daily scan
chkrootkit install and daily scan
Heres a quick one-liner to install chkrootkit and have it run daily:
sudo yum -y install chkrootkit && sudo printf "#"!"/bin/sh echo ### `date` `hostname` >> /tmp/rootkit.log `which chkrootkit` -q >> /tmp/rootkit.log " > /etc/cron.daily/chkrootkit.sh && sudo chmod +x /etc/cron.daily/chkrootkit.sh
Log file: /tmp/rootkit.log
Go to link download
Tuesday, September 20, 2016
How to install and use Veil Catapult in backtrack
How to install and use Veil Catapult in backtrack
Today we are gonna talk about Veil-Catapult.Veil-Catapult is payload delivery for when metasploit’s psexec getting caught by AV.It utilizes Veil-Evasion to generate AV-evading binaries, impacket to upload/host the binaries, and the passing-the-hash toolkit to trigger execution.It officially supported on kali linux only.I`m going to show you how to install Veil-Catapult in backtrack?
First if you have not already installed veil-evasion framework then first install it as mentioned here.After installing Veil-evasion follow steps.
root@bt:~wget https://github.com/Veil-Framework/Veil-Catapult/archive/master.zip
root@bt:~unzip master.zip
root@bt:~cd Veil-Catapult-master/
root@bt:~sh setup.sh
Now veil-catapult require impacket library & passing the hash toolkit.So setup script try to install PTH suite but we got error.So we have to manually do it.
First if you have not already installed veil-evasion framework then first install it as mentioned here.After installing Veil-evasion follow steps.
root@bt:~wget https://github.com/Veil-Framework/Veil-Catapult/archive/master.zip
root@bt:~unzip master.zip
root@bt:~cd Veil-Catapult-master/
root@bt:~sh setup.sh
Now veil-catapult require impacket library & passing the hash toolkit.So setup script try to install PTH suite but we got error.So we have to manually do it.
Install passing the hash.
root@bt:~wget https://passing-the-hash.googlecode.com/files/wmiPTH-1.0-1.deb
root@bt:~wget https://passing-the-hash.googlecode.com/files/winexePTH1.1.0-1.deb
root@bt:~dpkg -i winexePTH1.1.0-1.deb
root@bt:~dpkg -i wmiPTH-1.0-1.deb
If you are using other OS then you have to manually build it as mentioned here .
It installed into the /opt/pth/bin folder , we have to move it into /usr/bin.
root@bt:~# ln -s /opt/pth/bin/wmis /usr/bin/pth-wmis
root@bt:~# ln -s /opt/pth/bin/winexe /usr/bin/pth-winexe
root@bt:~# ln -s /opt/pth/bin/wmic /usr/bin/pth-wmic
Installing impacket library
root@bt:~# wget http://corelabs.coresecurity.com/index.php?module=Wiki&action=attachment&type=tool&page=Impacket&file=impacket-0.9.11.tar.gz
root@bt:~# tar -xvzf impacket-0.9.11.tar.gz
root@bt:~# cd impacket
root@bt:~# python setup.py build
I know you have question that we can install it , but when we tried to install , it installed succesfully ;but some of modules are missing.So we first gonna build it then copy it. Now copy folder impacket from build/lib.linux-i686-2.6/ and paste it into /usr/lib/pymodules/python2.6
Now everything is ready ,we can run it. Before that open /etc/veil/settings.py and checkout all path.
root@bt:~/Veil-Catapult-master# python Veil-Catapult.py
Now select number according to your choice & fill out necessary option.
Powershell injector

Barebones python injector

Sethc backdoor

Reboot, hit Shift key 5 times, SYSTEM shell will pop up. Also there is script for it in metasploit.Check it out this awesome blog for more details.
EXE delivery upload


Cleanup resource script is generated , you can use it after your work completed for kill process & remove exe.

You can also host exe using temporary SMB server.This will load the payload executable into memory without touching disk, allowing otherwise disk-detectable executable to bypass detection
Alternatives of Veil-Catapult are smbexec and keimpx.
Go to link download
Tuesday, August 16, 2016
How to Install Windows from USB Disk
How to Install Windows from USB Disk
Today Im gonna share a very useful tip with you. In this post, you will learn - how to create a bootable USB disk (pen drive) for Windows/ Linux. And this is the easiest way to install Windows from USB disk. Earlier, I wrote about creating bootable Windows disk.
If your PC doesnt have a DVD drive, or if your DVD drive is not functioning properly, you can use your pen drive to install Windows. And notebooks dont have DVD drive usually. To install Windows there, you must require a bootable pen drive.
This post applies to:
- Windows 7
- Windows 8
- Windows 8.1
I havent tested this technique for Windows XP. Maybe this will also work there. But Im not 100% sure about XP.
In order to install Windows from USB Flash Drive, you need the following tools:
- A USB Flash Drive/ Pen Drive (8 GB Recommended)
- Windows ISO Image
- Rufus - to create bootable USB disk
Step 1 - Get Windows ISO Image
Hopefully, all of you got an 8 GB pen drive. Now your task is to get an ISO image of your Windows. If you have a Windows Installation disk, you can prepare the ISO file using ISO Creator or by Infra Recorder.
Step 2 - Create Bootable Disk
Now youve to create a bootable flash drive by Rufus. And then youre ready to install Windows from pen drive! Download Rufus from this link. Its just 616 KB.
- Insert your pen drive. Back up the necessary files of it (if any). And perform a quick format.
- Run Rufus from your PC just by double click.
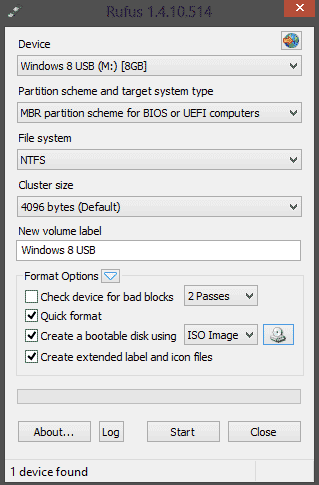
- Device - Your pen drive, Partition Scheme - for BIOS and UEFI, File System - NTFS, Cluster Size - Default, Type your Windows Name in Volume > Choose Quick Format > Create a Bootable Disk using ISO Image > Hit on the CD icon and locate your ISO file > Select Extended Labels and Icon Files > Hit on the Start button to launch the operation.
- This may take a few minutes. Then you will get a confirmation message. Done!
You can follow the image below:
Step 3 - Boot from USB Flash Drive
Restart your system. To access BIOS settings, you need to press F1 in case of Intel Mainboard. Gigabyte users will press Del key. And most other mainboards use F1 key to access to the BIOS utility.
Now depending on your BIOS version, there could be different interface styles. But the basic option you need to find is - The Boot Priority or The Boot Order.
To install the Windows from a USB disk, you need to select - Boot from USB Drive. Now Save and Exit from BIOS. Restart your PC. Now you will see the following message -
Press any key to boot from USB...
Now press enter to start installing Windows from USB disk! If you face any problem, please leave a comment . . .
Wait a Minute!
Wait a Minute!
When your PC copies files from the disk and restarts, the installation process may start again. If this happens to you, simply remove your pen drive and continue the installation process.
Stay with Marks PC Solution to get more interesting IT topics!
Go to link download
Subscribe to:
Posts (Atom)