Showing posts with label kitkat. Show all posts
Showing posts with label kitkat. Show all posts
Tuesday, October 18, 2016
Motorola kills swype with KitKat
Motorola kills swype with KitKat
The Motorola Razr M update to KitKat today deleted my free OEM install of swype. Major lame :(
Since the free Google keyboard app (thats presumably meant to replace it) tracks your typed messages in the cloud and the free version of the Yii keyboard app doesnt have left/right arrows, I finally broke down and paid my lame $4 to The Man - argh!
...even then, I still lose my left/right arrows on the main keyboard screen (an OEM-only feature) and now have to swipe the swype symbol onto the +!= button to get to them. Double Argh!!
Go to link download
Thursday, September 8, 2016
Tutorial Installing CyanogenMod on Verizon Droid Razr M KitKat 4 4 2
Tutorial Installing CyanogenMod on Verizon Droid Razr M KitKat 4 4 2
Update:
Update #4:
Update #4b: Some users are reporting success with kingroot for rooting the device but still no word on a reliable method to unlock the bootloader...
Update #5: This somewhat outdated guide is useful for switching from the Verizon stock OS to Cyanogenmod but if you already have a rooted phone or are already running Cyanogenmod and you want to upgrade to version 12.1, use this guide (the key is to use TWRP, install SuperSU when prompted in the recovery reboot process, and to use TK GAPPS [I like modular micro]). Once installed, make sure to enable root and reset GPS. Also, here are the Xposed instructions if you need them (get the latest xposed-v*-sdk22-arm.zip and XposedInstaller_3.0-alpha*.apk files here). And dont forget to choose a cool theme (I like Euphoria Dark)
_______________________
So youve heard about this great utopia of milk and honey where your smartphone runs faster, uses less battery life, gives you more control, and provides more frequent updates and you want to try it out yourself. Awesome. But before we dive into that adventure, you must swear with an oath to obey the:
~ ~ ~ ~ ~ ~ ~ ~ ~ ~ ~ ~ ~ ~ ~ ~ ~ ~ ~ ~ ~ ~ ~ ~ ~ ~ ~
Ten Commandments of ROM Flashing
- Thou shalt have no other ROMs before CyanogenMod
- Thou shalt not proceed if thy exact device and Android version is not listed at sbf.droid-developers.org
- If thou knowest not what thou art doing, thou shalt not do it
- Remember thy backups, to keep them holy -- if any warning screen says "CANNOT BE UNDONE", cancel, create full (nandroid) backup, then continue with action.
- Thou shalt charge thy smartphone completely (100%) before attempting a ROM flash
- Thou shalt not kill thy smartphone by skipping steps, ignoring warnings, tl;dr, voodoo programming, shotgun surgery, panicking, etc.
- Thou shalt not commit adultery by installing zip, img, bin, etc. files from another manufacturer, device, version, or random outdated forum post onto thy device
- Thou shalt use the manufacturers official USB cable (OEM)
- If thy device is Motorola, thou shalt use the Motorola version of fastboot
- Thou shalt give praise and thanksgiving to the many brilliant hackers that have made all of this possible!
~ ~ ~ ~ ~ ~ ~ ~ ~ ~ ~ ~ ~ ~ ~ ~ ~ ~ ~ ~ ~ ~ ~ ~ ~ ~ ~
Regarding Commandment #7, the following device terms are equivalent for the purposes of this guide:
- Smartphone model: "xt907", "Droid Razr M", "Razr M", and "msm8960" (Note: the "Razr HD" device is similar enough to the "Razr M" that youre generally okay with files for that device as well)
- Android version: "KitKat", "KK", "4.4.2"
~ ~ ~ ~ ~ ~ ~ ~ ~ ~ ~ ~ ~ ~ ~ ~ ~ ~ ~ ~ ~ ~ ~ ~ ~ ~ ~
WARNING: THE FOLLOWING GUIDE IS ONLY FOR VERIZON WIRELESS U.S. DROID RAZR M SMARTPHONES RUNNING ANDROID KitKat VERSION 4.4.2 (see Settings > About Phone). I CANNOT BE HELD RESPONSIBLE FOR ANYTHING THAT GOES WRONG IN THE PROCESS OF FOLLOWING THIS TUTORIAL. USING YOUR DEVICE IN THE WAYS DESCRIBED BELOW WILL VOID YOUR WARRANTY. PROCEED AT YOUR OWN RISK.
Okay, if youve made it this far youre pretty committed to doing this. So, without further ado:
A. Gain root access (similar to "jailbreak" on iOS devices)
2. Check Unknown sources and (if exists) uncheck Verify apps (click OK on any security prompts)

3. If Settings > Developer options doesnt exist, go to Settings > About Phone and scroll down to the bottom. Tap Build number seven times to enable developer mode

4. Go to Settings > Developer options, enable it if disabled, and check USB debugging

5. Open a web browser and download towelroot: https://tinyurl.com/khf62jr [mirror] {credit: geohot}
6. Click OK on the security warning to download.
6. Click OK on the security warning to download.
7. Go to your phone apps and click on Downloads
8. Click on tr.apk and click Install and then Open
9. Click on the make it ra1n button. You should now have root access!

8. Click on tr.apk and click Install and then Open
9. Click on the make it ra1n button. You should now have root access!
10. Open a web browser and download Root Checker: https://tinyurl.com/ppg9cj7 {credit: CMDann}
11. Click the Verify Root Access button and make sure a green checkmark appears

12. On your phone, go to Settings > Location and turn Location ON (say Yes to any prompts that appear)
13. Open a web browser and download GPS Test: https://tinyurl.com/puwhtue {credit: Chartcross Limited} and wait until "Accuracy (feet)" is greater than 0 (may take a few minutes; faster if youre outside with a clear view of the sky). Note: this is NOT an optional step. Activating GPS prior to flashing the ROM is required (see explanation here).
14. Congratulations, youre ready for the next phase!
B. Unlock the Bootloader
1. Open a web browser and download Moto-pocalypse: http://goo.gl/ioGJDo [mirror] {credit: djrbliss}
2. Click OK on the security warning to download.


C. Install device drivers
1. On your PC, download the latest Motorola drivers:
2. Connect your phone using the manufacturer cable (see Commandment #8) and make sure the device is recognized and you can browse the phone contents.
3. Congratulations, youre ready for the next phase!
D. Install custom Recovery image
1. Hold down power, volume up, and volume down buttons simultaneously. When the device powers off, let go of the power button but keep holding down the volume up and volume down buttons until the bootloader screen appears.
2. Quickly press the volume down button until AP Fastboot is highlighted and then press the volume up key.
3. The screen should now be in fastboot mode and should say Device is UNLOCKED. Status Code:3. At the bottom of the screen it should say usb connected

4. On your PC, download the Motorola version of fastboot (see Commandment #9) {credit: mattlgroff}
5. Extract the fastboot file for your operating system to somewhere in your PATH. For example, on Linux:
7. You should see something like {SERIAL NUMBER} fastboot
8. On your PC, download the Razr HD/M Recovery image: http://goo.gl/keFZNy [mirror] {credit: dhacker29} Update: some individuals have reported issues with installing the latest version of CM11 using the Clockworkmod (CWM) recovery mentioned in this step. If you have trouble, try using the Team Win (TWRP) recovery image (TWRP-2.7.0.0-moto_msm8960-hdpi.img) instead: http://d-h.st/nw4 {credit: dhacker29}
9. In a terminal command prompt, browse to where the image file is located and then type fastboot flash recovery CWM6049-RAZR-HD_M-KITKAT.img
10. Hold down power, volume up, and volume down buttons simultaneously. When the device powers off, let go of the power button but keep holding down the volume up and volume down buttons until the bootloader screen appears.
11. Quickly press the volume down button until Recovery is highlighted and then press the volume up key.
12. Your phone will boot into recovery mode:

13. Congratulations, youre ready for the next phase!
E. Create full device backup (a.k.a. "nandroid")
1. Use your volume down (or volume up) button to highlight backup and restore then press your power button to select it
2. Use your volume down button to highlight choose default backup format then press your power button to select it
3. Use your volume down button to highlight tar + gzip then press your power button to select it
4. Use your volume down button to highlight backup to /storage/sdcard1 then press your power button to select it
5. A full backup of your device will be created and stored on your SD card
6. Use your volume down button to highlight +++Go Back+++ then press your power button to select it
7. Use your volume down button to highlight mounts and storage then press your power button to select it
8. Use your volume down button to highlight mount USB storage then press your power button to select it
9. Your PC should now detect your phone. Open the clockworkmod/backup/ folder. Move the backup folder you just created (date timestamp may be off but thats okay) to your PC for safekeeping.
10. Use your volume down button to highlight +++Go Back+++ then press your power button to select it
11. Unplug the USB cable from your PC
12. Press the power button and let go. The phone will restart.
13. Congratulations, youre ready for the next phase!
F. Factory reset
1. Now that you have a full device backup, its time to perform a factory reset of your phone. This will ensure any previously encrypted partitions are deleted, permissions are reset to factory defaults, and no previous phone settings or installed applications will interfere with the CyanogenMod install.
2. Follow these instructions to reboot into safe mode and then follow these instructions to reset your phone to factory settings (note: if the phone goes into a bootloop, just hold down the power button and both volume buttons simultaneously until the screen turns black and then release the power button while still holding the volume buttons and then when the boot menu appears, use the Volume Down button to highlight "Factory" and press the Volume Up button to select it. Once the phone loads normally, turn it off and then back on again.)
3. Follow these instructions to reformat your SD card
4. Due to this bug and other various GPS and WiFi bugs with the KitKat bootloader, follow these instructions to downgrade your phone to Jelly Bean (4.1.2) ...P.S. its just the bootloader that will be running JellyBean, your actual phone OS will eventually be running KitKat (4.4.4) once you complete this guide
5. Re-do Section A above (gain root access)
6. Congratulations, youre ready for the next phase!
G. Install CyanogenMod
1. Connect your phone to your PC via the USB cable and browse to the SD card
2. On your PC, download the latest CyanogenMod snapshot with JellyBean bootloader
3. On your PC, download the desired Google Apps 4.4.4 image (I prefer the "Micro Modular" package)
4. On your PC, download the stock Motorola boot logo image: http://goo.gl/YYmG2f [mirror] {credit: aviwdoowks}
5. Copy the zip files from steps 2-4 to your phones SD card
6. Unplug the USB cable from your PC
7. Hold down power, volume up, and volume buttons down simultaneously. When the device powers off, let go of the power button but keep holding down the volume up and volume down buttons until the bootloader screen appears.
8. Quickly press the volume down button until Recovery is highlighted and then press the volume up key.
9. Once your phone boots into recovery mode, use your volume down button to highlight wipe data/factory reset then press your power button to select it
10. Use your volume down button to highlight Yes - Wipe all user data then press your power button to select it
11. Use your volume down button to highlight advanced then press your power button to select it
12. Use your volume down button to highlight wipe dalvik cache then press your power button to select it
13. Use your volume down button to highlight Yes - Wipe Dalvik Cache then press your power button to select it
14. Use your volume down button to highlight +++Go Back+++ then press your power button to select it
15. Use your volume down button to highlight install zip then press your power button to select it
16. Use your volume down button to highlight choose zip from /storage/sdcard1 then press your power button to select it
17. Use your volume down button to highlight stock.boot.logo.flashable.zip then press your power button to select it
18. Use your volume down button to highlight Yes - install ... then press your power button to select it
19. Use your volume down button to highlight choose zip from /storage/sdcard1 then press your power button to select it
20. Use your volume down button to highlight cm-11-2014... then press your power button to select it
21. Use your volume down button to highlight Yes - install ... then press your power button to select it
22. Use your volume down button to highlight choose zip from /storage/sdcard1 then press your power button to select it
23. Use your volume down button to highlight pa_gapps-modular... then press your power button to select it
24. Use your volume down button to highlight Yes - install ... then press your power button to select it
25. Use your volume down button to highlight +++Go Back+++ then press your power button to select it
26. Make sure reboot system now is highlighted, then press your power button to select it
27. Your phone will reboot, the Motorola logo will now display (instead of the annoying "Bootloader Unlocked" nag screen), and CyanogenMod will begin loading. Be patient -- may take up to 10 minutes to load for the first time.

Note: If CyanogenMod doesnt load after 10 minutes or you run into any other problems (e.g. bootloop, etc.), you can always start over by re-flashing your device back to factory settings.
In a follow-up post Ill describe some recommended settings and apps.
11. Click the Verify Root Access button and make sure a green checkmark appears
12. On your phone, go to Settings > Location and turn Location ON (say Yes to any prompts that appear)
13. Open a web browser and download GPS Test: https://tinyurl.com/puwhtue {credit: Chartcross Limited} and wait until "Accuracy (feet)" is greater than 0 (may take a few minutes; faster if youre outside with a clear view of the sky). Note: this is NOT an optional step. Activating GPS prior to flashing the ROM is required (see explanation here).
14. Congratulations, youre ready for the next phase!
B. Unlock the Bootloader
1. Open a web browser and download Moto-pocalypse: http://goo.gl/ioGJDo [mirror] {credit: djrbliss}
2. Click OK on the security warning to download.
3. Go to your phone apps and click on Downloads
4. Click on Motopocalypse.apk and click Install and then Open
8. Click on the Unlock Bootloader button.
4. Click on Motopocalypse.apk and click Install and then Open
8. Click on the Unlock Bootloader button.
9. Hold your power button and select Power off to turn off your phone.
10. Wait a few seconds for your phone to restart (if it doesnt, hold your power button down until it starts). Your phone should display this message:
11. Congratulations, youre ready for the next phase!
C. Install device drivers
1. On your PC, download the latest Motorola drivers:
- Windows / Mac
- Linux
2. Connect your phone using the manufacturer cable (see Commandment #8) and make sure the device is recognized and you can browse the phone contents.
3. Congratulations, youre ready for the next phase!
D. Install custom Recovery image
1. Hold down power, volume up, and volume down buttons simultaneously. When the device powers off, let go of the power button but keep holding down the volume up and volume down buttons until the bootloader screen appears.
2. Quickly press the volume down button until AP Fastboot is highlighted and then press the volume up key.
3. The screen should now be in fastboot mode and should say Device is UNLOCKED. Status Code:3. At the bottom of the screen it should say usb connected
4. On your PC, download the Motorola version of fastboot (see Commandment #9) {credit: mattlgroff}
5. Extract the fastboot file for your operating system to somewhere in your PATH. For example, on Linux:
- chmod +x fastboot
- sudo mv fastboot /usr/bin/
7. You should see something like
8. On your PC, download the Razr HD/M Recovery image: http://goo.gl/keFZNy [mirror] {credit: dhacker29} Update: some individuals have reported issues with installing the latest version of CM11 using the Clockworkmod (CWM) recovery mentioned in this step. If you have trouble, try using the Team Win (TWRP) recovery image (TWRP-2.7.0.0-moto_msm8960-hdpi.img) instead: http://d-h.st/nw4 {credit: dhacker29}
9. In a terminal command prompt, browse to where the image file is located and then type fastboot flash recovery CWM6049-RAZR-HD_M-KITKAT.img
10. Hold down power, volume up, and volume down buttons simultaneously. When the device powers off, let go of the power button but keep holding down the volume up and volume down buttons until the bootloader screen appears.
11. Quickly press the volume down button until Recovery is highlighted and then press the volume up key.
12. Your phone will boot into recovery mode:
13. Congratulations, youre ready for the next phase!
E. Create full device backup (a.k.a. "nandroid")
1. Use your volume down (or volume up) button to highlight backup and restore then press your power button to select it
2. Use your volume down button to highlight choose default backup format then press your power button to select it
3. Use your volume down button to highlight tar + gzip then press your power button to select it
4. Use your volume down button to highlight backup to /storage/sdcard1 then press your power button to select it
5. A full backup of your device will be created and stored on your SD card
6. Use your volume down button to highlight +++Go Back+++ then press your power button to select it
7. Use your volume down button to highlight mounts and storage then press your power button to select it
8. Use your volume down button to highlight mount USB storage then press your power button to select it
9. Your PC should now detect your phone. Open the clockworkmod/backup/ folder. Move the backup folder you just created (date timestamp may be off but thats okay) to your PC for safekeeping.
10. Use your volume down button to highlight +++Go Back+++ then press your power button to select it
11. Unplug the USB cable from your PC
12. Press the power button and let go. The phone will restart.
13. Congratulations, youre ready for the next phase!
F. Factory reset
1. Now that you have a full device backup, its time to perform a factory reset of your phone. This will ensure any previously encrypted partitions are deleted, permissions are reset to factory defaults, and no previous phone settings or installed applications will interfere with the CyanogenMod install.
2. Follow these instructions to reboot into safe mode and then follow these instructions to reset your phone to factory settings (note: if the phone goes into a bootloop, just hold down the power button and both volume buttons simultaneously until the screen turns black and then release the power button while still holding the volume buttons and then when the boot menu appears, use the Volume Down button to highlight "Factory" and press the Volume Up button to select it. Once the phone loads normally, turn it off and then back on again.)
3. Follow these instructions to reformat your SD card
4. Due to this bug and other various GPS and WiFi bugs with the KitKat bootloader, follow these instructions to downgrade your phone to Jelly Bean (4.1.2) ...P.S. its just the bootloader that will be running JellyBean, your actual phone OS will eventually be running KitKat (4.4.4) once you complete this guide
5. Re-do Section A above (gain root access)
6. Congratulations, youre ready for the next phase!
G. Install CyanogenMod
1. Connect your phone to your PC via the USB cable and browse to the SD card
2. On your PC, download the latest CyanogenMod snapshot with JellyBean bootloader
3. On your PC, download the desired Google Apps 4.4.4 image (I prefer the "Micro Modular" package)
4. On your PC, download the stock Motorola boot logo image: http://goo.gl/YYmG2f [mirror] {credit: aviwdoowks}
5. Copy the zip files from steps 2-4 to your phones SD card
6. Unplug the USB cable from your PC
7. Hold down power, volume up, and volume buttons down simultaneously. When the device powers off, let go of the power button but keep holding down the volume up and volume down buttons until the bootloader screen appears.
8. Quickly press the volume down button until Recovery is highlighted and then press the volume up key.
9. Once your phone boots into recovery mode, use your volume down button to highlight wipe data/factory reset then press your power button to select it
10. Use your volume down button to highlight Yes - Wipe all user data then press your power button to select it
11. Use your volume down button to highlight advanced then press your power button to select it
12. Use your volume down button to highlight wipe dalvik cache then press your power button to select it
13. Use your volume down button to highlight Yes - Wipe Dalvik Cache then press your power button to select it
14. Use your volume down button to highlight +++Go Back+++ then press your power button to select it
15. Use your volume down button to highlight install zip then press your power button to select it
16. Use your volume down button to highlight choose zip from /storage/sdcard1 then press your power button to select it
17. Use your volume down button to highlight stock.boot.logo.flashable.zip then press your power button to select it
18. Use your volume down button to highlight Yes - install ... then press your power button to select it
19. Use your volume down button to highlight choose zip from /storage/sdcard1 then press your power button to select it
20. Use your volume down button to highlight cm-11-2014... then press your power button to select it
21. Use your volume down button to highlight Yes - install ... then press your power button to select it
22. Use your volume down button to highlight choose zip from /storage/sdcard1 then press your power button to select it
23. Use your volume down button to highlight pa_gapps-modular... then press your power button to select it
24. Use your volume down button to highlight Yes - install ... then press your power button to select it
25. Use your volume down button to highlight +++Go Back+++ then press your power button to select it
26. Make sure reboot system now is highlighted, then press your power button to select it
27. Your phone will reboot, the Motorola logo will now display (instead of the annoying "Bootloader Unlocked" nag screen), and CyanogenMod will begin loading. Be patient -- may take up to 10 minutes to load for the first time.
Congratulations, youve installed CyanogenMod on your Razr M!
Note: If CyanogenMod doesnt load after 10 minutes or you run into any other problems (e.g. bootloop, etc.), you can always start over by re-flashing your device back to factory settings.
In a follow-up post Ill describe some recommended settings and apps.
Go to link download
Wednesday, August 24, 2016
Cherry Mobile Emerald Kitkat Update and to unbrick your phone
Cherry Mobile Emerald Kitkat Update and to unbrick your phone
Hi,
This firmware is for Cherry Mobile Emerald. You can use this firmware to unbrick or to update your phone to Kitkat version.
The firmware is not rooted. If you want to root this phone you can use vRoot to root it.

You can fix the following issue in your phone:
1. Bootloop
2. Damaged System UI
3. TP Upgrade only
4. Dead phone but it is detected in computer
5. Remove Gmail Account / Password / Pattern Lock (Alternative Way)
"DOWNLOAD THESE FILES"
Firmware Here -->Cherry Mobile Emerald Kitkat
VCOM Driver -->VCOM Manual
Alternative Driver --> AutoInstaller
Alternative Driver --> AutoInstaller
SPFlashTool --> LatestVersion
"Use WinRar or 7zip to extract the firmware"
"Extract the files to your desired folder"
"If you encounter error in flashtool, use different version of it."
"Extract the files to your desired folder"
"If you encounter error in flashtool, use different version of it."
"I suggest to use 32bit Windows OS for compatibility of the driver"
Installing Driver with AutoInstaller
First try the Alternative Driver, which is the AutoInstaller. Just open the install.exe then it will automatically install the driver. To fully check if the driver is correctly installed in your computer.
Follow these steps:
- Turn off your phone (always powered off is a must)
- Press and hold volume up or down, or you can simple press the two button.
- Insert your USB cable without releasing the VOLUME button(s).
- In your computer, it must detect your phone and it will install the MTK Preloader or Mediatek USB VCOM driver.
- Repeat 1 to 4 if it does not detect your phone.
- If MTK Preloader/Mediatek USB VCOM Driver is installed you are good to go in flashing your phone ^_^
Reference Video using Driver Auto Installer (watch in HD)
Installing Manually using VCOM Driver
When installing it manually your phone must be turned off, then connect it to your computer/laptop while pressing VOLUME UP or VOLUME DOWN. This will detect and look for the driver.

1. This is the first time that you will connect your phone and it will search for the correct driver.

2. Check include this location ... ... and click on browse. Look for USB VCOM Driver and Click on 2K_XP_COM folder if you are using Windows XP or Win7 for Windows 7 and then press OK when you are done picking the right folder for the driver.

3. If the driver is successfully installed MediaTek DA USB VCOM will appear in the New Hardware Wizard.
Video Installing VCOM Driver (please watch in HD)
"Your Phone must be turned off when you are ready to connect and flash your phone"
Flashing
1. Launch FlashTool (flash_tool.exe)
2. In Flashtool, Click on Scatter-Loading, and load your scatter file. (see example below)
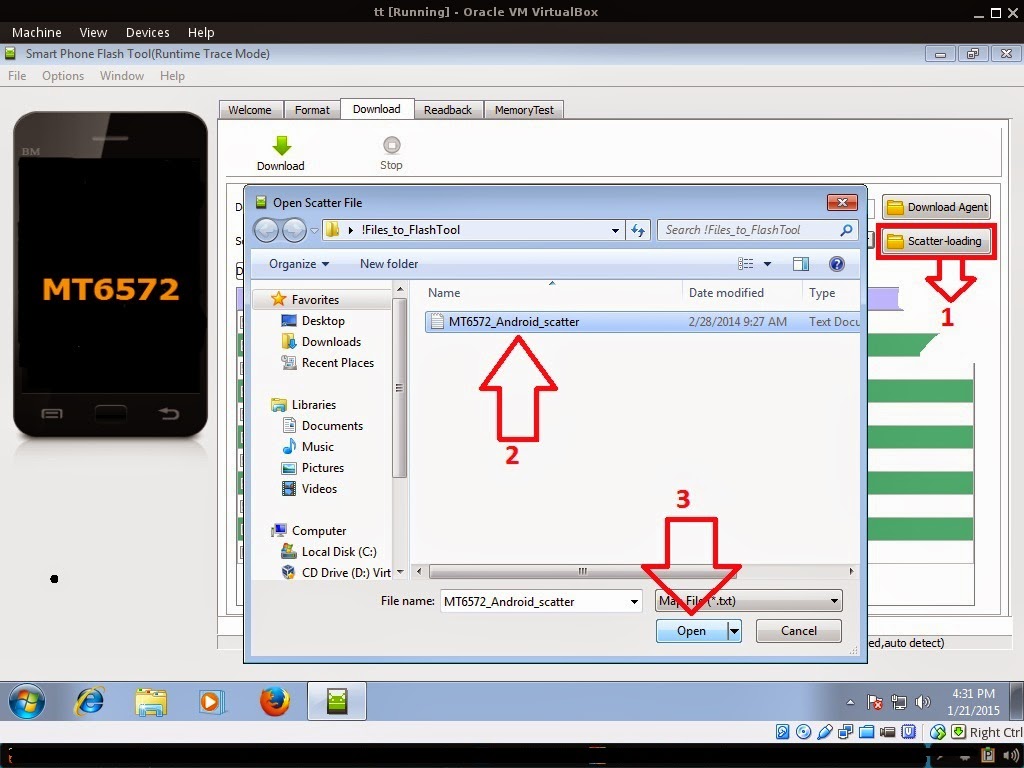
Reference Video Using FlashTool version 5.xxx (watch in HD)
3. After you load the file, press Press Download to Flash your Phone.
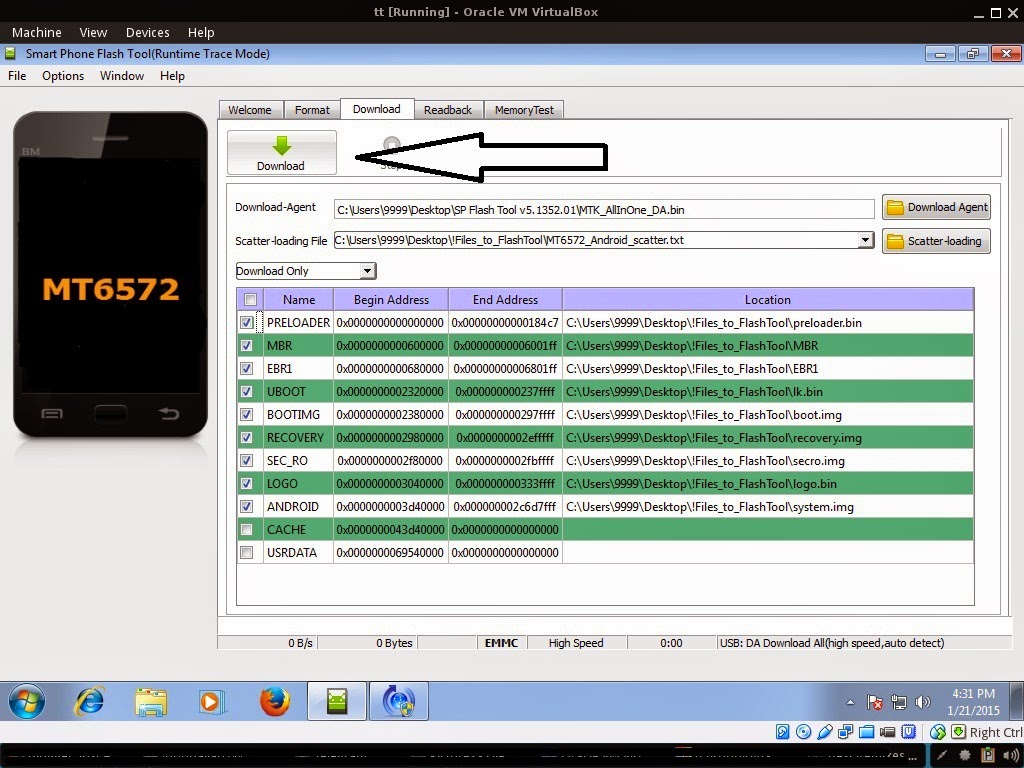
4. After you press Download Follow these steps
Some workarounds:
- Turn off your phone (always powered off is a must)
- Press and HOLD volume UP or Down or you can simply press it simultaneously
- Insert your USB cable without releasing the VOLUME button(s).
- Keep on repeating until Flashtool detected your phone.
"Hard reset your phone after flashing"
Some workarounds:
If you encounter PMT_Changed error here is what you do:
In Latest version of Flashtool
- Load the scatter file
- Choose Format all + Download (Underneath Scatter-loading file)
- Then Click Download and wait until it is done flashing
For Invalid IMEI:Your Phone/Tablet must be rooted first
Restore yong IMEI in MTKDroidTools version 2.5.3. You will have this error when you format your phone in Flashtool as I had experienced. To restore download MTKDroidTools version 2.5.3 After you extract the file. Open the green robot, you must enable the usb debugging in your phone. It is usually located in Settings>Devoloper Mode then look for usb debugging. After enabling it. Connect your phone in your computer then in MTKDroidTool click on ROOT. Wait for it to finish, then Click in IMEI/NVRAM, input 15 number in each box. Then click REPLACE. Then click Reboot or you can manually turn off your phone. Then turn your phone on again. You can see that you have fully restored your IMEI.
FOR DAMAGED BASEBAND or UNKNOWN BASEBAND (Your phone must be rooted first)
1. Make sure you have MTKDROIDSTOOL version 2.4.8 or version 2.5.3 (you can search it in google)
2. In MTKDroidstool (I assume you launch the tool) -- Click in Root.
3. In your device -- After you press Root, you need to authorize it. A pop up message will appear. Click Allow/Authorize depends on your root application.
4. In MTKDroidsTool -- Click in IMEI/NVRAM, then click in RESTORE.
5. Then look for the folder where you extracted the NVRAM files.
6. Check if the Baseband is fixed. And if the IMEI is fully restored.
7. If Baseband is still Unknown and IMEI is invalid. Then you need to hard reset first your phone.
8. After hard reset your baseband should be fixed already. (base on my experience)
9. If your baseband is fixed sometimes the IMEI is still invalid. So you need to restore the IMEI.
10. To restore IMEI follow Step 1-4, but you should not restore. You should fill the IMEI then click REPLACE. Then reboot your phone. VOILA! I hope the phone is fully working :)
I hope this tutorial help you. Please drop a comment if something is not clear to you.
Tested by:
Me - Files / Flashing
Go to link download
Subscribe to:
Comments (Atom)