Showing posts with label tutorial. Show all posts
Showing posts with label tutorial. Show all posts
Wednesday, October 19, 2016
Tutorial on Goal Seek Project File Included
Tutorial on Goal Seek Project File Included

Goal Seek helps you to find a specific target from a given data. Suppose you are required to adjust either cost or price or production unit to make a certain amount of profit. In this situation, you can use Goal Seek to find out the optimum level of input to meet your target. Here you must know that the Goal Seek can only work with a single variable.
Note: This tutorial is prepared on Excel 2013. Excel 2007 and 2010 will be much similar to version 2013.
Example 1
Lets start by a simple example. Go to Excel > Open a Blank Worksheet > Input the data as shown below:
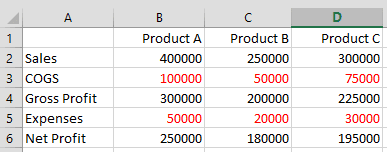
The red figures are negative values.
- Input the figures in Sales for Product A, B and C.
- Enter Cost of Goods Sold in the next row.
- Deduct 3rd row from 2nd row to find out the Gross Profit. (i.e. =B2-B3)
- Enter the other expenses in the 5th row.
- Deduct expenses from Gross profit to find Net Profit. (i.e. =B4-B5)
Important: you must find out the Gross Profit, Net Profit through formula. Otherwise, the Goal Seek function may not work.
At the 6th row, we get the Net Profit for Product A, B and C as 250000, 180000 and 195000 respectively.
Problems & Solutions
In this settings, how can we increase the Net Profit of Product C from 195000 to 200000?
Ans: You can either increase sales, or decrease COGS and other expenses. But you have only one choice. Choose any of the three variables what you are supposed to change. Suppose, you have to change COGS. That means, cell D3. Use Goal Seek as follows:
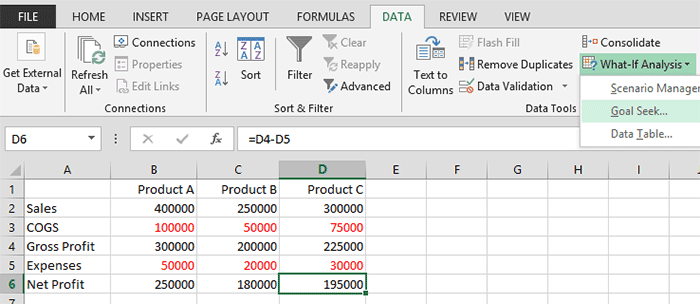
- Select the D6 cell. Move to the DATA tab > What-If Analysis > Choose Goal Seek.

- Make sure that the Set Cell box contains D6.
- Type 200000 in To Value box.
- Click on the By changing cell box and choose D3 from the worksheet. Then it will be automatically converted to $D$3.
- Hit OK > You will get the following result -

This example is easy to calculate. You can find the result through manual process. Now I would like to move to the more complex example.
Example 2
Go to Excel > Create a new worksheet. Input the data as shown below:
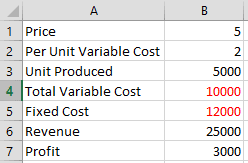
- Input the price of finished goods in B1.
- Per unit variable cost in B2.
- Enter the total number of units produced in B3.
- Get total variable cost by multiplying variable cost and total unit (=B3*B2).
- Enter the fixed cost as given.
- Multiply price with total number of units produced to find out Revenue (=B3*B1).
- Deduct fixed cost and variable cost from revenue to determine profit (=B6-B5-B4).
In the above example, the profit is 3000. How to make it 5000?
Well, you may have several choice as:
- Changing the price
- Reducing the variable cost
- Increasing the production unit etc.
Suppose, you have no way to reduce the cost or increase the production. In that situation, you can only adjust the price. Lets raise it through Goal Seek . . .

- Click on the cell B1
- Move to Data > What-It Analysis > Goal Seek
- Set Cell B1
- To Value 5000
- By Changing Cell, choose B1 ($B$1)
- Hit OK > Finally Get the following result -
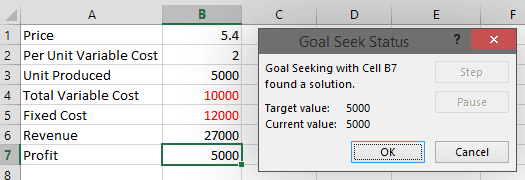
Within wasting much time, you can calculate the optimum product price to earn your target profit. You just raise the price by .40 to increase the profit from 3000 to 5000. Similarly, you can also adjust variable cost or production unit. But you cant work with more than one variable at a time.
Project File
Ive uploaded the project file in Google Drive. You can download this if necessary. The project file is saved as .xlsx format. You must need at least Excel 2007 or above to open this file.
There are two sheets - Sheet 1 and Sheet 2. Download the Goal Seek tutorial . . .
Project File
Ive uploaded the project file in Google Drive. You can download this if necessary. The project file is saved as .xlsx format. You must need at least Excel 2007 or above to open this file.
There are two sheets - Sheet 1 and Sheet 2. Download the Goal Seek tutorial . . .
Stay with Marks PC Solution to get more interesting IT topics!
Go to link download

Sunday, October 2, 2016
Complete Tutorial on Facebook Open Graph
Complete Tutorial on Facebook Open Graph

Facebook Open Graph allows you to use custom site title, URL, description and even a custom image when you share your page. If you use Facebook Open Graph code on your site, every time when you share any page, it will be counted directly for your home page. Suppose, if I share the following URL on Facebook -
http://www.markspcsolution.com/2014/09/complete-tutorial-on-facebook-open-graph.html
The sharing/ like will be counted for -
http://www.markspcsolution.com/
But If there is no open graph code on my site, the sharing of the first URL will be counted individually. And the sharing will not be counted for your home page. Now I guess, youve understood the importance of open graph. Its really helpful to increase facebook likes of your site rapidly.
Couple of days ago, I discussed about how to claim a site on Facebook. Following the same method, you can place Facebook Open Graph code on your site. Open graph code is as follows:
You have to place the above code in the head (<head> </head>) section of your sites HTML. The code must be placed before closing head tag - </head>.

Now follow the steps below:

Couple of days ago, I discussed about how to claim a site on Facebook. Following the same method, you can place Facebook Open Graph code on your site. Open graph code is as follows:
<meta property="og:title" content="Site Title">
<meta property="og:description" content="Site Description">
<meta property="og:type" content="Content Type">
<meta property="og:url" content="http://www.example.com/">
<meta property="og:image" content="Custom Image Link">
<meta property="og:site_name" content="Your Site Name">
<meta property="fb:admins" content="Your Numeric FB ID">
You have to place the above code in the head (<head> </head>) section of your sites HTML. The code must be placed before closing head tag - </head>.
Now follow the steps below:
- Go to Facebook Insights > Domain Insights > Add your Domain
- Type your home page URL > Copy the Numeric FB ID > Keep the window open
- Go to your sites code or HTML and find the closing header tag </head>
- Place the above code before closing header tag
- Now back to the Facebook Insight Page
- Hit on the Get Insights button
- Now you should be able to see your domain under the Domain Insights section
There are 7 meta properties in the above code. You have to change in the content option. Make sure youve used them properly. Im gonna clarify the points -
- Site Title Example - Marks PC Solution.
- Site Description - Whats your site about. Example - Your Ultimate Choice for Computer, Internet, Blogging, SEO & PC Troubleshooting Tips!
- Content Type - Website/ Blog/ Article/ News etc.
- Site URL Example - www.markspcsolution.com
- Custom Image - Upload your desired image in a server. Then simply copy and paste the link here. You can use postimage.org to upload image.
- Type your Site Title here. Example - Marks PC Solution.
- Numeric FB ID that youve got from the 2nd step in Facebook Insights Page. You can also find numeric by this method.
Troubleshooting
If you face any problem after implementing the code on your site, you can take help of Debugger. Here you can paste your site URL and debug the errors. You can check whether all properties are functioning normally or if there is a problem.
Remember, you can omit some properties. If you use Custom Image, then it will be same for any link of your site. So you can also use a shorter version of the code as below:
<meta content=Website property=og:type/><meta content=http://www.example.com/ property=og:url/><meta content=100002127563096 property=fb:admins/>
It will do the same job for you. You can also use multiple Admin IDs. Simply add more numeric IDs in the admin property.
If you need any support regarding Facebook Open Graph, please leave a comment . . .
Stay with Marks PC Solution to get more interesting IT topics!
Go to link download
Saturday, October 1, 2016
Tutorial How to write IMEI in All SPD Phones having P 05b Connector
Tutorial How to write IMEI in All SPD Phones having P 05b Connector
How to write IMEI with VolcanoBox
in All SPD Phones having P-05b Connector
Before Repairing IMEI, User must follow these -
User must have Win Xp (Service Pack 3) for best results
Install Correct Drivers for your handset.
If you dont have correct driver, then download from below links -
SPD Android Usb Driver for win7/win8 (64bits)
SPD Android Usb Driver for winXP/win7 (32bits)
SC6530/6531/6610 New Usb Driver for win7/win8 (64bits)
SC6530/6531/6610 New Usb Driver for winXP/win7 (32bits)
Now Make These Settings -
* Go to Detect tab & Select [D+/D-]SPD/Anyka in Detect Type.
* Manually put pinouts (Pin2= D- Pin3= D+ Pin5= GND) as given below -

* After putting pins like this, Connect Handset on Volcano Main Cable.
* Attach Power cables also & Press "Set Pinout" button.
* After Pinouts Setting Complete, Remove Cable from Box Socket (Dont Remove Cables from Handset)
See in pic below -

Now do as stated here -
in All SPD Phones having P-05b Connector
Before Repairing IMEI, User must follow these -
User must have Win Xp (Service Pack 3) for best results
Install Correct Drivers for your handset.
If you dont have correct driver, then download from below links -
SPD Android Usb Driver for win7/win8 (64bits)
SPD Android Usb Driver for winXP/win7 (32bits)
SC6530/6531/6610 New Usb Driver for win7/win8 (64bits)
SC6530/6531/6610 New Usb Driver for winXP/win7 (32bits)
Now Make These Settings -
* Go to Detect tab & Select [D+/D-]SPD/Anyka in Detect Type.
* Manually put pinouts (Pin2= D- Pin3= D+ Pin5= GND) as given below -
* After putting pins like this, Connect Handset on Volcano Main Cable.
* Attach Power cables also & Press "Set Pinout" button.
* After Pinouts Setting Complete, Remove Cable from Box Socket (Dont Remove Cables from Handset)
See in pic below -
Now do as stated here -
Code:
Step 1 - Open Volcano tool and go to spd tab and (Enable IMEI Option)
Step 2 - Tick "Write IMEI" and Untick "Auto-detect pinouts"
Step 3 - Set R/W IMEI to "COM" and press RUN Button(New Tool will Open)
Step 4 - Select "USB" in ComP and Fill IMEI in boxes.
Step 5 - Press "Write IMEI" button
Step 6 - Now Connect the cable back to the BOX.
Step 7 - wait for 2-3 minutes..you see message "Write IMEI done".

Go to link download
Thursday, September 8, 2016
Tutorial Installing CyanogenMod on Verizon Droid Razr M KitKat 4 4 2
Tutorial Installing CyanogenMod on Verizon Droid Razr M KitKat 4 4 2
Update:
Update #4:
Update #4b: Some users are reporting success with kingroot for rooting the device but still no word on a reliable method to unlock the bootloader...
Update #5: This somewhat outdated guide is useful for switching from the Verizon stock OS to Cyanogenmod but if you already have a rooted phone or are already running Cyanogenmod and you want to upgrade to version 12.1, use this guide (the key is to use TWRP, install SuperSU when prompted in the recovery reboot process, and to use TK GAPPS [I like modular micro]). Once installed, make sure to enable root and reset GPS. Also, here are the Xposed instructions if you need them (get the latest xposed-v*-sdk22-arm.zip and XposedInstaller_3.0-alpha*.apk files here). And dont forget to choose a cool theme (I like Euphoria Dark)
_______________________
So youve heard about this great utopia of milk and honey where your smartphone runs faster, uses less battery life, gives you more control, and provides more frequent updates and you want to try it out yourself. Awesome. But before we dive into that adventure, you must swear with an oath to obey the:
~ ~ ~ ~ ~ ~ ~ ~ ~ ~ ~ ~ ~ ~ ~ ~ ~ ~ ~ ~ ~ ~ ~ ~ ~ ~ ~
Ten Commandments of ROM Flashing
- Thou shalt have no other ROMs before CyanogenMod
- Thou shalt not proceed if thy exact device and Android version is not listed at sbf.droid-developers.org
- If thou knowest not what thou art doing, thou shalt not do it
- Remember thy backups, to keep them holy -- if any warning screen says "CANNOT BE UNDONE", cancel, create full (nandroid) backup, then continue with action.
- Thou shalt charge thy smartphone completely (100%) before attempting a ROM flash
- Thou shalt not kill thy smartphone by skipping steps, ignoring warnings, tl;dr, voodoo programming, shotgun surgery, panicking, etc.
- Thou shalt not commit adultery by installing zip, img, bin, etc. files from another manufacturer, device, version, or random outdated forum post onto thy device
- Thou shalt use the manufacturers official USB cable (OEM)
- If thy device is Motorola, thou shalt use the Motorola version of fastboot
- Thou shalt give praise and thanksgiving to the many brilliant hackers that have made all of this possible!
~ ~ ~ ~ ~ ~ ~ ~ ~ ~ ~ ~ ~ ~ ~ ~ ~ ~ ~ ~ ~ ~ ~ ~ ~ ~ ~
Regarding Commandment #7, the following device terms are equivalent for the purposes of this guide:
- Smartphone model: "xt907", "Droid Razr M", "Razr M", and "msm8960" (Note: the "Razr HD" device is similar enough to the "Razr M" that youre generally okay with files for that device as well)
- Android version: "KitKat", "KK", "4.4.2"
~ ~ ~ ~ ~ ~ ~ ~ ~ ~ ~ ~ ~ ~ ~ ~ ~ ~ ~ ~ ~ ~ ~ ~ ~ ~ ~
WARNING: THE FOLLOWING GUIDE IS ONLY FOR VERIZON WIRELESS U.S. DROID RAZR M SMARTPHONES RUNNING ANDROID KitKat VERSION 4.4.2 (see Settings > About Phone). I CANNOT BE HELD RESPONSIBLE FOR ANYTHING THAT GOES WRONG IN THE PROCESS OF FOLLOWING THIS TUTORIAL. USING YOUR DEVICE IN THE WAYS DESCRIBED BELOW WILL VOID YOUR WARRANTY. PROCEED AT YOUR OWN RISK.
Okay, if youve made it this far youre pretty committed to doing this. So, without further ado:
A. Gain root access (similar to "jailbreak" on iOS devices)
2. Check Unknown sources and (if exists) uncheck Verify apps (click OK on any security prompts)

3. If Settings > Developer options doesnt exist, go to Settings > About Phone and scroll down to the bottom. Tap Build number seven times to enable developer mode

4. Go to Settings > Developer options, enable it if disabled, and check USB debugging

5. Open a web browser and download towelroot: https://tinyurl.com/khf62jr [mirror] {credit: geohot}
6. Click OK on the security warning to download.
6. Click OK on the security warning to download.
7. Go to your phone apps and click on Downloads
8. Click on tr.apk and click Install and then Open
9. Click on the make it ra1n button. You should now have root access!

8. Click on tr.apk and click Install and then Open
9. Click on the make it ra1n button. You should now have root access!
10. Open a web browser and download Root Checker: https://tinyurl.com/ppg9cj7 {credit: CMDann}
11. Click the Verify Root Access button and make sure a green checkmark appears

12. On your phone, go to Settings > Location and turn Location ON (say Yes to any prompts that appear)
13. Open a web browser and download GPS Test: https://tinyurl.com/puwhtue {credit: Chartcross Limited} and wait until "Accuracy (feet)" is greater than 0 (may take a few minutes; faster if youre outside with a clear view of the sky). Note: this is NOT an optional step. Activating GPS prior to flashing the ROM is required (see explanation here).
14. Congratulations, youre ready for the next phase!
B. Unlock the Bootloader
1. Open a web browser and download Moto-pocalypse: http://goo.gl/ioGJDo [mirror] {credit: djrbliss}
2. Click OK on the security warning to download.


C. Install device drivers
1. On your PC, download the latest Motorola drivers:
2. Connect your phone using the manufacturer cable (see Commandment #8) and make sure the device is recognized and you can browse the phone contents.
3. Congratulations, youre ready for the next phase!
D. Install custom Recovery image
1. Hold down power, volume up, and volume down buttons simultaneously. When the device powers off, let go of the power button but keep holding down the volume up and volume down buttons until the bootloader screen appears.
2. Quickly press the volume down button until AP Fastboot is highlighted and then press the volume up key.
3. The screen should now be in fastboot mode and should say Device is UNLOCKED. Status Code:3. At the bottom of the screen it should say usb connected

4. On your PC, download the Motorola version of fastboot (see Commandment #9) {credit: mattlgroff}
5. Extract the fastboot file for your operating system to somewhere in your PATH. For example, on Linux:
7. You should see something like {SERIAL NUMBER} fastboot
8. On your PC, download the Razr HD/M Recovery image: http://goo.gl/keFZNy [mirror] {credit: dhacker29} Update: some individuals have reported issues with installing the latest version of CM11 using the Clockworkmod (CWM) recovery mentioned in this step. If you have trouble, try using the Team Win (TWRP) recovery image (TWRP-2.7.0.0-moto_msm8960-hdpi.img) instead: http://d-h.st/nw4 {credit: dhacker29}
9. In a terminal command prompt, browse to where the image file is located and then type fastboot flash recovery CWM6049-RAZR-HD_M-KITKAT.img
10. Hold down power, volume up, and volume down buttons simultaneously. When the device powers off, let go of the power button but keep holding down the volume up and volume down buttons until the bootloader screen appears.
11. Quickly press the volume down button until Recovery is highlighted and then press the volume up key.
12. Your phone will boot into recovery mode:

13. Congratulations, youre ready for the next phase!
E. Create full device backup (a.k.a. "nandroid")
1. Use your volume down (or volume up) button to highlight backup and restore then press your power button to select it
2. Use your volume down button to highlight choose default backup format then press your power button to select it
3. Use your volume down button to highlight tar + gzip then press your power button to select it
4. Use your volume down button to highlight backup to /storage/sdcard1 then press your power button to select it
5. A full backup of your device will be created and stored on your SD card
6. Use your volume down button to highlight +++Go Back+++ then press your power button to select it
7. Use your volume down button to highlight mounts and storage then press your power button to select it
8. Use your volume down button to highlight mount USB storage then press your power button to select it
9. Your PC should now detect your phone. Open the clockworkmod/backup/ folder. Move the backup folder you just created (date timestamp may be off but thats okay) to your PC for safekeeping.
10. Use your volume down button to highlight +++Go Back+++ then press your power button to select it
11. Unplug the USB cable from your PC
12. Press the power button and let go. The phone will restart.
13. Congratulations, youre ready for the next phase!
F. Factory reset
1. Now that you have a full device backup, its time to perform a factory reset of your phone. This will ensure any previously encrypted partitions are deleted, permissions are reset to factory defaults, and no previous phone settings or installed applications will interfere with the CyanogenMod install.
2. Follow these instructions to reboot into safe mode and then follow these instructions to reset your phone to factory settings (note: if the phone goes into a bootloop, just hold down the power button and both volume buttons simultaneously until the screen turns black and then release the power button while still holding the volume buttons and then when the boot menu appears, use the Volume Down button to highlight "Factory" and press the Volume Up button to select it. Once the phone loads normally, turn it off and then back on again.)
3. Follow these instructions to reformat your SD card
4. Due to this bug and other various GPS and WiFi bugs with the KitKat bootloader, follow these instructions to downgrade your phone to Jelly Bean (4.1.2) ...P.S. its just the bootloader that will be running JellyBean, your actual phone OS will eventually be running KitKat (4.4.4) once you complete this guide
5. Re-do Section A above (gain root access)
6. Congratulations, youre ready for the next phase!
G. Install CyanogenMod
1. Connect your phone to your PC via the USB cable and browse to the SD card
2. On your PC, download the latest CyanogenMod snapshot with JellyBean bootloader
3. On your PC, download the desired Google Apps 4.4.4 image (I prefer the "Micro Modular" package)
4. On your PC, download the stock Motorola boot logo image: http://goo.gl/YYmG2f [mirror] {credit: aviwdoowks}
5. Copy the zip files from steps 2-4 to your phones SD card
6. Unplug the USB cable from your PC
7. Hold down power, volume up, and volume buttons down simultaneously. When the device powers off, let go of the power button but keep holding down the volume up and volume down buttons until the bootloader screen appears.
8. Quickly press the volume down button until Recovery is highlighted and then press the volume up key.
9. Once your phone boots into recovery mode, use your volume down button to highlight wipe data/factory reset then press your power button to select it
10. Use your volume down button to highlight Yes - Wipe all user data then press your power button to select it
11. Use your volume down button to highlight advanced then press your power button to select it
12. Use your volume down button to highlight wipe dalvik cache then press your power button to select it
13. Use your volume down button to highlight Yes - Wipe Dalvik Cache then press your power button to select it
14. Use your volume down button to highlight +++Go Back+++ then press your power button to select it
15. Use your volume down button to highlight install zip then press your power button to select it
16. Use your volume down button to highlight choose zip from /storage/sdcard1 then press your power button to select it
17. Use your volume down button to highlight stock.boot.logo.flashable.zip then press your power button to select it
18. Use your volume down button to highlight Yes - install ... then press your power button to select it
19. Use your volume down button to highlight choose zip from /storage/sdcard1 then press your power button to select it
20. Use your volume down button to highlight cm-11-2014... then press your power button to select it
21. Use your volume down button to highlight Yes - install ... then press your power button to select it
22. Use your volume down button to highlight choose zip from /storage/sdcard1 then press your power button to select it
23. Use your volume down button to highlight pa_gapps-modular... then press your power button to select it
24. Use your volume down button to highlight Yes - install ... then press your power button to select it
25. Use your volume down button to highlight +++Go Back+++ then press your power button to select it
26. Make sure reboot system now is highlighted, then press your power button to select it
27. Your phone will reboot, the Motorola logo will now display (instead of the annoying "Bootloader Unlocked" nag screen), and CyanogenMod will begin loading. Be patient -- may take up to 10 minutes to load for the first time.

Note: If CyanogenMod doesnt load after 10 minutes or you run into any other problems (e.g. bootloop, etc.), you can always start over by re-flashing your device back to factory settings.
In a follow-up post Ill describe some recommended settings and apps.
11. Click the Verify Root Access button and make sure a green checkmark appears
12. On your phone, go to Settings > Location and turn Location ON (say Yes to any prompts that appear)
13. Open a web browser and download GPS Test: https://tinyurl.com/puwhtue {credit: Chartcross Limited} and wait until "Accuracy (feet)" is greater than 0 (may take a few minutes; faster if youre outside with a clear view of the sky). Note: this is NOT an optional step. Activating GPS prior to flashing the ROM is required (see explanation here).
14. Congratulations, youre ready for the next phase!
B. Unlock the Bootloader
1. Open a web browser and download Moto-pocalypse: http://goo.gl/ioGJDo [mirror] {credit: djrbliss}
2. Click OK on the security warning to download.
3. Go to your phone apps and click on Downloads
4. Click on Motopocalypse.apk and click Install and then Open
8. Click on the Unlock Bootloader button.
4. Click on Motopocalypse.apk and click Install and then Open
8. Click on the Unlock Bootloader button.
9. Hold your power button and select Power off to turn off your phone.
10. Wait a few seconds for your phone to restart (if it doesnt, hold your power button down until it starts). Your phone should display this message:
11. Congratulations, youre ready for the next phase!
C. Install device drivers
1. On your PC, download the latest Motorola drivers:
- Windows / Mac
- Linux
2. Connect your phone using the manufacturer cable (see Commandment #8) and make sure the device is recognized and you can browse the phone contents.
3. Congratulations, youre ready for the next phase!
D. Install custom Recovery image
1. Hold down power, volume up, and volume down buttons simultaneously. When the device powers off, let go of the power button but keep holding down the volume up and volume down buttons until the bootloader screen appears.
2. Quickly press the volume down button until AP Fastboot is highlighted and then press the volume up key.
3. The screen should now be in fastboot mode and should say Device is UNLOCKED. Status Code:3. At the bottom of the screen it should say usb connected
4. On your PC, download the Motorola version of fastboot (see Commandment #9) {credit: mattlgroff}
5. Extract the fastboot file for your operating system to somewhere in your PATH. For example, on Linux:
- chmod +x fastboot
- sudo mv fastboot /usr/bin/
7. You should see something like
8. On your PC, download the Razr HD/M Recovery image: http://goo.gl/keFZNy [mirror] {credit: dhacker29} Update: some individuals have reported issues with installing the latest version of CM11 using the Clockworkmod (CWM) recovery mentioned in this step. If you have trouble, try using the Team Win (TWRP) recovery image (TWRP-2.7.0.0-moto_msm8960-hdpi.img) instead: http://d-h.st/nw4 {credit: dhacker29}
9. In a terminal command prompt, browse to where the image file is located and then type fastboot flash recovery CWM6049-RAZR-HD_M-KITKAT.img
10. Hold down power, volume up, and volume down buttons simultaneously. When the device powers off, let go of the power button but keep holding down the volume up and volume down buttons until the bootloader screen appears.
11. Quickly press the volume down button until Recovery is highlighted and then press the volume up key.
12. Your phone will boot into recovery mode:
13. Congratulations, youre ready for the next phase!
E. Create full device backup (a.k.a. "nandroid")
1. Use your volume down (or volume up) button to highlight backup and restore then press your power button to select it
2. Use your volume down button to highlight choose default backup format then press your power button to select it
3. Use your volume down button to highlight tar + gzip then press your power button to select it
4. Use your volume down button to highlight backup to /storage/sdcard1 then press your power button to select it
5. A full backup of your device will be created and stored on your SD card
6. Use your volume down button to highlight +++Go Back+++ then press your power button to select it
7. Use your volume down button to highlight mounts and storage then press your power button to select it
8. Use your volume down button to highlight mount USB storage then press your power button to select it
9. Your PC should now detect your phone. Open the clockworkmod/backup/ folder. Move the backup folder you just created (date timestamp may be off but thats okay) to your PC for safekeeping.
10. Use your volume down button to highlight +++Go Back+++ then press your power button to select it
11. Unplug the USB cable from your PC
12. Press the power button and let go. The phone will restart.
13. Congratulations, youre ready for the next phase!
F. Factory reset
1. Now that you have a full device backup, its time to perform a factory reset of your phone. This will ensure any previously encrypted partitions are deleted, permissions are reset to factory defaults, and no previous phone settings or installed applications will interfere with the CyanogenMod install.
2. Follow these instructions to reboot into safe mode and then follow these instructions to reset your phone to factory settings (note: if the phone goes into a bootloop, just hold down the power button and both volume buttons simultaneously until the screen turns black and then release the power button while still holding the volume buttons and then when the boot menu appears, use the Volume Down button to highlight "Factory" and press the Volume Up button to select it. Once the phone loads normally, turn it off and then back on again.)
3. Follow these instructions to reformat your SD card
4. Due to this bug and other various GPS and WiFi bugs with the KitKat bootloader, follow these instructions to downgrade your phone to Jelly Bean (4.1.2) ...P.S. its just the bootloader that will be running JellyBean, your actual phone OS will eventually be running KitKat (4.4.4) once you complete this guide
5. Re-do Section A above (gain root access)
6. Congratulations, youre ready for the next phase!
G. Install CyanogenMod
1. Connect your phone to your PC via the USB cable and browse to the SD card
2. On your PC, download the latest CyanogenMod snapshot with JellyBean bootloader
3. On your PC, download the desired Google Apps 4.4.4 image (I prefer the "Micro Modular" package)
4. On your PC, download the stock Motorola boot logo image: http://goo.gl/YYmG2f [mirror] {credit: aviwdoowks}
5. Copy the zip files from steps 2-4 to your phones SD card
6. Unplug the USB cable from your PC
7. Hold down power, volume up, and volume buttons down simultaneously. When the device powers off, let go of the power button but keep holding down the volume up and volume down buttons until the bootloader screen appears.
8. Quickly press the volume down button until Recovery is highlighted and then press the volume up key.
9. Once your phone boots into recovery mode, use your volume down button to highlight wipe data/factory reset then press your power button to select it
10. Use your volume down button to highlight Yes - Wipe all user data then press your power button to select it
11. Use your volume down button to highlight advanced then press your power button to select it
12. Use your volume down button to highlight wipe dalvik cache then press your power button to select it
13. Use your volume down button to highlight Yes - Wipe Dalvik Cache then press your power button to select it
14. Use your volume down button to highlight +++Go Back+++ then press your power button to select it
15. Use your volume down button to highlight install zip then press your power button to select it
16. Use your volume down button to highlight choose zip from /storage/sdcard1 then press your power button to select it
17. Use your volume down button to highlight stock.boot.logo.flashable.zip then press your power button to select it
18. Use your volume down button to highlight Yes - install ... then press your power button to select it
19. Use your volume down button to highlight choose zip from /storage/sdcard1 then press your power button to select it
20. Use your volume down button to highlight cm-11-2014... then press your power button to select it
21. Use your volume down button to highlight Yes - install ... then press your power button to select it
22. Use your volume down button to highlight choose zip from /storage/sdcard1 then press your power button to select it
23. Use your volume down button to highlight pa_gapps-modular... then press your power button to select it
24. Use your volume down button to highlight Yes - install ... then press your power button to select it
25. Use your volume down button to highlight +++Go Back+++ then press your power button to select it
26. Make sure reboot system now is highlighted, then press your power button to select it
27. Your phone will reboot, the Motorola logo will now display (instead of the annoying "Bootloader Unlocked" nag screen), and CyanogenMod will begin loading. Be patient -- may take up to 10 minutes to load for the first time.
Congratulations, youve installed CyanogenMod on your Razr M!
Note: If CyanogenMod doesnt load after 10 minutes or you run into any other problems (e.g. bootloop, etc.), you can always start over by re-flashing your device back to factory settings.
In a follow-up post Ill describe some recommended settings and apps.
Go to link download
Subscribe to:
Posts (Atom)