Showing posts with label claim. Show all posts
Showing posts with label claim. Show all posts
Saturday, September 24, 2016
How to Claim a Site in Facebook
How to Claim a Site in Facebook
Do you know, you can claim your domain/site in Facebook to get insights? If you register your site on Facebook, you can view analytics for referral traffic, stories, user engagement and other related information. And definitely this will help you to take better actions for your site.
I always say, if Facebook were a country, it could be the most populated state of the world. Its a site with the most registered active users. No other site, even Google and Twitter cant attract users as much as Facebook. Most of the users waste their valuable time on Facebook.
But as a blogger/ web developer/ app developer, you cant either waste your time or avoid Facebook. You can take advantage of the popularity of Facebook. You can promote your website/ blog/ app on Facebook. You can do this in your way. Im not gonna interfere there!
Today Im writing about - claiming/ registering a site on Facebook. You can do this easily. All you need is just adding a simple meta tag before your closing head (</head>) tag.
Never try this trick if you -
- Dont have a website/ blog
- Dont have a Facebook ID
Okay, Im talking too much for a little trick! Lets back to the track -
- Visit this page - Facebook Insignts
- Domain Insights > Add your Domain
- A new window will appear with your name and a meta property
- Type your sites URL there (ie. www.markspcsolution.com)
- Copy the meta property (ie. <meta property="fb:admins" content="100002117543096" />) and paste it in your sites HTML closing head tag.
- Now hit on the get insights button.
- If youre done properly, you will see your domain here.
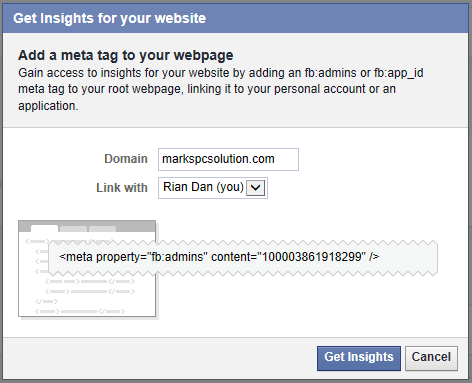
Hope youve completed the task easily. But I couldnt do this as easily. Dont know why the meta property didnt appear when I was trying to implement the code in my site. Maybe something was wrong in that time when I was trying.
If anybody face the same problem, I mean if the meta property with your numeric FB ID didnt appear as shown in the above image, follow the steps below -
- Go to Facebook Insights
- Hit on the Add a Domain button
- Enter your domain in the domain box
- Find your numeric Facebook ID
- Copy the following code and paste it in your sites HTML header section
<meta property="fb:admins" content="100002197543196" />
Replace the above numeric ID with yours. And the code should be placed before the closing head tag - </head>
You can also use several IDs here. Suppose you want multiple users to get your sites insights. Then you can use more than one ID as below -
<meta property="fb:admins" content="102117543096, 10034534562" />
Remember, this will just help you to get insights from facebook. If you wanna customize your sharing URL, Image or description you need to use Open Graph. I will discuss it later. Thanks.
Stay with Marks PC Solution to get more interesting IT topics!
Go to link download

Saturday, August 20, 2016
Claim your Business on Google Maps
Claim your Business on Google Maps

In my previous post I discussed about adding your business to Google Maps. And in this post I would like to talk about claiming a business on Maps. If your business is not already listed on Google then you can read my previous post. But if your organization is already listed then youre good to go . . .
Prerequisites for Claiming your Business
- Your business should be listed on Google Maps
Necessary Tools
- Android Phone with GPS & Data Connection
- Google Maps Application
- Browser (I prefer Google Chrome)
- My Business App (Optional)

Steps in Claiming the Business
- Open Google Maps on your Android Device.
- Search and locate your business on Maps.
- Tap on your business and it will prompt you to a new window.
- Choose the option - Claim this business.
- Now you will be redirected (maybe by your web browser) to this address - business.google.com.
- Here you need to confirm your business. Tick the option - Im authorized to manage this business . . . > Continue.
- Tap on the Mail button > Google will show you postcard sample > Type a contact name if necessary > Hit on the Send Postcard button.
- Within few weeks (less than 30 days) this postcard should reach the destination.
- After you get the postcard, get the PIN from there, and follow the steps again. Finally verify your business location by entering the PIN. Thats it!

Verifying your business address on Google will provide you several advantages. When people search for your organization using Google search, Google will show your business location on Google Map, including your phone number and web address.
And from that search result, your prospective clients can make direct phone call to you. It will also include photos and images you provided.
Hopefully this post will help you. Continue with Marks PC to get more useful contents in the future . . .
Stay with Marks PC Solution to get more interesting IT topics!
Go to link download
Subscribe to:
Posts (Atom)